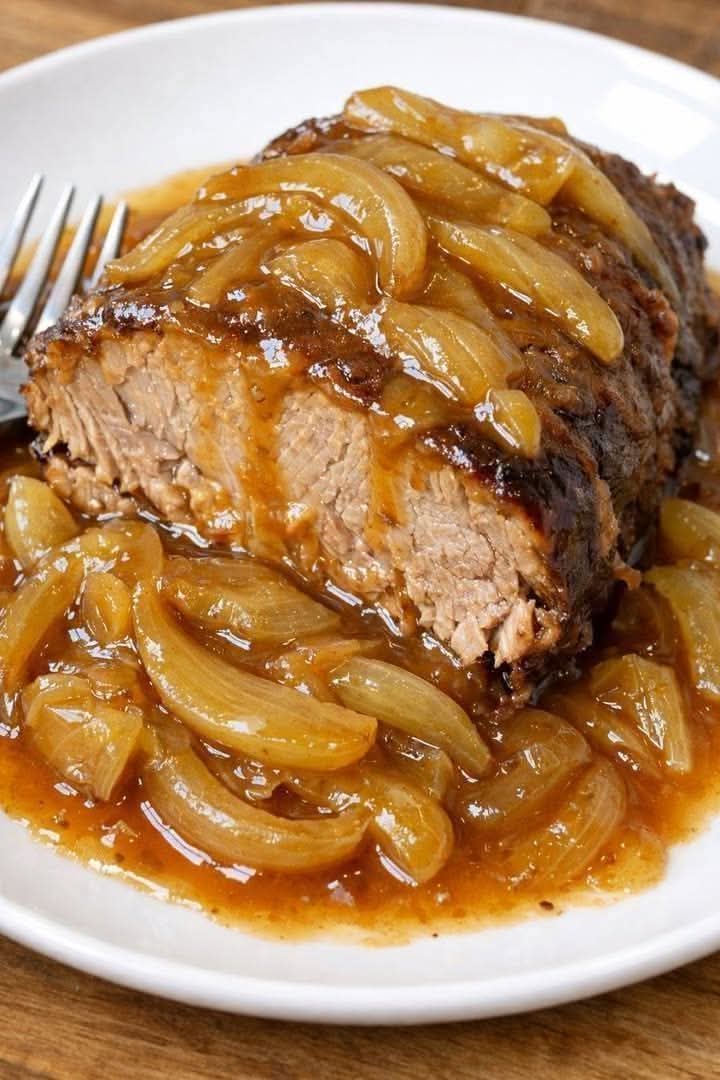
In the quiet rhythms of Amish country, where meals are built on simplicity, seasonality, and the deep satisfaction of food made from scratch, a perfectly cooked pork roast with onion gravy is the heart of the Sunday table. This Amish Onion Gravy Pork Roast is a masterclass in turning humble ingredients into something transcendent: a marbled pork shoulder, seared until deeply browned, then braised low and slow in a velvety onion gravy infused with butter, a touch of garlic, and a whisper of black pepper. The meat emerges fork-tender, collapsing into succulent shreds, while the gravy—rich, savory, and studded with sweet, caramelized onion strands—is the kind of sauce you’ll want to spoon over mashed potatoes, ladle onto crusty bread, or simply eat by the spoonful. It’s the meal that fills the house with an aroma so inviting that everyone drifts toward the kitchen, and it’s the recipe that embodies the very best of farmhouse cooking: uncomplicated, deeply flavorful, and made with love.
What makes Amish cooking so beloved is its reliance on real, whole ingredients and time-honored techniques. There are no shortcuts here, but there’s also nothing complicated. A well-marbled pork roast is seasoned simply with salt and pepper, then seared in butter until a deep, caramelized crust forms. That crust is the foundation of all the flavor to come. Then, in the same pot, sliced onions are cooked slowly until they turn golden and sweet, releasing their natural sugars and creating the base for an incredibly rich gravy. A bit of flour thickens the broth, and the pork is nestled back in, covered, and left to cook gently in the oven (or a slow cooker) until it surrenders to the touch of a fork. The result is a dish that tastes like it’s been simmering on a woodstove all day—deeply savory, with the pork melting into the gravy and the onions practically dissolved into the sauce. It’s the kind of meal that requires patience but rewards you with pure, nostalgic comfort.
In this comprehensive guide, we’ll walk through every step of creating this Amish-inspired classic: choosing the right cut of pork for maximum tenderness, the art of caramelizing onions deeply without burning, how to build a velvety, lump-free gravy, and the best cooking methods (oven, slow cooker, or Instant Pot). You’ll find tips for making it ahead, variations that incorporate root vegetables, and all the secrets to serving a dish that will have everyone asking for seconds—and the recipe. Let’s bring a taste of Amish country to your table.
Why You’ll Love This Amish Onion Gravy Pork Roast
Incredibly tender, melt-in-your-mouth pork. The low-and-slow cooking method breaks down the collagen in a pork shoulder (also known as a Boston butt), transforming an inexpensive, tough cut into the most succulent, shreddable meat. Every bite is juicy, tender, and infused with the savory onion gravy. You don’t need an expensive cut of meat to create a show-stopping dinner; this recipe proves that patience and a well-marbled roast are the real secrets to luxury.
A rich, deeply savory onion gravy made from scratch. This isn’t a gravy from a packet. It starts with real butter and thinly sliced onions, cooked slowly until they’re soft and caramelized, releasing their natural sweetness. A sprinkle of flour creates a roux, and then beef broth is whisked in to form a velvety sauce. As the pork roasts, its juices meld with the gravy, creating a depth of flavor that’s impossible to achieve with shortcuts. The onions practically melt into the sauce, leaving behind a luxurious, silky texture and a savory-sweetness that’s utterly addictive.
Simple, honest ingredients—the Amish way. There’s nothing in this recipe you can’t pronounce. Pork, butter, onions, garlic, broth, a little flour, and salt and pepper. That’s the heart of it. It’s the kind of cooking that’s been passed down through generations because it works, and it nourishes both body and soul. This meal is a reminder that you don’t need a long list of exotic items to create something deeply satisfying. It’s a celebration of the basics, executed well.
Versatile and perfect for any gathering. This pork roast is equally at home on a Sunday dinner table, at a holiday feast, or as a make-ahead meal for busy weeknights. It can be cooked in a Dutch oven in the oven, braised in a slow cooker while you’re at work, or even prepared in an Instant Pot for a faster version. The leftovers are a gift—the flavors deepen overnight, and the shredded pork and gravy can be served over biscuits, piled onto sandwiches, or tossed with egg noodles for a whole new meal. It’s a recipe that keeps on giving.
Ingredient Deep Dive: The Simple, Honest Cast
Each ingredient in this recipe is chosen to build layers of flavor. Here’s what you need and why.
Pork Shoulder (Boston Butt) – The Perfect Roast
You’ll need a 3 to 4-pound boneless pork shoulder roast, also known as a Boston butt. This cut comes from the upper part of the shoulder and is marbled with fat and connective tissue. When cooked low and slow, that collagen melts into gelatin, basting the meat from the inside and yielding incredibly tender, juicy results. You can also use a bone-in shoulder; it will add even more flavor. Ask your butcher to tie the roast if it’s uneven, so it cooks uniformly. Pork loin is a leaner option and can be used, but it’s much less forgiving—it can dry out if overcooked, so watch the internal temperature carefully (pull at 140–145°F). Shoulder is the traditional choice for this kind of braised dish, and it’s one of the most affordable cuts you can buy, making it a budget-friendly centerpiece.
Butter – The Golden Foundation
Four tablespoons (½ stick) of unsalted butter are used to sear the pork and then to cook the onions. Butter adds a rich, nutty flavor that oil alone can’t replicate. As it browns, it creates a beautiful fond on the bottom of the pot—the caramelized bits that dissolve into the gravy and add incredible depth. Use unsalted butter so you can control the salt level; the broth and any added seasoning will also contribute saltiness. For a dairy-free version, you can substitute with olive oil or lard, but the buttery flavor is part of the Amish farmhouse charm.
Onions – The Star of the Gravy
Three large yellow onions, thinly sliced, form the heart of the gravy. Yellow onions are ideal because they have a balanced flavor that becomes wonderfully sweet and mellow when cooked slowly. The slices will break down during the long braise, thickening the gravy and infusing it with a savory, slightly sweet onion flavor. The key is to slice them uniformly, about ¼-inch thick, so they cook at the same rate. Don’t rush the cooking of the onions—let them gently brown in the butter after searing the pork. This caramelization step concentrates their flavor and gives the gravy its rich, golden-brown color. If you have time, you can cook them for 20–30 minutes over low heat until they’re deeply golden, but even a 10–15 minute sauté before adding the flour will make a big difference.
Garlic – The Aromatic Accent
Two to three cloves of garlic, minced, are added to the onions just before the flour. Garlic provides a subtle, savory depth that supports the onion flavor without overpowering it. It’s a quiet note in the background, but you’d miss it if it weren’t there. Fresh garlic is best; minced from a jar can be used in a pinch but lacks the same pungency. If you’re a garlic lover, you can double the cloves—this is a flexible, rustic dish that welcomes personal touches.
All-Purpose Flour – The Thickener
Three tablespoons of all-purpose flour are sprinkled over the cooked onions and butter, creating a roux that will thicken the gravy. The flour should be cooked for a minute or two to eliminate any raw, pasty taste. This step ensures a smooth, velvety gravy with no lumps. If you need a gluten-free version, you can substitute an equal amount of a 1:1 gluten-free flour blend, or use 2 tablespoons of cornstarch mixed with 2 tablespoons of cold water (a slurry) stirred in at the end of cooking, though the traditional roux method gives the best flavor. The flour also helps bind the gravy as it cooks, giving it that luscious, spoon-coating consistency.
Beef Broth – The Liquid Gold
Two cups of beef broth (or stock) provide the liquid base for the gravy. Beef broth adds a hearty, savory richness that complements the pork beautifully. You can use homemade stock or a good-quality store-bought broth. Low-sodium is recommended so you can control the salt level. If you prefer a lighter flavor, chicken broth works too, but beef broth gives a deeper, more robust gravy. Some Amish recipes use water and a bouillon cube, which is also fine in a pinch. As the pork braises, it releases its own juices, further enriching the broth. The combination of broth, butter, flour, and onion creates a gravy that’s intensely flavorful—far more than the sum of its parts.
Salt, Black Pepper, and Optional Herbs
The roast is generously seasoned with salt and freshly ground black pepper before searing. These simple seasonings are all you need to bring out the natural flavor of the pork. You can also add a bay leaf or two to the braising liquid, which infuses the gravy with a subtle herbal note. A sprig of fresh thyme or rosemary can be added as well, though traditional Amish recipes often keep the seasoning minimal. A dash of Worcestershire sauce (about 1 teaspoon) stirred into the broth adds an extra layer of savory umami, though it’s not strictly traditional. The beauty of this recipe is its simplicity; you can dress it up or keep it pure.
Step-by-Step: Building Layers of Flavor
This dish is all about patience and building flavor at every stage. Follow these detailed steps for a perfect roast and gravy every time.
Step 1: Preheat and Season the Pork
Preheat your oven to 325°F (160°C). Pat the pork shoulder roast completely dry with paper towels. This is crucial for a good sear—moisture will cause the meat to steam rather than brown. Season the roast generously on all sides with salt and freshly ground black pepper, pressing the seasonings into the meat. Let the roast sit at room temperature for about 20–30 minutes while you prep the onions; this allows the seasoning to penetrate and the meat to cook more evenly.
Step 2: Sear the Pork Roast
Heat a large Dutch oven or heavy-bottomed oven-safe pot over medium-high heat. Add the butter and let it melt until it’s foamy and just starting to brown. Carefully place the pork roast in the hot pot. Sear it on all sides, about 3–4 minutes per side, until a deep, golden-brown crust forms. Do not rush this step—the browning creates the Maillard reaction, which is the foundation of the entire dish’s flavor. Use tongs to turn the roast, and don’t move it around until it releases easily from the pot. Once well-browned, transfer the pork to a plate and set aside.
Step 3: Cook the Onions and Garlic
Reduce the heat to medium. In the same pot (with all the browned bits and remaining butter), add the sliced onions. Stir them to coat in the fat, scraping up any browned bits from the bottom of the pot with a wooden spoon. Cook the onions, stirring occasionally, for 10–15 minutes until they are soft, translucent, and beginning to turn golden. Don’t let them burn; adjust the heat as needed. The onions will release moisture and deglaze the pan, picking up all that flavorful fond. Once the onions are golden, add the minced garlic and cook for an additional 1 minute, until fragrant. The combination of caramelized onions and garlic smells incredible.
Step 4: Create the Roux and Add the Broth
Sprinkle the flour evenly over the cooked onions and butter. Stir continuously with a wooden spoon or whisk, and cook the flour for 1–2 minutes. This step removes the raw flour taste and helps the gravy thicken later. The mixture will be thick and pasty. Gradually pour in the beef broth, whisking constantly to prevent lumps from forming. Bring the liquid to a gentle simmer, continuing to whisk, until the gravy has thickened slightly. It will still be somewhat thin at this stage; it will continue to thicken as it braises in the oven. Add the bay leaf and any optional herbs (like thyme or rosemary). Taste the gravy and adjust the seasoning—it should be well-seasoned but not overly salty, as it will concentrate as it cooks. Return the seared pork roast to the pot, nestling it into the onion gravy. Spoon some of the onions and gravy over the top of the roast.
Step 5: Braise Low and Slow in the Oven
Cover the Dutch oven with its lid and place it in the preheated oven. Braise for 3 to 4 hours, until the pork is fork-tender and shreds easily. Check the roast after about 2½ hours; the internal temperature should be around 200°F (93°C) for optimal tenderness—that’s the point where the collagen has fully broken down. If the liquid seems low, you can add a splash more broth or water, but the covered pot should retain enough moisture. The pork should be fall-apart tender when done. You can also cook it at a lower temperature (300°F) for a longer time (4–5 hours) for even more tender results. The low oven heat gently cooks the meat and allows the gravy to develop a deep, rich flavor. Once done, carefully remove the pot from the oven and transfer the roast to a cutting board. Let it rest for a few minutes while you finish the gravy.
Step 6: Finish the Gravy and Serve
Place the Dutch oven on the stovetop over medium heat. Remove the bay leaf and any herb sprigs. If the gravy seems too thin, bring it to a simmer and let it reduce for a few minutes until it reaches your desired consistency. If it’s too thick, whisk in a little more broth or water. Taste and adjust salt and pepper. You can also add a teaspoon of Worcestershire sauce or a splash of apple cider vinegar for a little extra tang. The onions will have mostly broken down into the gravy, creating a thick, luscious texture. Shred the pork or slice it—it will likely fall apart when you touch it. Return the pork to the gravy or arrange it on a platter and spoon the onion gravy generously over the top. Serve hot, with plenty of extra gravy on the side.
Pro Tips for the Most Tender Roast and Richest Gravy
- Choose the right cut of pork. Pork shoulder (Boston butt) is the gold standard for braising. It’s marbled with fat that renders during the long, slow cook, keeping the meat moist and adding richness to the gravy. Pork loin is leaner and more prone to drying out; if you use it, cook to an internal temperature of 140–145°F and slice rather than shred. Do not use pork tenderloin, which is too lean and small for this method.
- Don’t skip the sear. The deep browning on the outside of the pork is what gives the entire dish its savory, complex flavor. Take the time to sear all sides until a rich, dark-golden crust forms. This step also renders some of the fat, which you’ll use to cook the onions. A good sear is the difference between a good roast and a great one.
- Caramelize the onions patiently. The longer you cook the onions before adding the flour, the sweeter and more flavorful they become. Don’t just soften them—let them turn a deep golden color. This natural sweetness balances the savory broth and creates a more complex gravy. If you’re short on time, even 10 minutes makes a difference, but 20–30 minutes of gentle cooking over low heat transforms them into onion gold.
- Cook to temperature, not time. The roast is done when it’s fork-tender, usually around an internal temperature of 195–205°F. This is higher than the standard “safe” temperature for pork; it’s necessary to melt the collagen and achieve that shreddable texture. Use an instant-read thermometer to check. If the pork still feels firm, give it more time. It’s almost impossible to overcook a pork shoulder in a moist environment—it just gets more tender.
- Skim excess fat if necessary. Pork shoulder renders a fair amount of fat during cooking. Before serving, you can tilt the pot and skim off some of the clear fat from the surface of the gravy with a spoon. This is optional but can make the gravy a bit less greasy. Leave some of the fat, though—it carries a ton of flavor and gives the gravy its silky richness.
Variations, Cooking Methods & Add-Ins
This classic recipe is a wonderful foundation for making it your own. Here are some variations and different ways to cook it.
- Slow Cooker Method: Sear the pork and cook the onions and gravy on the stovetop as directed. Transfer everything to a 6-quart slow cooker. Cook on LOW for 8–10 hours or on HIGH for 5–6 hours, until the pork is fork-tender. The slow cooker makes this an effortless dump-and-go meal, perfect for busy days. The gravy may be thinner; you can thicken it at the end by transferring the liquid to a saucepan, bringing it to a simmer, and whisking in a cornstarch slurry (2 tablespoons cornstarch mixed with 2 tablespoons cold water). Then stir it back into the pork.
- Instant Pot (Pressure Cooker) Method: Use the Sauté function to sear the pork and cook the onions. Add the flour, broth, and seasonings. Seal the lid and pressure cook on HIGH for 60–70 minutes (for a 3–4 lb roast). Allow a natural release for 15 minutes, then quick release any remaining pressure. The pork will be tender in a fraction of the time. The gravy may need to be reduced using the Sauté function after the pork is removed, if it’s too thin.
- Add Root Vegetables for a One-Pot Meal: After the first hour of braising, add chunks of carrots, potatoes, and celery to the pot around the roast. They’ll cook in the onion gravy and become tender and flavorful, turning this into a complete Sunday dinner with built-in sides. Use waxy potatoes like Yukon Golds or red potatoes, which hold their shape. You can also add parsnips or turnips for an authentic Amish touch.
- Apple Cider Onion Gravy: Replace ½ cup of the beef broth with apple cider. The natural sweetness of the cider pairs beautifully with pork and adds a subtle fruity note. This variation is especially lovely in the fall. You can also add a thinly sliced apple to the onions while they cook, letting it soften and melt into the gravy.
- Creamy Onion Gravy: For an even richer, more decadent gravy, stir in ½ cup of heavy cream or sour cream at the end, after removing the roast. Heat gently without boiling to prevent curdling. The cream adds a luxurious, velvety texture that makes the gravy taste almost like a stroganoff. This variation is a bit more modern but incredibly comforting.
What to Serve with Onion Gravy Pork Roast
This rich, savory dish pairs beautifully with simple sides that can soak up the incredible gravy. Creamy mashed potatoes are the classic choice—a bed of buttery, whipped potatoes is the perfect canvas for the tender pork and onion gravy. Wide egg noodles or homemade spaetzle are also wonderful, catching the gravy in their curves. For an authentic Amish meal, serve it with buttered corn, green beans, or a simple side of pickled beets. Fresh crusty bread or soft dinner rolls are essential for mopping up every last drop of gravy. A side of braised red cabbage or sauerkraut adds a tangy, bright contrast that cuts through the richness. Roasted root vegetables—carrots, parsnips, rutabaga—are a natural fit, especially if you’ve cooked them alongside the roast. For a lighter option, a simple green salad with a sharp vinaigrette balances the hearty main course. And don’t forget a generous ladle of extra gravy over everything on the plate.
Storage, Make-Ahead & Reheating
Make-Ahead: This dish is a perfect candidate for making ahead. You can braise the pork a day or two in advance. After cooking, let the roast cool in the gravy, then refrigerate the entire pot. The fat will solidify on top, which you can easily lift off and discard before reheating. The flavors meld and deepen overnight, making it even more delicious the next day. Reheat gently on the stovetop or in a 325°F oven until warmed through.
Storing Leftovers: Transfer shredded or sliced pork and gravy to an airtight container. Refrigerate for up to 4 days. The pork remains moist, and the gravy thickens as it chills. This is one of those meals where leftovers are genuinely something to look forward to—pile the pork onto toasted bread for an incredible hot sandwich, or toss it with pasta for a quick dinner.
Reheating: Warm the pork and gravy gently on the stovetop over medium-low heat, stirring occasionally, until heated through. A splash of broth or water can be added if the gravy has become too thick. The microwave works for individual portions but may not heat the gravy as evenly. For larger amounts, cover with foil and reheat in a 325°F oven until hot. Avoid boiling, which can toughen the meat.
Freezing: This dish freezes beautifully. Portion the cooled pork and gravy into freezer-safe containers. Freeze for up to 3 months. Thaw overnight in the refrigerator, then reheat gently on the stovetop. The texture of the pork remains remarkably tender, and the gravy may need a little whisk to re-emulsify after thawing. A splash of broth can help restore its smooth consistency. It’s a wonderful freezer meal to have on hand for busy nights.
Want the full recipe and simple step-by-step instructions?
Page 2 continues with the full ingredients, cooking tips, and easy directions so you can make this recipe perfectly at home.