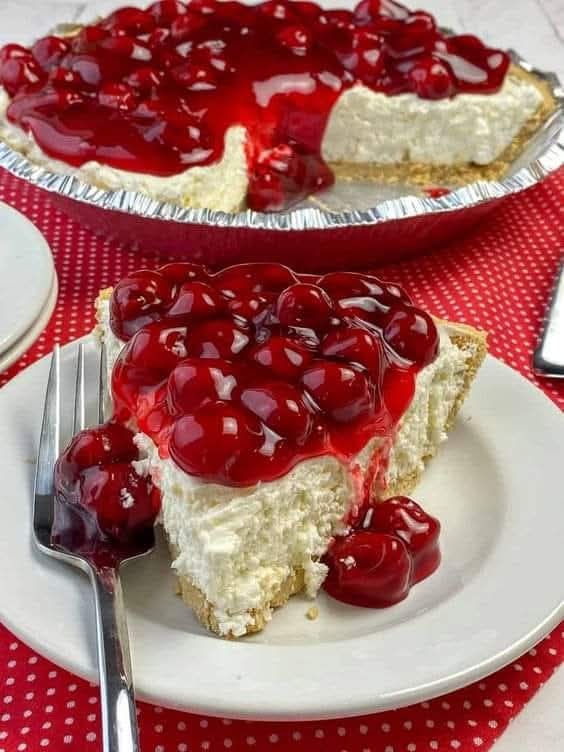
There are desserts that are merely sweet, and then there are desserts that are a symphony of flavors and textures – the kind that make you close your eyes, savor every creamy, tangy, fruity bite, and reach for seconds before you’ve even finished the first. No‑Bake Cherry Cheesecake is emphatically the latter. Imagine a silky, velvety cream cheese filling, perfectly sweet and tangy, nestled on a buttery graham cracker crust, and crowned with a generous layer of glossy, ruby‑red cherry topping. It’s the kind of dessert that looks like it came from a fancy bakery, yet it comes together in minutes with no oven required.
If you’ve ever been intimidated by traditional baked cheesecakes – with their water baths, cracking concerns, and precise oven temperatures – this recipe is your liberation. No‑bake cheesecake is forgiving, foolproof, and just as delicious as its baked counterpart. The filling sets up perfectly in the refrigerator, thanks to the magic of whipped cream and cream cheese. It’s the ultimate make‑ahead dessert for summer gatherings, holiday tables, or any time you want something special without the stress.
What Is No‑Bake Cherry Cheesecake?
At its heart, this dessert is a chilled, creamy cheesecake that relies on the fridge rather than the oven to set. The filling is a luxurious blend of cream cheese, powdered sugar, vanilla, and heavy cream that’s been whipped to stiff peaks. The whipped cream aerates the filling, giving it a light, mousse‑like texture that’s incredibly smooth and decadent. The whole thing is poured over a classic graham cracker crust and topped with a sweet, tangy cherry topping – either homemade or store‑bought.
This recipe falls into the category of “no‑fuss entertaining desserts” – dishes that look impressive, taste incredible, and require minimal active time. Unlike baked cheesecakes, which can crack or overbake, this version is remarkably forgiving. The texture is lighter and creamier than a traditional New York‑style cheesecake, making it a refreshing finish to any meal, especially in warmer months.
What makes this version especially brilliant is the cherry topping. The sweet‑tart cherries provide the perfect contrast to the rich, creamy filling. You can use canned cherry pie filling for a shortcut, or make a quick homemade cherry compote with fresh or frozen cherries. Either way, the cherry topping takes this cheesecake to the next level.
Why You’ll Love This Recipe
There are countless reasons to fall in love with this No‑Bake Cherry Cheesecake. Here are just a few that will have you making it on repeat:
No oven required – perfect for hot days or when your oven is otherwise occupied.
Incredibly creamy and smooth – the whipped cream creates a light, mousse‑like texture.
Foolproof and forgiving – no cracking, no water baths, no overbaking worries.
Quick to assemble – active prep time is just 15–20 minutes.
Make‑ahead friendly – needs to chill for several hours, making it perfect for party planning.
Naturally gluten‑free option – use gluten‑free graham crackers or a nut crust.
Endlessly customizable – use any fruit topping, chocolate, or different crust.
Kid‑friendly – a great recipe for little helpers to mix and pour.
Beautiful presentation – the glossy cherry topping makes it a showstopper.
Always a crowd‑pleaser – everyone loves a good cheesecake.
This is the dessert that will make you feel like a pastry chef without any of the stress. It’s proof that simple ingredients and a little patience can create something truly spectacular.
Ingredients for No‑Bake Cherry Cheesecake
This recipe uses simple, wholesome ingredients that come together beautifully. Here’s what you’ll need:
For the Graham Cracker Crust
- 1½ cups graham cracker crumbs (about 12 full crackers)
- ¼ cup granulated sugar
- 6 tablespoons unsalted butter, melted
- Pinch of salt
For the Cheesecake Filling
- 16 oz cream cheese, softened to room temperature (two 8‑oz blocks)
- ¾ cup powdered sugar (confectioners’ sugar)
- 2 teaspoons pure vanilla extract
- 1½ cups heavy whipping cream (cold)
- 1 tablespoon fresh lemon juice (optional, adds a bright tang)
For the Cherry Topping
- 1 can (21 oz) cherry pie filling – OR –
- Homemade Cherry Topping:
- 4 cups pitted fresh or frozen cherries
- ½ cup granulated sugar (or to taste)
- 2 tablespoons cornstarch
- 1 tablespoon lemon juice
- ½ teaspoon almond extract (optional)
Ingredient Notes and Substitutions
Cream Cheese: Full‑fat cream cheese is essential for the richest, creamiest texture. Low‑fat or Neufchâtel cheese will result in a softer set and a less indulgent flavor. Make sure your cream cheese is properly softened – cold cream cheese will leave lumps in your filling. Leave it on the counter for at least an hour before you start.
Heavy Whipping Cream: Cold heavy cream is crucial for whipping to stiff peaks. Don’t substitute with half‑and‑half or milk – they don’t have enough fat to hold the structure. For a dairy‑free version, you can use coconut cream (the solid part from a can of full‑fat coconut milk), though the flavor will shift.
Powdered Sugar: Confectioners’ sugar dissolves instantly and creates a smooth texture. Granulated sugar won’t dissolve properly in a no‑bake filling and can leave a gritty texture. If you’re out of powdered sugar, you can make your own by grinding granulated sugar in a blender until powdery.
Cherry Topping: Canned cherry pie filling is the ultimate shortcut – it’s thick, glossy, and already sweetened. For a homemade version, cook fresh or frozen cherries with sugar and cornstarch until thickened. Either way, the cherry topping is what makes this cheesecake so special.
Step‑by‑Step Instructions
Follow these detailed steps to create a flawless No‑Bake Cherry Cheesecake every single time. The process is straightforward, and the results are spectacular.
1. Prepare the Crust
In a medium bowl, combine the graham cracker crumbs, sugar, and salt. Pour in the melted butter and stir until the mixture resembles wet sand. Press the crumbs firmly into the bottom and about 1 inch up the sides of a 9‑inch springform pan. Use the flat bottom of a measuring cup to compress it tightly. Place the pan in the refrigerator to chill while you prepare the filling.
2. Beat the Cream Cheese
In a large mixing bowl or the bowl of a stand mixer fitted with the paddle attachment, beat the softened cream cheese on medium speed until completely smooth and free of lumps – about 2 minutes. Scrape down the sides of the bowl. Add the powdered sugar, vanilla extract, and lemon juice (if using). Beat until smooth and well combined, about 1 minute more. Scrape down the bowl again.
3. Whip the Heavy Cream
In a separate chilled bowl, using a hand mixer or a stand mixer with the whisk attachment, whip the cold heavy cream on medium‑high speed until stiff peaks form. This should take about 3–4 minutes. The cream should hold its shape when the whisk is lifted – don’t overbeat, or it will turn into butter.
4. Fold the Cream Into the Cream Cheese
Gently fold the whipped cream into the cream cheese mixture in three additions. Use a large spatula and fold with a gentle, sweeping motion – don’t stir vigorously, or you’ll deflate the air. The goal is to maintain as much volume as possible. The mixture should be light, fluffy, and uniformly colored.
5. Assemble the Cheesecake
Remove the springform pan from the refrigerator. Spoon the cheesecake filling over the chilled crust, smoothing the top with a spatula. Tap the pan gently on the counter a few times to release any air bubbles.
6. Chill Until Set
Cover the pan loosely with plastic wrap and refrigerate for at least 4 hours, preferably overnight. The cheesecake needs time to set fully – it should be firm to the touch and hold its shape when sliced.
7. Add the Cherry Topping
When the cheesecake is set, spread the cherry pie filling (or homemade cherry topping) evenly over the top of the cheesecake. Return to the refrigerator for at least 30 minutes to allow the topping to set.
8. Garnish and Serve
When ready to serve, carefully remove the sides of the springform pan. Use a sharp knife dipped in hot water and wiped dry to cut clean slices. Serve chilled.
Expert Tips for the Perfect No‑Bake Cheesecake
This recipe is simple, but a few expert tricks will elevate it to perfection. Here’s what I’ve learned from making this dessert countless times:
Use room‑temperature cream cheese – this is non‑negotiable. Cold cream cheese will leave lumps and won’t incorporate smoothly.
Chill your bowl and beaters – for the whipped cream, a cold bowl and cold beaters help the cream whip faster and hold more volume.
Don’t over‑whip the cream – stop as soon as stiff peaks form. Overwhipped cream will separate and turn grainy.
Fold gently – the key to a light, fluffy cheesecake is preserving the air in the whipped cream. Fold with care, and don’t rush.
Chill for at least 4 hours – overnight is even better. The cheesecake needs time to set properly.
Press the crust firmly – a compacted crust prevents crumbling when you slice. Use a measuring cup or flat glass to press it down.
Use a springform pan – it makes removal effortless and ensures beautiful, intact slices.
Add the cherry topping after chilling – adding the topping too early can make it sink into the filling.
Delicious Variations
One of the best things about this recipe is how easily it adapts to different tastes and occasions. Here are some of my favorite ways to switch it up:
Strawberry No‑Bake Cheesecake
Replace the cherry topping with strawberry pie filling or a homemade strawberry compote. The sweet, tart strawberries pair beautifully with the creamy filling.
Blueberry No‑Bake Cheesecake
Top the cheesecake with blueberry pie filling or a homemade blueberry sauce. The blueberries add a beautiful color and a sweet, slightly tangy flavor.
Lemon No‑Bake Cheesecake
Add 2 tablespoons of lemon zest and 2 tablespoons of fresh lemon juice to the filling. Top with a lemon glaze (powdered sugar + lemon juice) for a bright, citrusy version that’s perfect for spring.
Chocolate No‑Bake Cheesecake
Add 2 tablespoons of unsweetened cocoa powder to the filling. Top with chocolate ganache and fresh berries for a decadent, chocolate lover’s version.
No‑Bake Cheesecake Cups
Press the crust into the bottoms of 12‑ounce mason jars or small glasses, fill with the cheesecake mixture, and top with cherry filling. These individual servings are perfect for parties and require no slicing.
Vegan No‑Bake Cheesecake
Use vegan cream cheese, coconut cream (chilled and whipped), and a vegan butter substitute for the crust. The texture will be slightly different, but many plant‑based versions work beautifully.
Serving Suggestions
This versatile cheesecake can be served in a variety of ways, making it perfect for any occasion:
With fresh cherries – garnish with fresh cherries for a beautiful, elegant finish.
With whipped cream – an extra dollop of whipped cream makes it feel extra special.
With a drizzle of chocolate sauce – for a decadent, gourmet twist.
With a sprinkle of cinnamon – a warm, subtle spice that enhances the cherry flavor.
With a cup of coffee or tea – the perfect pairing for an afternoon treat.
For birthdays or holidays – this cheesecake is always a celebration centerpiece.
Storage and Reheating Guidelines
This cheesecake stores beautifully, making it a fantastic make‑ahead dessert.
Refrigeration: Store the cheesecake covered in the refrigerator for up to 5 days. Cover it with plastic wrap or place it in an airtight container to prevent it from absorbing fridge odors.
Freezing: This cheesecake freezes exceptionally well. Wrap the whole cheesecake (or individual slices) tightly in plastic wrap, then in aluminum foil. Freeze for up to 2 months. Thaw overnight in the refrigerator before serving.
Pro tip: If you’re freezing individual slices, place them on a baking sheet to freeze solid, then wrap them individually. This way, you can defrost just one or two slices at a time.
No reheating needed – this cheesecake is served cold. Simply remove it from the fridge, garnish, and serve.
Want the full recipe and simple step-by-step instructions?
Page 2 continues with the full ingredients, cooking tips, and easy directions so you can make this recipe perfectly at home.