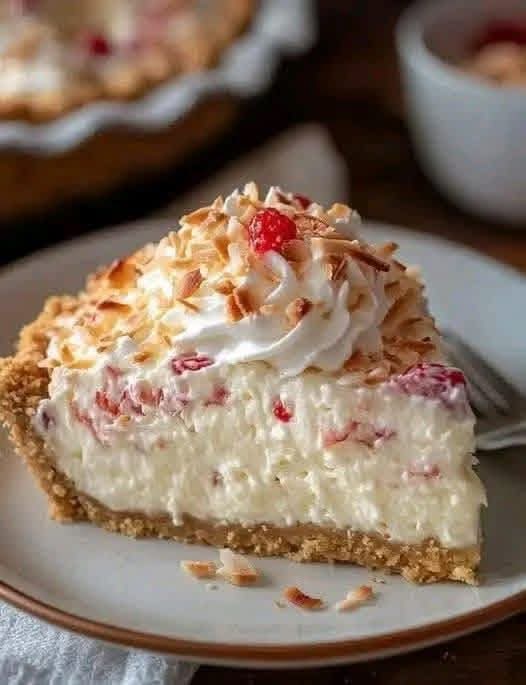
There are desserts that feel like a guilty pleasure, and then there are desserts that prove you can have your cheesecake and eat it too – without the sugar spike. Diabetic‑Friendly No‑Bake Creamy Cheesecake is emphatically the latter. Imagine a silky, velvety, cloud‑like cheesecake that’s rich, tangy, and utterly indulgent – yet it’s made with zero refined sugar, low carbs, and wholesome ingredients that won’t send your blood sugar soaring. It’s the kind of dessert that makes you feel like you’re treating yourself, even as you’re taking care of your health.
If you or a loved one are managing diabetes, prediabetes, or simply looking to reduce sugar without sacrificing flavor, this cheesecake is about to become your new favorite dessert. It’s incredibly creamy, naturally sweetened with a sugar‑free sweetener, and comes together in minutes with no baking required. Perfect for holidays, birthdays, summer gatherings, or any time you need a little sweetness in your life – without the guilt.
What Is Diabetic‑Friendly No‑Bake Creamy Cheesecake?
At its heart, this dessert is a classic no‑bake cheesecake that’s been thoughtfully reimagined for a low‑sugar, diabetic‑friendly lifestyle. The filling is a luscious blend of cream cheese, heavy cream, and a sugar‑free sweetener, whipped to airy perfection and set in the refrigerator. The crust is made from nuts or low‑carb cookies, adding a satisfying crunch without the carbs of traditional graham crackers.
This recipe falls into the category of “healthier desserts” – treats that are lower in sugar and carbohydrates than traditional versions, making them suitable for people with diabetes, prediabetes, or anyone following a low‑carb or keto lifestyle. The high fat content from the cream cheese and heavy cream provides satiety, while the sugar‑free sweetener delivers sweetness without the glycemic impact.
What makes this version especially brilliant is its simplicity and versatility. There’s no baking required, no water baths, no cracking concerns – just mix, pour, chill, and enjoy. It’s the ultimate make‑ahead dessert that’s guaranteed to impress.
Why You’ll Love This Recipe
There are countless reasons to fall in love with this Diabetic‑Friendly No‑Bake Creamy Cheesecake. Here are just a few that will have you making it on repeat:
Diabetic‑friendly – low in sugar and carbohydrates, with a balanced glycemic impact.
No baking required – perfect for hot days or when you don’t want to turn on the oven.
Incredibly creamy and smooth – the texture is light, airy, and utterly indulgent.
Quick and easy – active prep time is just 15–20 minutes.
Make‑ahead friendly – needs to chill for several hours, making it perfect for party planning.
Naturally gluten‑free option – use a nut‑based crust or skip the crust entirely.
Endlessly customizable – add fruit swirls, chocolate, or different toppings.
Kid‑friendly – even picky eaters love this creamy, dreamy dessert.
Budget‑friendly – simple ingredients that go a long way.
Always a crowd‑pleaser – everyone loves a good cheesecake, and this one is no exception.
This is the dessert that will make you feel like you’re cheating on your healthy eating plan – when in reality, you’re making a smart, nourishing choice. It’s proof that diabetic‑friendly desserts can be every bit as delicious as their sugar‑laden counterparts.
Ingredients for Diabetic‑Friendly No‑Bake Creamy Cheesecake
This recipe uses simple, wholesome ingredients that come together beautifully. Here’s what you’ll need:
For the Crust (Optional – Omit for Crustless)
- 1½ cups almond flour or finely ground pecans/walnuts
- ¼ cup melted butter or coconut oil
- 2 tablespoons powdered erythritol or monk fruit sweetener
- ½ teaspoon cinnamon (optional)
For the Creamy Cheesecake Filling
16 oz cream cheese, softened to room temperature (two 8‑oz blocks)
1½ cups heavy whipping cream (cold)
¾ cup powdered erythritol or monk fruit sweetener (adjust to taste)
2 teaspoons pure vanilla extract
1 tablespoon fresh lemon juice (optional, for brightness)
Pinch of salt
For the Topping (Optional)
- Sugar‑free berry compote – strawberries, blueberries, or raspberries
- Sugar‑free whipped cream
- Fresh berries – for garnish
- Lemon zest or mint leaves
Ingredient Notes and Substitutions
Cream Cheese: Full‑fat cream cheese is essential for the richest, creamiest texture. Low‑fat or Neufchâtel cheese will result in a softer set and less indulgent flavor. Make sure it’s properly softened – cold cream cheese will leave lumps in your filling. Leave it on the counter for at least an hour before you start.
Heavy Whipping Cream: Cold heavy cream is crucial for whipping to stiff peaks. Don’t substitute with half‑and‑half or milk – they don’t have enough fat to hold the structure. For a dairy‑free version, use coconut cream (the solid part from a can of full‑fat coconut milk).
Sweetener: Powdered erythritol or monk fruit sweetener works best because it dissolves easily and doesn’t leave a gritty texture. Adjust the amount to your taste – start with ¾ cup and add more if needed. Stevia can also be used, but it’s much sweeter, so use it sparingly.
Lemon Juice: A small amount of lemon juice brightens the flavor and adds a subtle tang that balances the richness. It’s optional but highly recommended.
Step‑by‑Step Instructions
Follow these detailed steps to create a flawless Diabetic‑Friendly No‑Bake Creamy Cheesecake every single time. The process is straightforward, and the results are spectacular.
1. Prepare the Crust (Optional)
In a medium bowl, combine the almond flour, melted butter, sweetener, and cinnamon (if using). Stir until the mixture resembles wet sand. Press the crumbs firmly into the bottom and about 1 inch up the sides of a 9‑inch springform pan. Use the flat bottom of a measuring cup to compress it tightly. Place the pan in the refrigerator to chill while you prepare the filling.
2. Beat the Cream Cheese
In a large mixing bowl or the bowl of a stand mixer fitted with the paddle attachment, beat the softened cream cheese on medium speed until completely smooth and free of lumps – about 2 minutes. Scrape down the sides of the bowl. Add the sweetener, vanilla extract, lemon juice (if using), and salt. Beat until smooth and well combined, about 1 minute more. Scrape down the bowl again.
3. Whip the Heavy Cream
In a separate chilled bowl, using a hand mixer or a stand mixer with the whisk attachment, whip the cold heavy cream on medium‑high speed until stiff peaks form. This should take about 3–4 minutes. The cream should hold its shape when the whisk is lifted – don’t overbeat, or it will turn into butter.
4. Fold the Cream Into the Cream Cheese
Gently fold the whipped cream into the cream cheese mixture in three additions. Use a large spatula and fold with a gentle, sweeping motion – don’t stir vigorously, or you’ll deflate the air. The goal is to maintain as much volume as possible. The mixture should be light, fluffy, and uniformly colored.
5. Assemble the Cheesecake
Remove the springform pan from the refrigerator. Spoon the cheesecake filling over the chilled crust, smoothing the top with a spatula. Tap the pan gently on the counter a few times to release any air bubbles.
6. Chill Until Set
Cover the pan loosely with plastic wrap and refrigerate for at least 4 hours, preferably overnight. The cheesecake needs time to set fully – it should be firm to the touch and hold its shape when sliced.
7. Garnish and Serve
When ready to serve, carefully remove the sides of the springform pan. Top with sugar‑free berry compote, fresh berries, or a dollop of sugar‑free whipped cream. Use a sharp knife dipped in hot water and wiped dry to cut clean slices. Serve chilled.
Expert Tips for the Perfect No‑Bake Cheesecake
This recipe is simple, but a few expert tricks will elevate it to perfection. Here’s what I’ve learned from making this dessert countless times:
Use room‑temperature cream cheese – this is non‑negotiable. Cold cream cheese will leave lumps and won’t incorporate smoothly.
Chill your bowl and beaters – for the whipped cream, a cold bowl and cold beaters help the cream whip faster and hold more volume.
Don’t over‑whip the cream – stop as soon as stiff peaks form. Overwhipped cream will separate and turn grainy.
Fold gently – the key to a light, fluffy cheesecake is preserving the air in the whipped cream. Fold with care, and don’t rush.
Chill for at least 4 hours – overnight is even better. The cheesecake needs time to set properly.
Press the crust firmly – a compacted crust prevents crumbling when you slice. Use a measuring cup or flat glass to press it down.
Use a springform pan – it makes removal effortless and ensures beautiful, intact slices.
Add a parchment paper sling – for extra insurance, cut a strip of parchment paper to line the bottom of the pan, leaving overhang on two sides. This makes removal even easier.
Delicious Variations
One of the best things about this recipe is how easily it adapts to different tastes and occasions. Here are some of my favorite ways to switch it up:
Berry Swirl No‑Bake Cheesecake
After spreading the filling into the crust, dollop ½ cup of sugar‑free strawberry or raspberry compote on top and swirl it with a knife. The swirl creates a beautiful marbled pattern and adds a fruity burst of flavor.
Lemon No‑Bake Cheesecake
Add 2 tablespoons of lemon zest and 2 tablespoons of fresh lemon juice to the filling. Top with a lemon glaze (powdered sweetener + lemon juice) for a bright, citrusy version.
Chocolate Chip No‑Bake Cheesecake
Fold in ½ cup of sugar‑free mini chocolate chips after combining the cream cheese and whipped cream. The chocolate adds a delightful crunch and extra indulgence.
Pumpkin Spice No‑Bake Cheesecake
Add ½ cup of pumpkin puree and 1 teaspoon of pumpkin pie spice to the filling. This fall‑inspired version is perfect for Thanksgiving.
No‑Bake Cheesecake Cups
Press the crust into the bottoms of 12‑ounce mason jars or small glasses, fill with the cheesecake mixture, and chill. These individual servings are perfect for parties and require no slicing.
Vegan No‑Bake Cheesecake
Use vegan cream cheese, coconut cream (chilled and whipped), and a vegan butter substitute for the crust. The texture will be slightly different, but many plant‑based versions work beautifully.
Chocolate No‑Bake Cheesecake
Add 2 tablespoons of unsweetened cocoa powder to the filling. Top with a sugar‑free chocolate ganache for a rich, decadent treat.
Serving Suggestions
This versatile cheesecake can be served in a variety of ways, making it perfect for any occasion:
With fresh berries – a classic pairing that adds color and brightness.
With sugar‑free fruit compote – warm or cold, a berry compote adds a beautiful contrast.
With sugar‑free whipped cream – a dollop makes it feel extra special.
With a sprinkle of cinnamon – a warm, subtle spice that enhances the vanilla.
With a cup of coffee or tea – the perfect pairing for an afternoon treat.
With a drizzle of sugar‑free caramel – for a decadent finish.
Storage and Reheating Guidelines
This cheesecake stores beautifully, making it a fantastic make‑ahead dessert.
Refrigeration: Store the cheesecake covered in the refrigerator for up to 5 days. Cover it with plastic wrap or place it in an airtight container to prevent it from absorbing fridge odors.
Freezing: This cheesecake freezes exceptionally well. Wrap the whole cheesecake (or individual slices) tightly in plastic wrap, then in aluminum foil. Freeze for up to 2 months. Thaw overnight in the refrigerator before serving.
Pro tip: If you’re freezing individual slices, place them on a baking sheet to freeze solid, then wrap them individually. This way, you can defrost just one or two slices at a time.
No reheating needed – this cheesecake is served cold. Simply remove it from the fridge, garnish, and serve.
Nutritional Information
Approximate values per slice (based on 12 servings, with nut crust):
- Calories: 320–350
- Carbohydrates: 8–10g
- Net Carbs: 5–7g
- Protein: 8–10g
- Fat: 30–32g
- Fiber: 3–4g
- Sugar: 2–3g (from natural sources)
- Sodium: 200–230mg
For a crustless version, calories drop to approximately 270–290 per serving, with 3–5g net carbs.
Want the full recipe and simple step-by-step instructions?
Page 2 continues with the full ingredients, cooking tips, and easy directions so you can make this recipe perfectly at home.