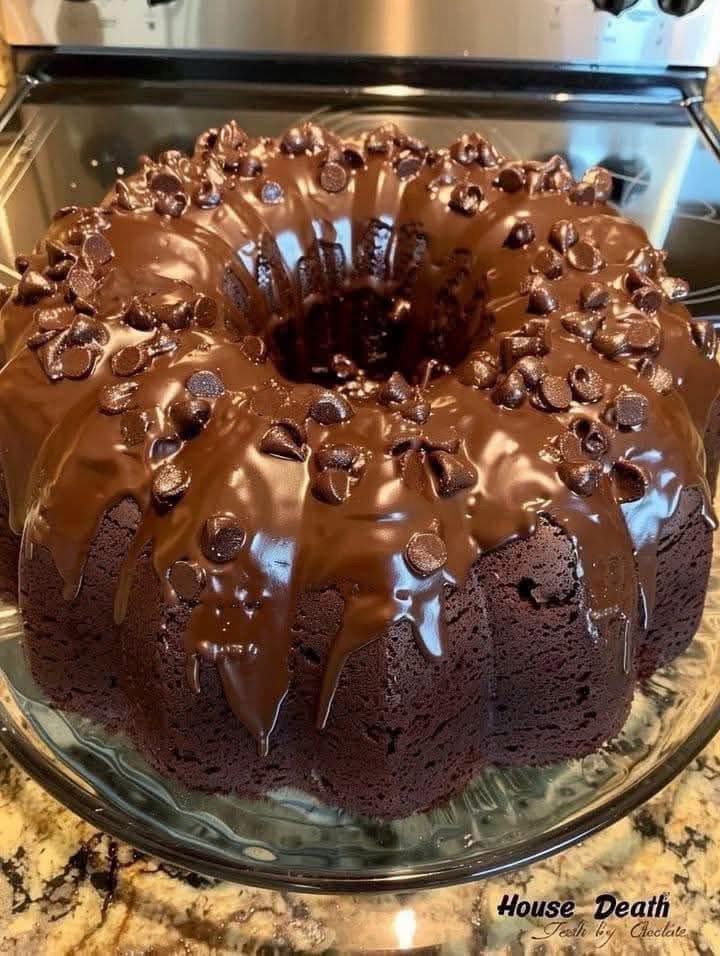
This Death by Chocolate Bundt Cake is rich, moist, deeply chocolatey, and covered with a smooth chocolate ganache that drips beautifully down every curve.
The cake has a soft, tender crumb with intense cocoa flavor, while chocolate chips add small pockets of melted chocolate throughout the center. A glossy ganache coating and extra chocolate chips turn the simple Bundt cake into an impressive dessert suitable for celebrations.
Despite its dramatic appearance, this chocolate cake is easy to prepare with ordinary baking ingredients. It does not require complicated decorating skills, multiple layers, or special piping equipment.
Serve it for birthdays, holidays, potlucks, family dinners, Valentine’s Day, dinner parties, or whenever you need a homemade dessert for serious chocolate lovers.
Why You Will Love This Chocolate Bundt Cake
This cake combines several chocolate textures and flavors in one dessert.
You will love it because it is:
Rich and deeply chocolatey
Moist without being heavy
Covered with silky chocolate ganache
Easy to decorate
Suitable for making ahead
Beautiful enough for special occasions
Delicious with coffee, milk, or ice cream
Simple to transport in one piece
The Bundt pan naturally creates an elegant shape. Once the cake is covered with ganache and chocolate chips, it looks professionally decorated with very little effort.
Recipe Information
Prep Time: 25 minutes
Bake Time: 45–55 minutes
Cooling Time: Approximately 2 hours
Total Time: Approximately 3 hours
Servings: 12–16 slices
Ingredients for the Chocolate Cake
2 cups all-purpose flour
¾ cup unsweetened cocoa powder
2 cups granulated sugar
2 teaspoons baking soda
1 teaspoon baking powder
1 teaspoon salt
2 large eggs, at room temperature
1 cup buttermilk, at room temperature
½ cup vegetable oil
2 teaspoons vanilla extract
1 cup hot coffee or hot water
1 cup semi-sweet chocolate chips
1 tablespoon flour for coating the chocolate chips
Ingredients for the Chocolate Ganache
8 ounces semi-sweet chocolate, finely chopped
¾ cup heavy whipping cream
1 tablespoon unsalted butter, optional
½ teaspoon vanilla extract, optional
Ingredients for Decorating
½ cup semi-sweet chocolate chips
Mini chocolate chips, optional
Chocolate curls, optional
Powdered sugar, optional
Fresh berries, optional
The Best Bundt Pan to Use
A standard 10- to 12-cup Bundt pan works well for this recipe.
The pan should be large enough to hold the batter without overflowing during baking.
Avoid using a very small Bundt pan. Cake batter should not fill the pan more than approximately two-thirds to three-quarters full.
A light-colored metal Bundt pan usually produces the most even result.
Very dark pans can cause the outside of the cake to bake and brown more quickly. When using a dark pan, begin checking the cake several minutes early.
Choose a pan with clearly defined ridges but avoid extremely detailed patterns when you are new to Bundt cakes. Simple curves make the cake easier to release.
How to Grease a Bundt Pan Properly
Bundt cakes have many curves where batter can stick.
Generously coat every part of the inside with softened butter or baking spray containing flour.
Use a pastry brush to spread the grease inside the center tube, around the bottom, and through every ridge.
After greasing with butter, dust the pan lightly with cocoa powder.
Cocoa powder is better than white flour for chocolate cake because it does not leave pale marks on the dark surface.
Turn and tap the pan until the cocoa covers the interior.
Discard the excess.
Prepare the pan immediately before adding the batter. If the grease slides or collects at the bottom, coat it again before filling.
Why Coffee Is Added to Chocolate Cake
Hot coffee strengthens the chocolate flavor without making the cake taste strongly like coffee.
The heat also helps dissolve the cocoa powder and produces a smoother batter.
Use freshly brewed regular or decaffeinated coffee.
When you prefer not to use coffee, replace it with an equal amount of hot water.
The cake will still taste delicious, although the chocolate flavor may be slightly less intense.
Do not add cold coffee. The hot liquid is an important part of the recipe’s texture.
Choosing the Best Cocoa Powder
Natural unsweetened cocoa powder works well with the baking soda in this recipe.
Dutch-processed cocoa can create a darker color and smoother flavor, but it reacts differently with leavening ingredients.
For the most predictable result, use ordinary natural cocoa unless the package or recipe specifically recommends Dutch-processed cocoa.
Do not use sweetened hot-chocolate powder. It contains sugar and other ingredients that can change the structure of the cake.
Sift cocoa powder when it contains hard lumps.
Why Buttermilk Is Important
Buttermilk adds moisture and mild acidity.
The acidity reacts with baking soda, helping the cake rise and develop a tender crumb.
Full-fat or low-fat buttermilk can be used.
When you do not have buttermilk, prepare a quick substitute.
Add one tablespoon of lemon juice or white vinegar to a measuring cup.
Add enough regular milk to reach one cup.
Stir and allow it to rest for approximately five to ten minutes.
The mixture may look slightly curdled. That is normal.
Prepare the Dry Ingredients
Preheat the oven to 350°F.
Place the all-purpose flour, cocoa powder, sugar, baking soda, baking powder, and salt inside a large mixing bowl.
Whisk thoroughly.
Make sure the cocoa powder is evenly distributed and no large lumps remain.
Properly combining the dry ingredients prevents concentrated areas of baking soda, salt, or cocoa from appearing inside the finished cake.
Prepare the Wet Ingredients
Place the eggs, buttermilk, vegetable oil, and vanilla extract inside a separate bowl.
Whisk until smooth and evenly combined.
The eggs and buttermilk should be near room temperature.
Very cold ingredients can make the batter combine unevenly.
Vegetable oil keeps the cake soft even after refrigeration. Melted butter may be used, but the cake can become slightly firmer after chilling.
Combine the Cake Batter
Pour the wet mixture into the dry ingredients.
Mix on low speed or whisk gently until most of the dry flour disappears.
Do not continue beating for a long time.
Slowly add the hot coffee while mixing on low speed.
The batter will become thin. This is expected.
Scrape the sides and bottom of the bowl with a silicone spatula.
Mix only until the batter looks smooth and evenly colored.
A thin batter helps create the moist texture of this chocolate Bundt cake.
Add the Chocolate Chips
Toss one cup of chocolate chips with one tablespoon of flour.
The light flour coating helps reduce sinking.
Fold the chocolate chips gently into the batter.
Do not add a very large quantity of chips. Too many can make the cake heavy and may cause parts of it to stick to the pan.
Semi-sweet chocolate chips provide balanced sweetness.
Milk chocolate chips create a sweeter result, while dark chocolate chips produce a stronger cocoa flavor.
Fill the Bundt Pan
Pour the batter slowly into the prepared Bundt pan.
Move around the pan as you pour so the batter is distributed evenly.
Use a spatula to smooth the surface.
Gently tap the pan against the counter two or three times to release large air bubbles.
Do not tap too aggressively.
Place the Bundt pan on a baking sheet when you are concerned about spills or want to move it more easily.
Bake the Chocolate Bundt Cake
Bake at 350°F for approximately 45–55 minutes.
Begin checking after 45 minutes.
Insert a toothpick or thin skewer into the thickest part of the cake.
It should come out with a few moist crumbs but no wet batter.
Avoid inserting the tester directly through a melted chocolate chip, which may make the cake appear underbaked.
The top should spring back lightly when touched.
Do not overbake the cake. Chocolate cake can become dry quickly after it has finished cooking.
Cool the Cake Before Removing It
Place the Bundt pan on a wire rack.
Allow the cake to cool inside the pan for approximately 15–20 minutes.
Do not attempt to remove it immediately. A very hot cake is delicate and may break.
Do not leave it inside the pan until completely cold either. The sugars can become sticky and make release more difficult.
After 15–20 minutes, run a thin flexible knife gently around any accessible edges.
Do not scratch a nonstick pan.
Place a serving plate or cooling rack upside down over the pan.
Hold both firmly and turn them over together.
Lift the pan slowly.
If the cake does not release, place the pan down, wait another five minutes, and try again.
Allow the Cake to Cool Completely
The cake must cool completely before ganache is added.
Warm cake can melt the ganache and cause most of it to run onto the plate.
Place the cake on a wire rack for approximately one to two hours.
The center of a Bundt cake stays warm longer than the outside.
Touch the thickest area carefully to make sure it no longer feels warm.
How to Make Chocolate Ganache
Place the finely chopped chocolate inside a heat-safe bowl.
Heat the heavy cream in a small saucepan over medium-low heat.
Remove it from the heat when small bubbles begin forming around the edges.
Do not allow the cream to boil strongly.
Pour the hot cream over the chocolate.
Let the mixture stand without stirring for approximately three minutes.
Begin stirring slowly from the center.
Continue until the chocolate is completely melted and the ganache becomes smooth and glossy.
Add the butter and vanilla extract when desired.
Butter gives the ganache additional shine.
Adjusting the Ganache Consistency
Fresh ganache may be too thin to create thick drips.
Allow it to rest at room temperature for approximately 10–20 minutes.
Stir occasionally.
It should become thick enough to coat a spoon while still flowing slowly.
When the ganache becomes too thick, warm it gently for a few seconds or add one teaspoon of warm cream.
When it remains too thin, allow it to cool longer.
Do not refrigerate it for too long, or it may become difficult to pour smoothly.
Decorate the Bundt Cake
Place the completely cooled cake on a serving plate.
Spoon or pour the ganache around the top ridge.
Allow it to move naturally down the sides.
Use the back of a spoon to guide several drips when necessary.
Sprinkle chocolate chips over the ganache before it sets.
Add chocolate curls, mini chocolate chips, or chopped chocolate for extra decoration.
Allow the ganache to rest for approximately 20–30 minutes before slicing.
Want the full recipe and simple step-by-step instructions?
Page 2 continues with the full ingredients, cooking tips, and easy directions so you can make this recipe perfectly at home.