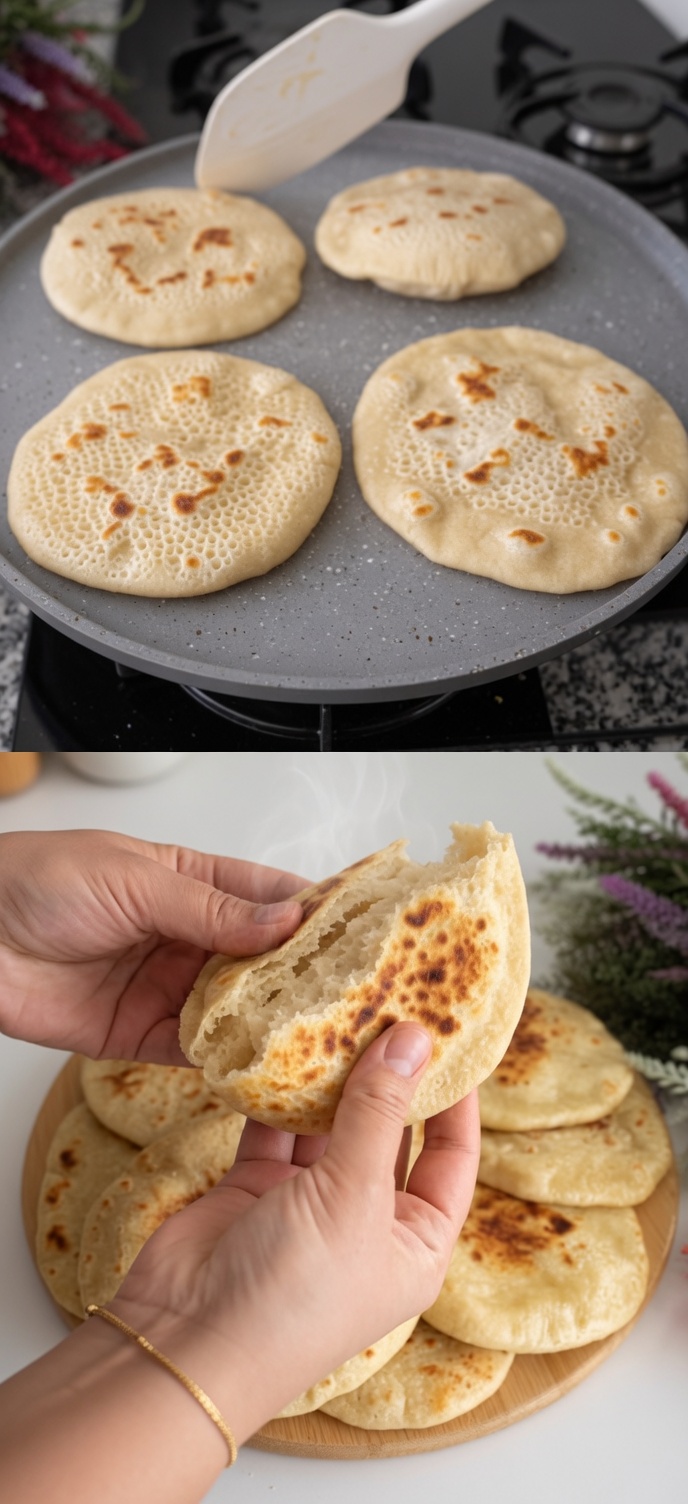
This Easy Stovetop Pita Bread is soft, fluffy, and surprisingly simple to prepare without an oven.
Each round cooks directly in a hot skillet, developing light golden spots while steam forms a hollow pocket inside. The finished bread is tender enough for sandwiches, strong enough for dipping, and delicious served warm with almost any meal.
Homemade pita bread can be filled with chicken, beef, vegetables, falafel, eggs, cheese, or salad. It can also be cut into wedges and served with hummus, yogurt dip, soup, stew, or olive oil.
The recipe uses basic pantry ingredients and does not require special equipment. With patient kneading, proper resting time, and a well-heated skillet, you can make fresh pita bread at home that tastes softer and fresher than many packaged versions.
Why You Will Love This Homemade Pita Bread
This stovetop pita recipe is practical, affordable, and versatile.
You will love it because it is:
Soft and fluffy
Cooked without an oven
Made with simple ingredients
Ready in about two hours
Easy to freeze
Perfect for sandwiches and wraps
Delicious with dips and soups
Suitable for breakfast, lunch, or dinner
The dough can be mixed by hand or with a stand mixer. Once it rises, it is divided into small portions, rolled into circles, rested briefly, and cooked in a dry skillet.
Recipe Information
Prep Time: 20 minutes
Rising Time: 1 hour
Second Resting Time: 20 minutes
Cooking Time: 20 minutes
Total Time: Approximately 2 hours
Yield: 8 pita breads
Ingredients
3 cups all-purpose flour, plus more for dusting
1 cup warm water
2¼ teaspoons active dry yeast
1 tablespoon granulated sugar or honey
1 teaspoon salt
2 tablespoons olive oil
Optional Ingredients
½ teaspoon garlic powder
1 teaspoon dried herbs
2 tablespoons whole-wheat flour
Sesame seeds for serving
Melted butter or olive oil for brushing
The Best Flour for Pita Bread
All-purpose flour creates soft pita bread with a light texture.
Bread flour can also be used. Its higher protein content may create slightly chewier bread with stronger pockets.
Whole-wheat flour adds a nutty flavor and more fiber, but using only whole-wheat flour may create denser pita.
For a balanced result, replace one cup of all-purpose flour with one cup of whole-wheat flour.
Different flour brands absorb water differently. Add extra flour only when the dough remains extremely wet after several minutes of kneading.
Too much flour can make the pita dry and prevent it from puffing properly.
The Correct Water Temperature
The water should feel warm but not hot.
A temperature between approximately 105°F and 115°F is suitable for active dry yeast.
Very hot water can damage the yeast and prevent the dough from rising.
Cold water will work more slowly and may require a longer rising time.
When you do not have a thermometer, test the water with your finger. It should feel comfortably warm, similar to bath water.
How to Activate the Yeast
Pour the warm water into a large mixing bowl.
Add the sugar or honey and stir until dissolved.
Sprinkle the yeast over the surface.
Allow it to rest for approximately five to ten minutes.
The mixture should become foamy.
The foam shows that the yeast is active.
If nothing happens after ten minutes, the yeast may be old or the water may have been too hot or too cold.
Begin again with fresh yeast for the most reliable result.
How to Make the Pita Dough
Add the olive oil and salt to the activated yeast mixture.
Gradually add approximately two and a half cups of flour.
Stir with a wooden spoon or sturdy spatula until a rough dough forms.
Add the remaining flour gradually.
The dough should be soft and slightly tacky but not so wet that it cannot be handled.
Avoid adding all the flour at once.
A soft dough produces lighter pita bread.
How to Knead by Hand
Transfer the dough to a lightly floured surface.
Knead for approximately eight to ten minutes.
Push the dough away with the heel of your hand, fold it back over itself, rotate it, and repeat.
At first, the dough may feel sticky and uneven.
As you continue kneading, it should become smoother and more elastic.
Add only a small amount of flour when necessary.
The finished dough should spring back slowly when pressed with one finger.
Stand-Mixer Instructions
Place the ingredients inside the mixer bowl.
Use the dough-hook attachment.
Mix on low speed until the ingredients begin coming together.
Increase to medium-low speed and knead for approximately six to eight minutes.
The dough should pull away from most of the bowl while remaining soft.
Stop the mixer and check the texture.
Add one tablespoon of flour at a time only if the dough remains extremely sticky.
The First Rise
Lightly grease a clean bowl with olive oil.
Place the dough inside and turn it once so the surface becomes lightly coated.
Cover the bowl with plastic wrap, a plate, or a clean kitchen towel.
Place it in a warm area without cold drafts.
Allow the dough to rise for approximately 45–75 minutes.
It should nearly double in size.
The exact rising time depends on the temperature of your kitchen.
A cooler room may require more time.
How to Create a Warm Rising Area
A slightly warm oven that has been turned off can provide a suitable environment.
Turn the oven on for only one or two minutes, then switch it off completely before placing the dough inside.
The oven should feel mildly warm, never hot.
You can also place the bowl near a warm appliance or inside a microwave that is turned off.
Do not place the dough directly over strong heat.
Divide the Dough
Gently press the risen dough to release large air pockets.
Transfer it to a lightly floured work surface.
Divide it into eight equal portions.
A kitchen scale can help create evenly sized pieces, but it is not essential.
Shape each portion into a smooth ball.
Pull the edges underneath and roll gently against the work surface.
Cover the dough balls with a towel.
Allow them to rest for approximately 10–15 minutes.
This short rest relaxes the gluten and makes the dough easier to roll.
How to Roll the Pita Bread
Lightly flour the work surface and rolling pin.
Flatten one dough ball with your hand.
Roll it into a circle approximately six inches wide and about ⅛ to ¼ inch thick.
Turn the dough several times while rolling.
Try to maintain an even thickness.
Areas that are much thinner than the rest may cook too quickly and prevent the pita from inflating evenly.
Do not roll the dough paper-thin.
Cover the rolled circles with a clean towel while preparing the remaining portions.
The Second Rest
Allow the rolled pita circles to rest for approximately 10–20 minutes.
This step helps the dough relax and gives the yeast a little more time to work.
Do not leave the rounds uncovered.
A dry surface can prevent proper expansion.
Keep them beneath a clean, slightly damp towel or lightweight kitchen cloth.
Choose the Right Skillet
A cast-iron skillet holds heat well and creates attractive golden spots.
A heavy nonstick skillet also works and makes turning the pita easy.
The skillet should be wide enough to hold one pita without folding the edges.
Do not add a large amount of oil.
Traditional pita cooks best on a dry or very lightly greased surface.
Heat the Skillet Properly
Place the skillet over medium-high heat.
Allow it to heat for several minutes before adding the first pita.
The pan must be hot enough to create steam quickly.
If it is too cool, the pita may dry out without puffing.
If it is extremely hot, the exterior may burn before the center cooks.
Test the skillet with one small piece of dough. It should begin forming bubbles within approximately 30 seconds.
How to Cook Stovetop Pita Bread
Place one rolled dough circle inside the hot skillet.
Cook for approximately 30–45 seconds.
Small bubbles should begin appearing across the surface.
Turn the pita with a wide spatula.
Cook the second side for approximately one minute.
Turn it again.
Within another 30–60 seconds, the bread should begin puffing.
Some pita rounds may inflate completely like balloons.
Others may form several large pockets.
Pressing very gently near the edges with a spatula can help encourage trapped steam to move through the bread.
Do not press hard because this can release the steam.
When the Pita Is Done
The pita should have light brown spots on both sides.
It should feel soft and cooked through without becoming dry or brittle.
Remove it from the skillet and place it inside a clean kitchen towel.
Cover it immediately.
The trapped warmth helps keep the bread soft while you cook the remaining rounds.
Repeat with the rest of the dough.
Allow the skillet to reheat briefly between batches when necessary.
Why Pita Bread Puffs
Pita bread puffs when moisture inside the dough turns into steam.
The hot surface cooks the outside quickly, creating two thin layers.
Steam expands between those layers and forms the pocket.
Even rolling, proper hydration, adequate resting, and a hot skillet all help create a successful pocket.
A pita that does not fully inflate can still taste delicious and be used as a flatbread or wrap.
Want the full recipe and simple step-by-step instructions?
Page 2 continues with the full ingredients, cooking tips, and easy directions so you can make this recipe perfectly at home.
Tips for Perfect Pita Pockets
Successful pita bread depends more on technique than complicated ingredients.
Keep the dough soft.
Knead it until smooth.
Allow enough rising time.
Roll each portion evenly.
Keep the rolled dough covered.
Preheat the skillet thoroughly.
Avoid cooking the bread for too long.
These small details help the steam remain trapped between the layers.
Why Did My Pita Bread Not Puff?
The skillet may not have been hot enough.
The dough may have been rolled unevenly or allowed to dry before cooking.
Too much flour can also create dense dough that does not expand easily.
The pita may still develop a pocket after being turned a second time.
When one side has cooked, turn it and wait for bubbles. Turn it again to encourage full inflation.
Even when the pita does not puff completely, it can still be served as soft flatbread.
Why Is My Pita Bread Hard?
The dough may contain too much flour.
The bread may also have been cooked for too long or left uncovered after cooking.
Measure the flour carefully and keep the dough soft.
Cook only until golden spots appear.
Transfer each finished pita directly into a clean towel and keep it covered.
A light brushing of olive oil or melted butter can also help soften the surface.
Why Is the Dough Too Sticky?
A small amount of stickiness is normal.
Flour absorbs liquid gradually as the dough is kneaded.
Continue kneading for several minutes before adding more flour.
When necessary, add flour one tablespoon at a time.
Avoid turning the dough into a stiff ball.
Soft dough generally creates softer pita bread.
Why Is the Dough Not Rising?
The yeast may be inactive.
The water may have been too hot or too cold.
The room may also be cold.
Check the yeast’s expiration date.
Allow the dough additional time in a warm area.
When the yeast mixture never became foamy at the beginning, prepare a new batch with fresh yeast.
Why Does the Pita Have Large Burned Spots?
The skillet may be too hot.
Reduce the heat slightly after the first batch.
Wipe away loose flour from the skillet between rounds because excess flour can burn and create bitter spots.
Use medium-high heat rather than the highest possible setting.
Whole-Wheat Pita Bread
Replace one cup of all-purpose flour with one cup of whole-wheat flour.
You may need one or two additional tablespoons of water because whole-wheat flour absorbs more moisture.
Allow the dough to rest for ten minutes after mixing before deciding whether it needs more liquid.
For a fully whole-wheat version, use white whole-wheat flour for a lighter texture.
The finished bread may be slightly denser than white pita.
Garlic Herb Pita Bread
Add one teaspoon of garlic powder and one teaspoon of dried herbs to the flour.
Good herb choices include:
Oregano
Parsley
Thyme
Rosemary
Italian seasoning
Za’atar
After cooking, brush the pita lightly with olive oil or melted butter.
Sprinkle with additional herbs and a small amount of salt.
Sesame Pita Bread
Brush each rolled dough circle very lightly with water.
Sprinkle sesame seeds over one side.
Press them gently into the dough.
Cook carefully because loose seeds may fall into the skillet and burn.
Sesame pita tastes delicious with hummus, cheese, eggs, or roasted vegetables.
Cheese-Stuffed Skillet Bread
The basic dough can also be used for stuffed flatbread.
Roll one dough ball into a small circle.
Place shredded mozzarella, feta, or another cheese in the center.
Bring the edges together and seal them.
Rest for five minutes.
Roll gently into a thick circle.
Cook over medium heat until golden on both sides and the cheese has melted.
Stuffed bread will not create the same hollow pocket as traditional pita.
How to Serve Homemade Pita
Serve the pita warm with:
Hummus
Baba ganoush
Tzatziki
Olive oil and herbs
Chicken shawarma
Beef kebabs
Falafel
Grilled vegetables
Gyro meat
Tuna salad
Egg salad
Scrambled eggs
Cheese
Soup
Lentil stew
Fresh garden salad
Cut the pita in half and open the pocket gently before filling.
Pita Breakfast Sandwiches
Fill warm pita pockets with scrambled eggs, cheese, spinach, tomatoes, or cooked breakfast meat.
For a lighter breakfast, add Greek yogurt, sliced cucumber, herbs, and boiled eggs.
The bread can be warmed briefly in a skillet before filling.
Avoid adding very wet ingredients too early because they may soften the bread.
Chicken Pita Sandwiches
Fill the pita with grilled or roasted chicken.
Add lettuce, tomatoes, onions, cucumber, feta cheese, and yogurt sauce.
Chicken pita sandwiches work well for lunches and meal preparation.
Store the filling separately and assemble the sandwich shortly before eating.
Homemade Pita Chips
Cut cooked pita bread into triangles.
Separate the two layers when possible.
Arrange the pieces on a baking sheet.
Brush lightly with olive oil.
Season with salt, garlic powder, paprika, or dried herbs.
Bake at 375°F for approximately eight to twelve minutes.
Turn once during baking.
Remove the chips when they are crisp and lightly golden.
Serve with hummus, salsa, or your favorite dip.
Pita Pizza
Place cooked pita rounds on a baking sheet.
Spread a thin layer of pizza sauce over each one.
Add shredded mozzarella and desired toppings.
Bake at 425°F until the cheese is melted and bubbly.
Popular toppings include:
Pepperoni
Mushrooms
Bell peppers
Olives
Chicken
Onions
Spinach
Tomatoes
Pita pizza is a quick lunch or family snack.
Make-Ahead Instructions
The dough can be prepared one day in advance.
After kneading, place it inside a lightly greased bowl.
Cover tightly and refrigerate overnight.
The dough will rise slowly in the refrigerator.
Remove it approximately 45–60 minutes before shaping.
Allow it to warm slightly, divide it into portions, and continue with the recipe.
The cooked pita can also be prepared ahead and reheated before serving.
How to Store Homemade Pita Bread
Allow the pita bread to cool completely.
Place it inside an airtight container or resealable storage bag.
Store it at room temperature for up to two days.
For longer storage, refrigerate it for up to five days.
Place parchment paper between the rounds when necessary.
Keep the container tightly closed so the bread does not dry out.
How to Reheat Pita Bread
Warm the pita in a dry skillet over medium-low heat for approximately 20–30 seconds per side.
You can also wrap several rounds in foil and warm them in a 350°F oven for approximately eight minutes.
For microwave reheating, wrap one pita in a slightly damp paper towel.
Heat for approximately 10–15 seconds.
Avoid overheating because the bread may become tough.
Can You Freeze Pita Bread?
Yes.
Allow the pita bread to cool completely.
Place parchment paper between each round.
Transfer the stack to a freezer-safe bag.
Remove as much air as possible.
Freeze for up to three months.
Thaw at room temperature or warm directly from frozen in a skillet or oven.
Freezing individual rounds with parchment paper makes it easier to remove only the quantity you need.
Can You Freeze the Dough?
Yes.
After the first rise, divide the dough into balls.
Place them on a parchment-lined tray.
Freeze until firm.
Transfer them to a freezer-safe container.
Thaw the dough balls overnight in the refrigerator.
Allow them to reach room temperature and become slightly puffy before rolling and cooking.
Meal-Prep Ideas
Prepare a batch of pita bread and store it with separate containers of fillings.
Useful fillings include:
Grilled chicken
Chopped salad
Hummus
Roasted vegetables
Cooked beef
Falafel
Boiled eggs
Tuna salad
Cheese
Keeping the bread and filling separate prevents sogginess.
Assemble the pita shortly before eating.
Can You Make Pita Without Yeast?
Yeast-free flatbread can be prepared with flour, baking powder, salt, yogurt, and water.
However, it will not usually form the same large hollow pocket.
Yeast creates the structure and fermentation that help traditional pita become light and airy.
For classic pocket bread, yeast is recommended.
Can You Cook Pita in the Oven?
Yes.
Preheat the oven and a baking stone or inverted baking sheet to 475°F.
Place one or two rolled dough circles on the hot surface.
Bake for approximately two to four minutes.
The pita should puff rapidly.
Remove it as soon as it inflates and develops light color.
Keep the baked bread covered with a towel.
Can You Use Instant Yeast?
Yes.
Instant yeast can be mixed directly with the flour.
Use approximately two teaspoons.
The dough may rise slightly faster than dough prepared with active dry yeast.
Watch the size of the dough rather than relying only on the clock.
Can You Use Self-Rising Flour?
Self-rising flour is not recommended for this yeast-based recipe.
It already contains baking powder and salt, which can affect the dough’s texture and flavor.
Use ordinary all-purpose flour for the most predictable result.
Can You Make the Dough Without Olive Oil?
Yes.
The oil helps create softer bread and adds flavor, but the recipe can be prepared without it.
Replace the oil with an equal amount of water.
The finished pita may be slightly chewier and may dry more quickly.
Frequently Asked Questions
How Thick Should I Roll Pita Bread?
Roll it approximately ⅛ to ¼ inch thick.
The most important factor is even thickness across the entire circle.
Why Does My Pita Puff Only on One Side?
One area may be thinner, or the skillet may heat unevenly.
Rotate the pita inside the pan and turn it more than once.
Can I Re-Roll a Pita Round?
Yes, but allow the dough to rest for several minutes before rolling again.
Repeated rolling without rest can make the dough resist stretching.
Should I Oil the Skillet?
A heavy nonstick or cast-iron skillet generally needs no oil.
A very light coating can be used when sticking occurs.
Too much oil changes the texture and may prevent even puffing.
Can I Use a Tortilla Press?
A tortilla press may flatten the dough, but a rolling pin gives better control over thickness.
Pita dough is elastic and may spring back after pressing.
How Do I Open the Pocket?
Allow the pita to cool for several minutes.
Cut it in half with a sharp knife.
Insert your fingers gently and separate the inner layers.
Do not force the bread when it is extremely hot.
Final Note
Easy Stovetop Pita Bread is a simple homemade bread made with flour, water, yeast, olive oil, sugar, and salt.
The hot skillet creates steam inside the dough, helping each round puff and form a soft pocket.
For the best result, keep the dough slightly soft, allow it to rise fully, roll every circle evenly, and heat the skillet before cooking.
Serve the pita warm with hummus, grilled meat, vegetables, salads, eggs, or cheese.
You can also transform it into pita chips, sandwiches, breakfast pockets, or quick pizzas.
Once you learn the technique, fresh homemade pita bread can become an easy and useful part of everyday meals.