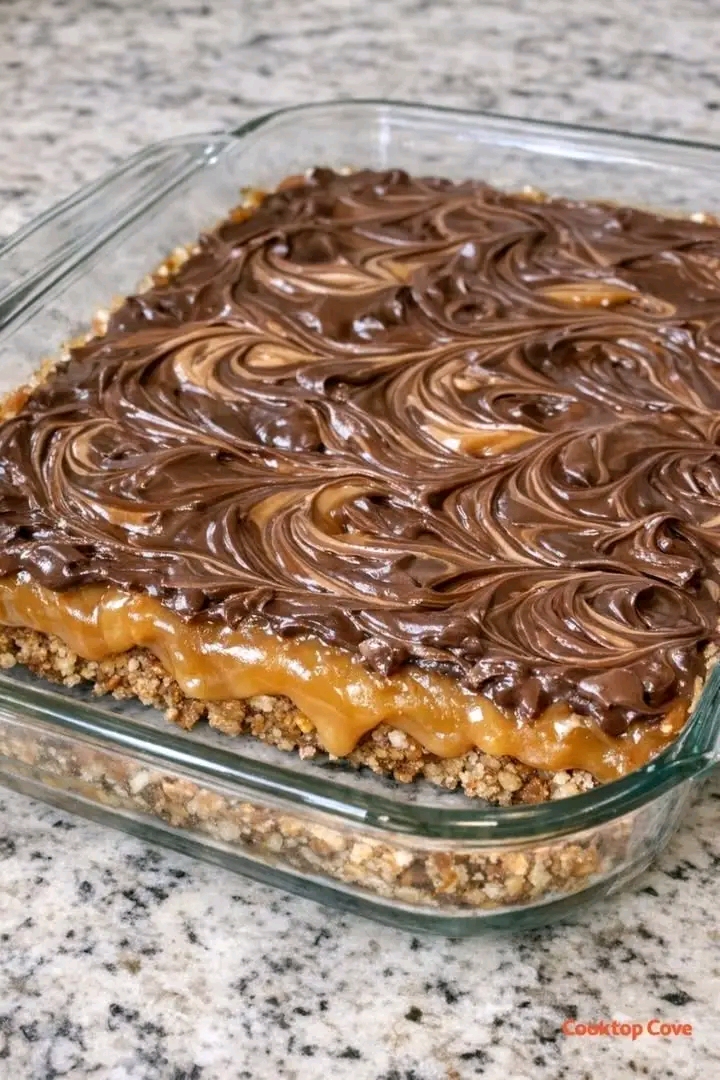
These Layered Caramel Chocolate Swirl Bars combine a buttery cookie crust, a thick layer of soft caramel, rich melted chocolate, and a beautiful marbled swirl in one indulgent homemade dessert. Every square has a satisfying balance of crisp edges, chewy caramel, creamy chocolate, and a lightly salted finish.
The bars look impressive enough for holidays, bake sales, dessert tables, potlucks, birthday parties, and special occasions, but the method is much easier than the finished layers suggest. The crust is pressed into one baking pan, the caramel is prepared in a saucepan, and the chocolate topping is swirled with a knife before chilling.
This is the kind of dessert that can be prepared ahead, stored in the refrigerator, and sliced shortly before serving. The firm layers travel well, making the bars useful for office parties, school events, family gatherings, cookie exchanges, and edible gift boxes.
The key to clean layers is allowing each component enough time to set. The crust should cool before the caramel is added, the caramel should firm slightly before the chocolate is spread, and the completed pan should chill completely before slicing.
Finish the bars with flaky sea salt for a salted caramel flavor, or leave them plain for a sweeter chocolate-caramel dessert. Chopped pecans, walnuts, toffee pieces, or crushed pretzels can also be added for extra texture.
Why You Will Love These Caramel Chocolate Bars
The bars combine several favorite dessert flavors in one pan. Buttery shortbread, chewy caramel, and smooth chocolate create a rich treat that feels more special than an ordinary cookie bar.
The layered design also creates contrasting textures. The crust provides structure, the caramel stays soft and chewy, and the chocolate topping firms into a creamy layer.
They are ideal for make-ahead entertaining because the finished bars need time to chill. Preparing them the day before an event reduces last-minute dessert work.
The recipe is also flexible. Use dark, milk, or semisweet chocolate, add nuts or pretzels, adjust the salt, or create a white chocolate swirl.
One pan produces many small servings because the bars are rich. This makes them practical for larger gatherings and dessert platters.
What Are Layered Caramel Chocolate Swirl Bars?
Layered caramel chocolate swirl bars are a tray-baked dessert made from three main components: a baked cookie crust, a soft caramel filling, and a chocolate topping.
The swirl can be created by combining two shades of chocolate or by reserving a portion of caramel and dragging it through the melted chocolate.
This version uses semisweet chocolate and white chocolate for a clearly visible marbled top. A small amount of caramel can also be drizzled over the chocolate before swirling for additional flavor.
The bars are chilled before cutting so the layers remain distinct and the caramel does not run.
Ingredients for Layered Caramel Chocolate Swirl Bars
For the Buttery Crust
- 1 cup unsalted butter, softened
- 1/2 cup granulated sugar
- 1/4 cup packed light brown sugar
- 2 cups all-purpose flour
- 1/2 teaspoon salt
- 1 teaspoon vanilla extract
For the Caramel Layer
- 1 cup unsalted butter
- 1 cup packed light brown sugar
- 1 can, 14 ounces, sweetened condensed milk
- 1/3 cup light corn syrup or golden syrup
- 1 teaspoon vanilla extract
- 1/2 teaspoon fine salt
For the Chocolate Swirl Topping
- 8 ounces semisweet or dark chocolate, chopped
- 4 ounces white chocolate, chopped
- 1 tablespoon neutral oil or coconut oil, divided
Optional Finishing Ingredients
- Flaky sea salt
- Chopped toasted pecans
- Chopped walnuts
- Toffee pieces
- Crushed pretzels
Ingredient Notes
Butter
Butter gives the crust a rich shortbread texture and provides the base for the caramel.
Use unsalted butter when possible so the total salt level can be controlled.
Granulated and Brown Sugar
Granulated sugar helps the crust bake with crisp edges, while brown sugar adds moisture and caramel flavor.
Light brown sugar produces a mild flavor. Dark brown sugar can be used for deeper molasses notes.
All-Purpose Flour
Measure the flour carefully. Too much flour can make the crust dry and crumbly.
Spoon the flour into the measuring cup and level it rather than packing it tightly.
Sweetened Condensed Milk
Sweetened condensed milk gives the caramel its creamy texture and helps it set into a sliceable layer.
Do not substitute evaporated milk. The two products have very different sugar and moisture levels.
Corn Syrup or Golden Syrup
Syrup helps keep the caramel smooth and reduces the chance of graininess.
Golden syrup creates a slightly deeper flavor, while light corn syrup is more neutral.
Chocolate
Semisweet chocolate balances the sweet caramel well.
Dark chocolate creates a more intense and less sweet topping, while milk chocolate creates a softer, sweeter dessert.
Chocolate bars or baking wafers generally melt more smoothly than standard chocolate chips.
White Chocolate
White chocolate creates the visible swirl on top.
It melts quickly, so use low heat and stir frequently.
Oil
A small amount of neutral oil or coconut oil makes the chocolate easier to spread and helps create a softer topping that is less likely to crack during slicing.
Kitchen Equipment
You will need a 9-by-13-inch baking pan, parchment paper, mixing bowls, electric mixer or wooden spoon, medium heavy-bottomed saucepan, heatproof spatula, whisk, offset spatula, microwave-safe bowls or double boiler, and sharp knife.
A candy thermometer is optional but helpful when preparing the caramel.
Use a heavy-bottomed saucepan to reduce the chance of scorching the condensed milk and sugar.
How to Make the Ultimate Layered Caramel Chocolate Swirl Bars
Step 1: Prepare the Baking Pan
Preheat the oven to 350°F.
Line a 9-by-13-inch baking pan with parchment paper, leaving enough overhang on two sides to lift the chilled bars from the pan.
Lightly grease the parchment.
Step 2: Cream the Butter and Sugars
Place the softened butter, granulated sugar, and brown sugar in a large mixing bowl.
Beat until smooth and creamy.
Add the vanilla and mix again.
Step 3: Add the Flour and Salt
Add the flour and salt gradually.
Mix only until a soft, crumbly dough forms.
Do not overmix because excessive mixing can make the crust tough.
Step 4: Press the Crust into the Pan
Transfer the dough to the prepared baking pan.
Press it into a firm, even layer.
Use the bottom of a measuring cup to compact and smooth the surface.
Step 5: Bake the Crust
Bake for approximately 18 to 22 minutes.
The edges should be lightly golden and the center should look set.
Do not overbake because the crust continues firming as it cools.
Step 6: Cool the Crust
Place the pan on a cooling rack.
Allow the crust to cool while preparing the caramel.
Step 7: Combine the Caramel Ingredients
Place the butter, brown sugar, sweetened condensed milk, corn syrup or golden syrup, and salt in a heavy-bottomed saucepan.
Set the pan over medium-low heat.
Step 8: Cook the Caramel
Stir continuously as the butter melts and the ingredients combine.
Bring the mixture to a gentle simmer.
Continue cooking and stirring for approximately eight to 12 minutes.
The caramel should become thicker, smoother, and slightly darker.
When using a candy thermometer, aim for approximately 225°F to 230°F for a soft, sliceable caramel layer.
Step 9: Add Vanilla
Remove the saucepan from the heat.
Stir in the vanilla carefully because the caramel may bubble.
Step 10: Pour the Caramel over the Crust
Pour the hot caramel over the cooled or slightly warm crust.
Spread it quickly into an even layer with a heatproof spatula.
Step 11: Let the Caramel Set
Allow the caramel to cool at room temperature for approximately 30 minutes.
Transfer the pan to the refrigerator for another 30 to 45 minutes, or until the caramel is firm enough to support the chocolate layer.
Step 12: Melt the Semisweet Chocolate
Place the semisweet chocolate with approximately two teaspoons of oil in a microwave-safe bowl.
Microwave in short intervals, stirring after each one, until smooth.
Do not overheat.
Step 13: Melt the White Chocolate
Place the white chocolate with the remaining oil in a separate bowl.
Melt it in very short microwave intervals, stirring frequently.
Step 14: Add the Chocolate Layer
Pour the semisweet chocolate over the chilled caramel.
Spread it evenly with an offset spatula.
Step 15: Create the Swirl
Drizzle the melted white chocolate in lines or small spoonfuls over the semisweet chocolate.
Drag a toothpick, skewer, or thin knife gently through both chocolates to create a marble pattern.
Avoid overmixing, or the colors will blend into one shade.
Step 16: Add Optional Toppings
Sprinkle with flaky sea salt, toasted nuts, toffee pieces, or crushed pretzels while the chocolate is still wet.
Step 17: Chill Completely
Refrigerate the pan for at least two hours, or until every layer is firm.
For the cleanest slices, chill overnight.
Step 18: Lift from the Pan
Use the parchment overhang to lift the entire slab onto a cutting board.
Step 19: Slice the Bars
Allow the slab to stand at room temperature for approximately five to 10 minutes.
Use a large sharp knife warmed under hot water and dried thoroughly.
Cut into small squares, wiping and reheating the blade between cuts.
How to Make Smooth Caramel
Use a heavy-bottomed saucepan.
Cook over medium-low rather than high heat.
Stir continuously, scraping the bottom and corners of the pan.
Use corn syrup or golden syrup to help prevent crystallization.
Make sure the brown sugar dissolves completely.
Do not walk away while the caramel cooks because sweetened condensed milk can scorch quickly.
How to Know When the Caramel Is Ready
The mixture should become visibly thicker and slightly darker.
When the spatula is drawn across the bottom of the saucepan, the path should remain visible briefly before the caramel flows back.
The caramel should fall from the spatula in a thick ribbon.
Undercooked caramel may remain too soft, while overcooked caramel can become hard or chewy.
A candy thermometer provides the most consistent result, but visual and texture cues can also be used.
How to Prevent Grainy Caramel
Use clean equipment.
Add the syrup, which helps interfere with sugar crystallization.
Keep the heat moderate.
Stir steadily rather than splashing sugar onto the sides of the pan.
Do not scrape dried sugar crystals from the upper sides of the saucepan into the finished caramel.
Remove the pan from the heat as soon as the caramel reaches the correct consistency.
How to Create a Beautiful Chocolate Swirl
Both chocolates should be melted and fluid at the same time.
Spread the dark chocolate first, then immediately add the white chocolate.
Use a toothpick, skewer, or knife to make shallow passes through the surface.
Alternate directions to create loops or feathered patterns.
Stop while the colors are still distinct.
The swirl does not need to be perfectly symmetrical. Natural irregular patterns often look more attractive.
How to Get Clean Slices
Chill the bars completely.
Lift the slab from the pan before cutting.
Allow it to soften slightly at room temperature so the chocolate does not shatter.
Warm a sharp knife under hot water.
Dry the blade carefully before each cut.
Press downward in one smooth motion rather than sawing.
Wipe the blade between cuts to keep the caramel and chocolate layers clean.
Tips for the Best Layered Caramel Bars
Line the pan with parchment and leave an overhang.
Press the crust into an even layer.
Do not overbake the crust.
Cook the caramel slowly and stir constantly.
Cool the caramel before adding chocolate.
Melt chocolate gently.
Do not overmix the swirl.
Chill completely before slicing.
Cut the bars into small portions because they are rich.
Easy Caramel Chocolate Bar Variations
Salted Caramel Chocolate Bars
Sprinkle flaky sea salt over the chocolate before it sets.
Dark Chocolate Caramel Bars
Use chocolate containing 60 to 70 percent cocoa for a less sweet topping.
Milk Chocolate Caramel Bars
Use milk chocolate for a sweeter, creamier result.
White Chocolate Caramel Bars
Reverse the swirl by using white chocolate as the base and dark chocolate for the decoration.
Pecan Caramel Bars
Sprinkle toasted chopped pecans over the caramel before adding chocolate.
Walnut Caramel Bars
Add chopped walnuts for a slightly bitter, earthy contrast.
Pretzel Caramel Bars
Add crushed salted pretzels over the caramel or chocolate layer.
Toffee Caramel Bars
Sprinkle toffee pieces over the chocolate before it sets.
Peanut Butter Chocolate Swirl Bars
Warm smooth peanut butter and swirl it into the chocolate topping.
Espresso Chocolate Caramel Bars
Add instant espresso powder to the melted dark chocolate.
Orange Chocolate Caramel Bars
Add finely grated orange zest to the chocolate or caramel.
Holiday Caramel Bars
Add crushed peppermint candy, festive sprinkles, or colored white chocolate.
S’mores Caramel Bars
Use a graham cracker crust and add toasted miniature marshmallows after the chocolate layer sets partially.
Can You Use Store-Bought Caramels?
Yes. Unwrap approximately 14 ounces of soft caramels and melt them with several tablespoons of heavy cream.
Stir over low heat until smooth, then spread over the crust.
This shortcut creates a good caramel layer but may have a firmer or sweeter texture than homemade condensed-milk caramel.
Can You Use Caramel Sauce?
Thin ice cream caramel sauce is generally too runny for a layered bar.
Use a thick caramel filling designed to set, or cook the sauce until it reaches a sliceable consistency.
The caramel layer must be firm enough to support the chocolate topping.
Can You Use Chocolate Chips?
Yes, but chocolate chips contain stabilizers that help them retain their shape and can make the melted topping thicker.
Add a little oil to improve spreadability.
Chopped baking chocolate or melting wafers usually produce a smoother finish.
Can You Make the Bars Gluten-Free?
Replace the all-purpose flour with a dependable cup-for-cup gluten-free baking blend.
Check the chocolate, condensed milk, syrup, vanilla, and optional toppings for gluten or cross-contact warnings.
The crust may be slightly more delicate, so chill thoroughly before slicing.
Can You Make Them Dairy-Free?
A dairy-free version requires plant-based butter, dairy-free condensed milk, and dairy-free chocolate.
Results vary according to the products used, especially in the caramel layer.
Choose a plant-based butter intended for baking rather than a high-water spread.
Can You Reduce the Sweetness?
Use dark chocolate for the topping.
Add flaky sea salt.
Reduce the granulated sugar in the crust slightly.
Do not reduce the sugar in the caramel dramatically because it affects texture and setting.
Cut the bars into smaller portions and serve with unsweetened coffee or tea.
Make-Ahead Instructions
The crust can be baked one day ahead, cooled, covered, and kept at room temperature.
The complete bars can be made up to three days before serving.
Keep the pan covered in the refrigerator and slice shortly before presentation.
For dessert boxes or gifts, place the chilled bars in paper liners and keep them cool until delivery.
How to Serve Layered Caramel Chocolate Bars
Serve the bars slightly chilled or allow them to stand at room temperature for approximately 10 to 15 minutes for a softer caramel texture.
Arrange them on a dessert tray with brownies, cookies, truffles, or fresh berries.
They pair especially well with coffee, espresso, tea, cold milk, or hot chocolate.
For a plated dessert, serve one bar with vanilla ice cream, whipped cream, berries, or a drizzle of warm caramel.
Holiday and Party Serving Ideas
Christmas Cookie Trays
Cut the bars into small squares and place them in decorative paper liners.
Thanksgiving Dessert Tables
Serve them beside pies, cheesecake, cookies, and coffee.
Birthday Parties
Add colorful sprinkles or a white chocolate swirl in the party colors.
Bake Sales
Wrap individual bars in clear packaging and label them clearly when they contain nuts.
Edible Gifts
Layer the bars between parchment in a sturdy gift tin.
Potlucks
Transport the bars chilled in a covered container and keep them away from direct heat.
How to Store the Bars
Place the bars in an airtight food storage container with parchment paper between layers.
Refrigerate for up to one week.
The crust may soften gradually as it absorbs moisture from the caramel, but the bars remain flavorful.
For serving, allow them to stand at room temperature briefly so the caramel softens slightly.
Can You Store Them at Room Temperature?
The bars can remain at cool room temperature for several hours during serving.
For longer storage, refrigeration is recommended because the caramel contains butter and condensed milk.
Warm rooms can soften the chocolate and caramel, making the bars messy to handle.
Can You Freeze Caramel Chocolate Bars?
Yes. Chill and slice the bars first.
Arrange them in a single layer until firm, then transfer them to a freezer-safe container with parchment between layers.
Freeze for up to three months.
Thaw overnight in the refrigerator.
Allow the bars to stand at room temperature briefly before serving.
Common Mistakes to Avoid
Do not overmeasure the flour.
Avoid overbaking the crust.
Do not cook the caramel over high heat.
Avoid leaving the caramel unattended.
Do not pour chocolate over very warm caramel.
Avoid overheating the chocolate.
Do not overwork the swirl.
Avoid cutting the bars before they are completely chilled.
Do not use a cold dull knife for slicing.
Frequently Asked Questions
Why Is My Caramel Too Soft?
It may not have cooked long enough, may contain too much liquid, or may need additional chilling time.
Why Is My Caramel Too Hard?
It may have cooked at too high a temperature or for too long.
Why Is My Caramel Grainy?
Sugar crystals may have formed, or the mixture may not have dissolved evenly.
Why Did the Chocolate Crack When I Cut It?
The bars may have been too cold, or the chocolate layer may have been too thick.
Allow the slab to soften briefly and warm the knife.
Can I Use Dark Chocolate?
Yes. Dark chocolate balances the sweet caramel especially well.
Can I Use Milk Chocolate?
Yes. It creates a sweeter topping.
Can I Add Nuts?
Yes. Pecans, walnuts, almonds, or peanuts can be added.
Can I Add Pretzels?
Yes. Salted pretzels create a sweet-and-salty crunch.
Do the Bars Need Refrigeration?
Refrigeration is recommended for storage and clean slicing.
How Long Do They Need to Chill?
Chill for at least two hours. Overnight chilling gives the cleanest layers.
How Many Bars Does the Recipe Make?
The recipe makes approximately 24 medium bars or 36 small dessert squares.
Can I Make Them Ahead?
Yes. Prepare them up to three days before serving.
How Long Do They Keep?
Store them in the refrigerator for up to one week.
Can They Be Frozen?
Yes. Freeze them for up to three months.
Food Safety and Allergy Notes
This recipe contains wheat and dairy.
Optional nuts introduce tree-nut or peanut allergens.
Use caution when handling hot caramel because it can cause serious burns.
Keep children and loose clothing away from the saucepan while the caramel cooks.
Do not touch or taste hot caramel directly from the pan.
Use clean, dry equipment when melting chocolate because water can cause chocolate to seize.
Refrigerate the finished bars for long-term storage.
Review flour, chocolate, condensed milk, syrup, vanilla, nuts, pretzels, and decorative toppings for allergy warnings.
Why These Bars Are Great for Entertaining
They can be made several days ahead.
One pan produces many portions.
The marbled chocolate topping gives them an elegant appearance.
They travel well when chilled.
The bars can be cut into different sizes for dessert trays, gift boxes, or plated desserts.
The flavor is familiar enough for a broad audience but rich enough to feel special.
Printable Layered Caramel Chocolate Swirl Bars Recipe
The Ultimate Layered Caramel Chocolate Swirl Bars
Prep Time: 30 minutes
Baking Time: 18 to 22 minutes
Caramel Cooking Time: 8 to 12 minutes
Chilling Time: At least 2 hours
Total Time: Approximately 3 hours 15 minutes
Yield: 24 medium bars or 36 small squares
Category: Dessert
Cooking Method: Oven and stovetop
Cuisine: American baking
Ingredients
Crust
- 1 cup unsalted butter, softened
- 1/2 cup granulated sugar
- 1/4 cup packed light brown sugar
- 2 cups all-purpose flour
- 1/2 teaspoon salt
- 1 teaspoon vanilla extract
Caramel Layer
- 1 cup unsalted butter
- 1 cup packed light brown sugar
- 1 can, 14 ounces, sweetened condensed milk
- 1/3 cup light corn syrup or golden syrup
- 1 teaspoon vanilla extract
- 1/2 teaspoon fine salt
Chocolate Swirl
- 8 ounces semisweet or dark chocolate, chopped
- 4 ounces white chocolate, chopped
- 1 tablespoon neutral or coconut oil, divided
- Flaky sea salt, nuts, toffee, or pretzels, optional
Instructions
- Preheat the oven to 350°F.
- Line a 9-by-13-inch baking pan with parchment paper.
- Beat the softened butter, granulated sugar, and brown sugar until creamy.
- Add the vanilla.
- Mix in the flour and salt until a soft dough forms.
- Press the dough evenly into the prepared pan.
- Bake for 18 to 22 minutes, until the edges are lightly golden.
- Cool the crust on a rack.
- Combine the caramel butter, brown sugar, condensed milk, syrup, and salt in a heavy saucepan.
- Cook over medium-low heat, stirring continuously.
- Bring to a gentle simmer and cook for eight to 12 minutes, until thickened.
- Remove from the heat and stir in the vanilla.
- Pour the caramel over the crust.
- Spread it into an even layer.
- Cool at room temperature for 30 minutes.
- Refrigerate for 30 to 45 minutes, until the caramel firms slightly.
- Melt the semisweet chocolate with approximately two teaspoons of oil.
- Melt the white chocolate separately with the remaining oil.
- Spread the semisweet chocolate over the caramel.
- Drizzle the white chocolate over the top.
- Use a toothpick, skewer, or knife to create a marble pattern.
- Add optional flaky salt, nuts, toffee, or pretzels.
- Refrigerate for at least two hours or overnight.
- Lift the chilled slab from the pan using the parchment.
- Allow it to stand at room temperature for five to 10 minutes.
- Slice with a warm, dry, sharp knife.
- Serve slightly chilled or at cool room temperature.
Storage
Store the bars in an airtight container in the refrigerator for up to one week.
Freezing
Freeze sliced bars with parchment between layers for up to three months.
Make-Ahead Tip
Prepare the complete dessert up to three days ahead and keep it refrigerated until ready to slice and serve.
Important Tip
Allow the caramel layer to firm before adding the chocolate, and chill the finished bars completely before slicing.
Final Thoughts
These Ultimate Layered Caramel Chocolate Swirl Bars combine a buttery cookie crust, smooth homemade caramel, rich chocolate, and a striking marbled topping.
The contrasting layers create the perfect balance of crisp, chewy, creamy, sweet, and lightly salty textures.
For the best result, measure the flour carefully, avoid overbaking the crust, cook the caramel over moderate heat, and chill each layer before continuing.
Use dark chocolate for balance, milk chocolate for extra sweetness, or white chocolate to create a bold decorative swirl.
Customize the bars with flaky salt, pecans, walnuts, toffee pieces, crushed pretzels, peanut butter, espresso, or orange zest.
Serve them for Christmas, Thanksgiving, birthdays, potlucks, bake sales, cookie exchanges, office parties, dessert tables, or homemade gifts.
With their elegant layered appearance, rich caramel center, smooth chocolate topping, and make-ahead convenience, these caramel chocolate swirl bars are an unforgettable dessert for any special occasion.