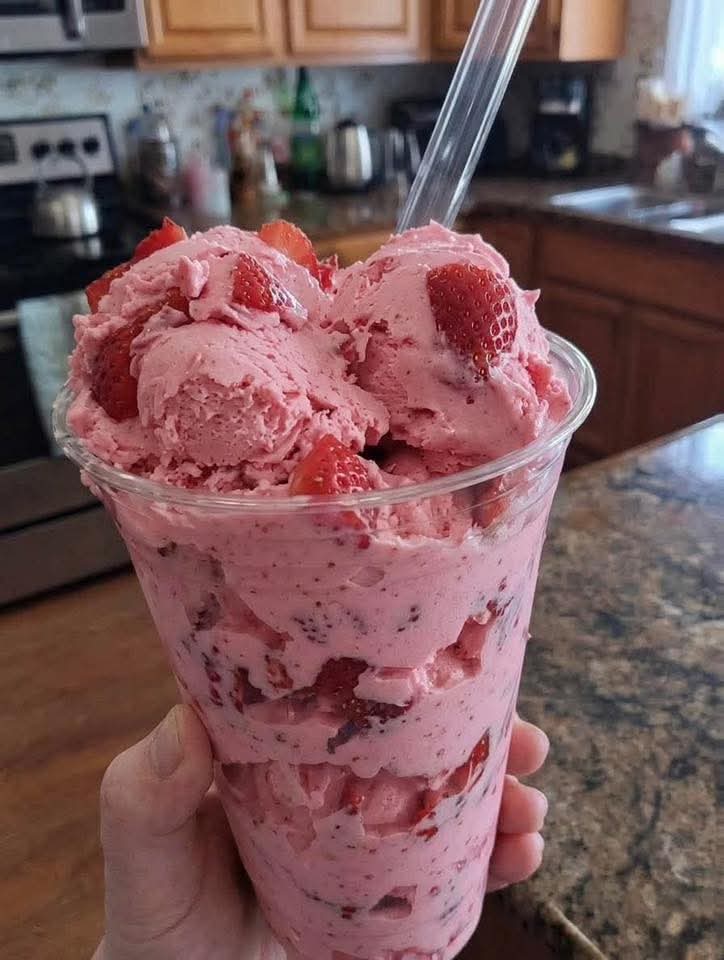
When a strawberry ice cream craving hits on a sweltering afternoon, but you’re determined to stick to your sugar-free, low-carb lifestyle, these Sugar-Free Strawberry Ice Cream Cups swoop in like a frosty, pink-hued superhero. They’re everything you love about a classic strawberry ice cream—creamy, bursting with real berry flavor, and just sweet enough—without a single grain of refined sugar. Made with fresh strawberries, rich cream cheese, heavy whipping cream, and a touch of sugar-free sweetener, these individual frozen cups are layered on a buttery almond flour crust that adds the perfect crunch. They’re the ultimate no-bake, make-ahead dessert for hot days, pool parties, or anytime you want a guilt-free indulgence that feels like a celebration. Creamy, fruity, refreshing, and completely sugar-free, these ice cream cups are destined to become your new favorite summer treat.
This recipe is proof that you don’t need an ice cream maker, a vat of custard, or any special equipment to create a dessert that rivals your favorite scoop shop. The “ice cream” is actually a no-churn marvel: a luscious blend of cream cheese, heavy whipping cream, pureed fresh strawberries, and a powdered sugar-free sweetener that dissolves seamlessly, leaving no gritty aftertaste. The cream cheese provides a tangy, cheesecake-like richness, while the whipped cream lightens the mixture into a velvety, mousse-like texture that freezes into perfectly scoopable cups. The crust, a simple press-in mixture of almond flour, melted butter, and a little sweetener, gives each cup a satisfying, buttery crunch that contrasts beautifully with the smooth, fruity filling. Best of all, these cups are portion-controlled, easy to store, and endlessly customizable. You can swirl in a ribbon of sugar-free strawberry jam, top them with a dollop of whipped cream and fresh berries, or even dip the frozen cups in a sugar-free chocolate shell for a strawberry-chocolate sensation. They’re naturally gluten-free, keto-friendly, and diabetic-friendly, with only a few grams of net carbs per serving. Whether you’re meal-prepping desserts for the week, planning a birthday party for a loved one with dietary restrictions, or just treating yourself to something sweet and wholesome, these strawberry ice cream cups deliver on all fronts. They’re the perfect way to capture the taste of summer, one creamy, berry-filled bite at a time.
In this comprehensive guide, I’ll walk you through every detail of creating these irresistible sugar-free ice cream cups. We’ll explore the best sweeteners to use for a smooth, non-gritty texture, the secrets to a perfectly crunchy crust that doesn’t crumble, and endless ways to customize the recipe with different fruits and flavors. You’ll find step-by-step instructions, pro tips, make-ahead and storage advice, and a full recipe card to keep handy. Let’s get out the mixing bowls and whip up a batch of pure, frozen, strawberry bliss.
Why You’ll Love These Sugar-Free Strawberry Ice Cream Cups
Completely sugar-free and diabetic-friendly. These ice cream cups are sweetened with a powdered keto-friendly sweetener like erythritol or monk fruit, which has zero impact on blood sugar. You get all the sweetness and indulgence of traditional strawberry ice cream without the sugar crash. The strawberries provide natural flavor and a touch of sweetness, but the overall carb count remains very low, making them safe for diabetics, keto dieters, and anyone looking to reduce their sugar intake. They prove that you can have your ice cream and eat it too, without compromising your health goals. No artificial colors, no corn syrup, just real, wholesome ingredients that taste like pure strawberry heaven.
No ice cream maker required—just a mixer and a freezer. This is a no-churn ice cream, which means you don’t need any special equipment. The heavy cream is whipped to stiff peaks, the cream cheese is beaten until smooth, and the two are folded together with a sweet strawberry puree. The mixture is then layered over a simple almond flour crust in individual cups or a loaf pan, and the freezer does the rest. There’s no churning, no rock-hard icy results, and no complicated custard base. The fat in the cream cheese and heavy cream keeps the ice cream soft and scoopable, even straight from the freezer. It’s the easiest way to make homemade ice cream, and it’s completely foolproof.
A perfect balance of creamy, fruity, and crunchy. Each cup delivers three distinct layers of texture and flavor. The almond flour crust on the bottom is buttery, nutty, and slightly crisp, providing a pleasant contrast to the smooth, velvety strawberry cream above. The ice cream itself is rich, tangy from the cream cheese, and bursting with fresh strawberry flavor. A few chunks of fresh strawberry can be folded in for juicy bursts of fruit. The combination is reminiscent of a strawberry cheesecake ice cream, and it’s absolutely addictive. You can add a sprinkle of crushed nuts or a drizzle of sugar-free chocolate on top for even more texture. Each spoonful is a little symphony of crunch, cream, and berry sweetness.
Perfectly portioned, portable, and party-ready. By assembling these in individual cups—muffin tins lined with parchment, silicone molds, or small ramekins—you create built-in portion control. They’re easy to store, easy to serve, and perfect for taking to a barbecue, a picnic, or a birthday party. Kids love having their own personal ice cream cup, and adults appreciate the elegant presentation. You can dress them up with a swirl of whipped cream, a fresh strawberry fan, and a sprig of mint for a truly stunning dessert. They can be made days in advance, which makes entertaining effortless. Just pull them out of the freezer 10 minutes before serving, and you have a dessert that looks and tastes like it came from a gourmet ice cream shop.
Ingredient Deep Dive: The Creamy, Fruity, Sugar-Free Cast
Let’s explore each ingredient and how it contributes to the perfect sugar-free strawberry ice cream cup.
The Almond Flour Crust – The Buttery, Nutty Base
You’ll need 1 cup of super-fine blanched almond flour, 3 tablespoons of melted unsalted butter (or coconut oil for a dairy-free version), and 1 tablespoon of powdered keto sweetener. Almond flour creates a tender, crumbly crust that mimics the texture of a graham cracker crust, but without the carbs. The butter binds the crumbs together and adds a rich, toasty flavor that hardens when chilled, creating a stable base. The sweetener just rounds out the nuttiness. Press the mixture firmly into the bottom of your cups; this ensures the crust holds together when you dig in. You can also add a pinch of cinnamon or a little lemon zest for extra flavor. The crust can be pre-baked for a crispier texture, but it’s also delicious pressed and frozen raw. If you’re allergic to nuts, you can use sunflower seed flour or a mix of crushed sugar-free cookies. The crust is the foundation that provides a satisfying crunch with every creamy spoonful. It’s a simple, no-fuss component that takes minutes to assemble, and it elevates the ice cream cups from simple to special. The almond flour also adds healthy fats and a touch of protein, making the dessert more satiating. Pressing the crust down firmly ensures it doesn’t crumble apart when you scoop. A flat-bottomed glass or a tart tamper is perfect for this job.
Fresh Strawberries – The Bright, Fruity Star
One cup of fresh, ripe strawberries is the heart of this recipe. You’ll puree most of them into a smooth sauce, and reserve a few to chop and fold into the ice cream for those delightful pockets of fruit. Ripe strawberries are naturally sweet, so they help reduce the amount of added sweetener needed. They’re also packed with vitamin C and antioxidants. The puree gives the ice cream its beautiful pink color and intense berry flavor. For the best results, use strawberries that are deeply red, fragrant, and in season. If fresh strawberries aren’t available, thawed frozen strawberries work well—just be sure to drain any excess liquid to prevent the ice cream from becoming icy. The puree is made by simply blending the strawberries with a little lemon juice, which brightens the flavor and helps preserve the color. You can also add a teaspoon of strawberry extract for an extra boost of flavor, but it’s not necessary. The strawberries are what make this dessert taste like summer, and their natural sweetness is a gift when you’re avoiding sugar. Chopped strawberries folded in at the end add texture and juicy bursts that make each bite interesting. You can even swirl in a ribbon of sugar-free strawberry jam for a marbled effect. The strawberry flavor is front and center, so use the best berries you can find. If you like a smoother ice cream, you can strain the puree to remove the seeds, but the seeds add a nice authenticity and fiber. The puree should be thick and concentrated for the best flavor. Simmering it briefly on the stove with a little sweetener can intensify the strawberry taste and reduce excess water, resulting in a creamier ice cream. But the fresh, raw puree is also delicious and retains more of the fresh berry brightness.
Cream Cheese and Heavy Whipping Cream – The Creamy, Dreamy Duo
Eight ounces of full-fat cream cheese, softened to room temperature, and 1 cup of cold heavy whipping cream are the foundation of this no-churn ice cream. The cream cheese adds a rich, tangy, cheesecake-like flavor and a dense, creamy body that prevents the ice cream from freezing into a solid block. It also helps emulsify the mixture, keeping it smooth. The heavy cream is whipped separately to stiff peaks, then folded into the cream cheese mixture. This incorporates air, giving the ice cream a light, mousse-like texture that’s still wonderfully creamy when frozen. The combination of cream cheese and whipped cream is the secret to a scoopable, no-churn ice cream that rivals any custard-based version. Use full-fat ingredients for the best results; low-fat cream cheese or milk will not provide the same richness and may result in an icy texture. The cream cheese must be softened so it blends smoothly without lumps. If you’re dairy-free, you can use a plant-based cream cheese and coconut cream (the thick part from a chilled can of full-fat coconut milk). The flavor will be slightly different but still delicious. The key is to whip the cream to stiff peaks, which gives the ice cream its volume and light mouthfeel. Fold gently to preserve the air, and you’ll have a dreamy, cloud-like strawberry cream that freezes into perfection.
Powdered Sugar-Free Sweetener – The Guilt-Free Sweetness
You’ll need about ½ cup of a powdered sugar-free sweetener, such as confectioners-style erythritol (Swerve) or a monk fruit blend. Powdered sweetener is crucial because it dissolves completely into the cream cheese and strawberry puree, leaving no gritty texture. Granulated sweeteners can remain crunchy and unpleasant in a frozen dessert. The sweetener should be added gradually, and you can taste the mixture before freezing to adjust the sweetness to your preference. Different brands have varying levels of sweetness, so start with a little and add more as needed. You can also use liquid stevia or monk fruit drops to boost sweetness without adding bulk. The sweetener allows the natural strawberry flavor to shine, without any of the carbs or calories of sugar. It’s what makes these ice cream cups safe for diabetics and keto diets. If you’re not strictly sugar-free, you could use honey or maple syrup, but the recipe would no longer be low-carb. The powdered sweetener is the key to achieving a smooth, professional-quality frozen dessert. Don’t skip the step of using a powdered form. If you only have granulated, you can blitz it in a blender until it becomes a fine powder. This simple step makes all the difference in texture. The sweetener also helps lower the freezing point slightly, which contributes to a softer, more scoopable ice cream. Combined with the fat from the cream cheese and cream, you get a dessert that’s easy to scoop straight from the freezer, no waiting required.
Vanilla Extract, Lemon Juice, and a Pinch of Salt – The Flavor Enhancers
A teaspoon of pure vanilla extract adds a warm, aromatic note that rounds out the strawberry and cream flavors. A squeeze of fresh lemon juice (about 1 teaspoon) brightens the fruit and balances the sweetness. A tiny pinch of salt enhances all the flavors and makes the sweetness pop. These small additions make a big difference, elevating the ice cream from a simple frozen treat to something that tastes complex and thoughtfully made. The lemon juice also helps preserve the bright red color of the strawberries. You can also add a teaspoon of strawberry extract if you want an even more intense berry flavor. These ingredients are stirred into the cream cheese mixture before folding in the whipped cream. They’re the little details that make the final product taste like a high-end ice cream. Don’t omit the salt—it’s the secret to making desserts taste balanced, not flat. The vanilla is the comforting background note, and the lemon is the bright, high note that makes the strawberry flavor sparkle. Together, they create a perfectly balanced flavor profile that will have everyone asking for the recipe.
Step-by-Step: From Crust to Freezer
Follow these detailed steps for perfectly creamy, crunchy, sugar-free strawberry ice cream cups every time.
Step 1: Prepare the Crust
In a small bowl, combine the almond flour, melted butter, and powdered sweetener. Stir with a fork until the mixture resembles damp sand and holds together when squeezed. Line a standard 12-cup muffin tin with parchment paper liners (or use silicone muffin cups for easy removal). Divide the crust mixture evenly among the cups (about 1 heaping tablespoon per cup). Use the back of a spoon, the bottom of a small glass, or your fingers to press the crust firmly and evenly into the bottom of each liner. Place the muffin tin in the refrigerator to chill while you prepare the filling. Chilling helps the butter solidify, creating a firmer crust that won’t float up when you add the ice cream. If you prefer a crispier crust, you can bake it at 350°F for 8–10 minutes until lightly golden, then cool completely before filling. However, the no-bake version works perfectly and saves time. The crust will set up beautifully in the freezer either way. This simple, nutty base is the perfect counterpoint to the creamy, fruity filling.
Step 2: Make the Strawberry Puree
Wash and hull 1 cup of fresh strawberries. Set aside a few berries (about ¼ cup) to chop into small pieces for folding in later. Place the remaining berries in a blender or food processor, along with the lemon juice. Blend until completely smooth. You should have a thick, vibrant pink puree. If you prefer a seedless puree, you can strain it through a fine-mesh sieve, but this is optional. Set the puree aside. If your strawberries are not very sweet, you can taste the puree and add a teaspoon of powdered sweetener to it. The puree will be the source of that intense strawberry flavor and color. If using frozen strawberries, thaw them completely and drain off any excess water before pureeing to avoid a watery ice cream. The puree is now ready to be incorporated into the creamy base. It smells like a strawberry field and is the heart of this dessert.
Step 3: Whip the Cream and Beat the Cream Cheese
In a large, clean mixing bowl, use a hand mixer or stand mixer with the whisk attachment to whip the cold heavy cream until stiff peaks form. This means the cream holds its shape firmly when you lift the beaters. Be careful not to overwhip, or it will turn into butter. Set the whipped cream aside in the refrigerator while you prepare the cream cheese mixture. In another large bowl, beat the softened cream cheese with the powdered sweetener, vanilla extract, and a pinch of salt. Beat on medium speed until the mixture is completely smooth, creamy, and free of lumps. Scrape down the sides of the bowl as needed. The cream cheese should be soft enough that it blends effortlessly; if it’s too cold, it will leave lumps. Gradually beat in the strawberry puree until the mixture is uniformly pink and well combined. The mixture will be thick and luscious, like a strawberry cheesecake batter. Now it’s time to bring everything together.
Step 4: Fold the Whipped Cream into the Strawberry Cream Cheese
Using a rubber spatula, gently fold about one-third of the whipped cream into the strawberry cream cheese mixture to lighten it. Then add the remaining whipped cream and fold with slow, sweeping motions until no white streaks remain. The mixture should be thick, airy, and a beautiful pale pink color. Be careful not to overfold, or you’ll deflate the air and the ice cream will be denser. Finally, fold in the reserved chopped strawberries, distributing them evenly. The mixture is now your no-churn strawberry ice cream base. It should be light, fluffy, and bursting with strawberry flavor. Taste and adjust sweetness if needed—remember, the flavors will mute slightly once frozen, so it should taste just a little sweeter than you think you want.
Step 5: Assemble the Cups and Freeze
Remove the muffin tin with the chilled crusts from the refrigerator. Spoon the strawberry ice cream mixture evenly over each crust, filling the cups nearly to the top. Smooth the tops with the back of a spoon or a small offset spatula. You can also pipe the mixture into the cups for a more decorative look. If desired, swirl a little sugar-free strawberry jam on top of each cup and use a toothpick to create a marbled pattern. This adds an extra burst of fruity flavor and a beautiful presentation. Cover the muffin tin loosely with plastic wrap and place it in the freezer. Freeze for at least 4–6 hours, or preferably overnight, until the ice cream cups are completely firm. The longer they freeze, the more set they’ll be. The individual cups freeze faster than a large loaf pan, making this a great last-minute dessert option. The cream cheese and heavy cream prevent them from freezing into solid bricks; they’ll be perfectly scoopable even straight from the freezer.
Step 6: Unmold, Garnish, and Serve
To serve, let the muffin tin sit at room temperature for about 5 minutes to loosen the cups. If you used parchment liners, simply lift them out. If you used silicone molds, pop the cups out gently. If you used a greased muffin tin without liners, run a thin knife around the edges to release them. Place the ice cream cups on a serving plate, top with a dollop of sugar-free whipped cream, a fresh strawberry slice, and a sprinkle of crushed nuts or a drizzle of melted sugar-free chocolate. A sprig of fresh mint adds a beautiful, refreshing finish. Serve immediately while still firm and cold. The combination of the crunchy crust, the creamy strawberry ice cream, and the fresh toppings is absolutely divine. Watch as everyone’s eyes light up—they won’t believe these are sugar-free. Enjoy every creamy, fruity, guilt-free bite.
Pro Tips for the Creamiest Texture and Perfect Crunch
- Use a powdered sweetener, not granulated. This is the single most important tip for a smooth, non-gritty ice cream. Granulated sweeteners do not dissolve in the cold mixture and will leave an unpleasant, crunchy texture. Powdered erythritol or monk fruit blends dissolve seamlessly and keep the ice cream velvety. If you only have granulated, blitz it in a blender or coffee grinder until it becomes a fine powder. This small step makes all the difference between a good sugar-free dessert and a great one.
- Whip the cream to stiff peaks, but don’t overwhip. Stiff peaks mean the cream holds its shape firmly and doesn’t droop when you lift the beaters. This gives the ice cream its light, airy texture. If you underwhip, the mixture will be too loose and may not set properly. If you overwhip, the cream will become grainy and start to turn into butter. Watch closely and stop as soon as the peaks stand tall. The whipped cream is what creates the volume and scoopability of this no-churn ice cream.
- Chill the crust before adding the filling. Placing the muffin tin with the pressed crusts in the refrigerator for at least 15 minutes helps the butter solidify, so the crust stays firm and doesn’t float up or mix into the ice cream when you spoon the filling on top. A cold crust also provides a better texture contrast. You can even pop the tin in the freezer for a few minutes while you make the filling. The firmer the crust, the more distinct the layers will be, giving you that beautiful crunch at the bottom of each cup.
- Fold the whipped cream gently to keep the mixture light. When combining the whipped cream with the cream cheese mixture, use a spatula and a light hand. Cut down through the center, scrape along the bottom, and lift the mixture up and over. Stop as soon as the ingredients are combined. Overmixing will deflate the air bubbles and result in a denser, icier ice cream. A few small streaks of white are okay; they’ll disappear as you continue to work. The air trapped in the whipped cream is what makes the ice cream so creamy and smooth.
- Let the cups sit at room temperature for a few minutes before serving. Straight from the freezer, the ice cream cups will be very firm. Allowing them to rest for about 5 minutes at room temperature softens them just enough to be perfectly scoopable and brings out the full strawberry flavor. The texture becomes even creamier as it warms slightly. Don’t let them sit too long, or they’ll melt. If you’re in a hurry, you can microwave a cup for 10–15 seconds, but be careful not to let the crust get soft. A few minutes at room temp is the ideal method.
Flavor Twists & Customizations
Once you’ve made the classic strawberry version, try these delicious variations to keep things fresh and exciting.
- Mixed Berry Ice Cream Cups: Replace half the strawberries with an equal amount of raspberries, blueberries, or blackberries. You can use a mix of whatever berries are in season. The flavor will be slightly more tart and complex. A swirl of sugar-free mixed berry jam adds an extra fruity burst. The color will be a beautiful deep magenta. Garnish with a mix of fresh berries for a stunning presentation. This variation is packed with antioxidants and is just as creamy and delicious.
- Chocolate-Covered Strawberry Ice Cream Cups: After the ice cream cups are fully frozen, melt ½ cup of sugar-free dark chocolate chips with 1 teaspoon of coconut oil. Dip the top of each cup into the melted chocolate, or drizzle it over the top. The chocolate will harden within minutes, creating a crackly, snappy shell. This version is a nod to the classic chocolate-covered strawberry and is absolutely decadent. Sprinkle with a tiny pinch of flaky sea salt on the wet chocolate for a gourmet touch.
- Lemon Strawberry Cheesecake Cups: Add the zest of one lemon to the cream cheese mixture, and increase the lemon juice slightly. The bright citrus elevates the strawberry flavor and adds a refreshing zing. Top each cup with a small dollop of sugar-free lemon curd before freezing. The combination of lemon and strawberry is classic and incredibly refreshing. A sprinkle of crushed sugar-free lemon cookies on top adds a delightful crunch.
- Peach Melba Ice Cream Cups: Replace the strawberries with an equal amount of ripe, peeled, and pureed peaches. Add a swirl of sugar-free raspberry jam for the classic Melba combination. The peaches provide a mellow, sweet flavor that pairs beautifully with the tangy cream cheese. Top with fresh raspberries and a few sliced almonds. This version tastes like a summer orchard in frozen form. It’s elegant, colorful, and perfect for a garden party.
- Pina Colada Ice Cream Cups: Replace the strawberries with ½ cup of pineapple puree (cooked down to reduce moisture) and add 1 teaspoon of coconut extract to the cream cheese mixture. Use a macadamia nut crust instead of almond flour, or add ¼ cup of toasted shredded coconut to the crust. Top with toasted coconut flakes and a drizzle of sugar-free caramel. This tropical twist is like a beach vacation in a cup. The pineapple and coconut flavors are a match made in heaven, and the creamy texture is irresistible.
Serving, Decorating & Party Ideas
These sugar-free strawberry ice cream cups are a stunning addition to any dessert table. Present them on a chilled platter, each cup in its parchment liner for easy grabbing. For a more formal presentation, unmold the cups onto small dessert plates and garnish with a rosette of sugar-free whipped cream, a fresh strawberry fan, and a mint leaf. You can also serve them in small, clear glass jars or ramekins, layering the crust and ice cream for a beautiful parfait effect. For a kid’s birthday party, set up a “decorate your own ice cream cup” station with bowls of sugar-free chocolate chips, chopped nuts, shredded coconut, and sugar-free sprinkles. The kids will love customizing their own treat. For a summer barbecue, arrange the cups on a large tray with an assortment of fresh berries and a pitcher of sugar-free lemonade. These cups are also a great make-ahead dessert for a dinner party—just pull them out of the freezer, garnish, and serve. Pair them with a glass of rosé or a sparkling water with a slice of lemon for a refreshing finish. No matter how you serve them, they’re guaranteed to be a conversation starter and a crowd-pleaser. And because they’re sugar-free, everyone can indulge without worry. The vibrant pink color and the creamy, dreamy texture are simply irresistible. Enjoy the smiles and the empty cups—they’re the highest compliment a dessert can receive.
Storage, Freezing & Make-Ahead
Make-Ahead: These ice cream cups are perfect for making ahead. You can prepare them up to a week in advance and store them in the freezer. In fact, they need at least 4–6 hours to freeze, so making them the night before a party is ideal. The crust and filling can also be prepared separately ahead of time: make the crust, press it into the cups, and refrigerate; make the ice cream base and keep it covered in the fridge for up to 24 hours. When ready, simply assemble and freeze. This is a great strategy for stress-free entertaining.
Storing: Once the cups are fully frozen, you can transfer them to an airtight, freezer-safe container, with parchment paper between layers to prevent sticking. They will keep well in the freezer for up to 2 weeks. After that, they may start to develop ice crystals, but they’ll still be delicious. If you used parchment liners, you can simply twist the tops closed and store them in a freezer bag. The crust may soften slightly over time, but the flavor remains excellent. To maintain the best texture, store them toward the back of the freezer where the temperature is most constant.
Thawing to Serve: Remove the desired number of cups from the freezer and let them sit at room temperature for 5–10 minutes before serving. This brief rest allows the ice cream to soften to a perfectly scoopable consistency and brings out the full strawberry flavor. Do not thaw them completely; they should still be firm and cold. If you’re in a hurry, a 10–15 second zap in the microwave can help, but the gradual thaw on the counter yields the best texture. Serve immediately after softening. The cups should not be refrozen once fully thawed; enjoy them fresh for the best experience.
Want the full recipe and simple step-by-step instructions?
Page 2 continues with the full ingredients, cooking tips, and easy directions so you can make this recipe perfectly at home.