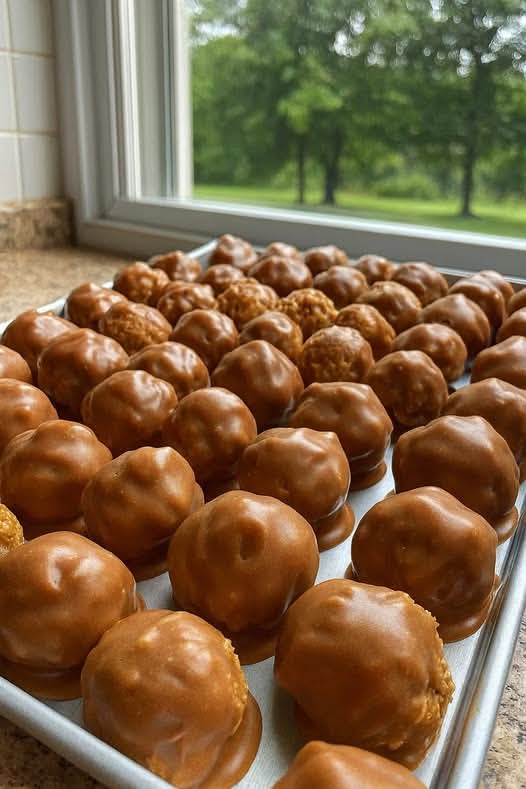
Some recipes aren’t just written on index cards—they’re etched into your heart, tied to memories of a warm kitchen, a flour-dusted apron, and the sweet, nutty scent of peanut butter and melted chocolate drifting through the house. Grandma’s Peanut Butter Balls are exactly that kind of recipe. With a creamy, slightly crunchy peanut butter filling that’s whipped together with butter, powdered sugar, and crispy rice cereal, then dipped in a glossy coat of semi-sweet chocolate, these little confections are pure, nostalgic bliss. They’re the no-bake treat that shows up at every Christmas cookie exchange, every family reunion, and every holiday dessert table, and they’re always the first to disappear. One bite delivers the perfect balance of rich chocolate, salty peanut butter, and that delicate crackle of the coating giving way to the velvety center. Whether you call them Buckeyes, peanut butter bonbons, or simply Grandma’s peanut butter balls, this recipe is a timeless treasure that deserves a permanent spot in your collection. It’s easy enough for a beginner, yet so delicious that even the most discerning sweet tooth will be utterly charmed.
What makes this version so special is the combination of a few simple, high-quality ingredients and a foolproof technique that’s been passed down through generations. The filling is a luscious blend of creamy peanut butter, softened butter, plenty of powdered sugar for structure and sweetness, and just enough crispy rice cereal to give it that subtle, satisfying crunch that contrasts with the smooth chocolate shell. There are no complicated steps, no ovens, and no candy thermometers required—just a mixing bowl, a sturdy spoon, and a little patience while the balls chill before dipping. The result is a candy that looks like it came from a fancy chocolate shop, yet tastes like a hug from your grandmother. You can customize them with dark chocolate, white chocolate, or a drizzle of both. You can roll them in sprinkles, crushed nuts, or a dusting of flaky sea salt. You can even make them keto-friendly, dairy-free, or vegan with a few simple swaps. But the classic version, made with love and shared with the people who matter most, is the one that will make you the most popular person at any gathering. This is the recipe that will become your signature, just as it was Grandma’s before you.
In this comprehensive guide, I’ll walk you through every detail of making the most irresistible peanut butter balls you’ve ever tasted. We’ll dive deep into the ingredients, explore the secrets to achieving the perfect texture and a flawless chocolate coating, share dozens of creative variations, and provide all the tips for storing, gifting, and even freezing these little gems. Whether you’re a lifelong fan or making them for the very first time, this recipe is destined to become a cherished tradition in your home. Let’s gather our ingredients and get ready to roll up some memories.
Why You’ll Love Grandma’s Peanut Butter Balls
No-bake, fuss-free, and ready in a flash. When the holiday season is in full swing, the last thing you need is a complicated dessert that requires hours in the kitchen. These peanut butter balls are completely no-bake, which means your oven stays off and your house stays cool. The active time is about 30 minutes, and the rest is hands-off chilling. It’s the perfect recipe for busy days, last-minute gatherings, or baking with kids who love to help roll the dough into little spheres. You can even make the filling ahead of time and dip them later, spreading the work over a couple of days.
An irresistible combination of creamy and crunchy. The filling is a textural masterpiece. Creamy peanut butter and butter create a rich, melt-in-your-mouth base, while the powdered sugar sweetens it and gives it structure. The optional crispy rice cereal adds a light, airy crunch that takes these balls from great to legendary. Then there’s the chocolate coating—a thin, snappy shell of semi-sweet or dark chocolate that encases each bite. The contrast between the smooth, cool peanut butter center and the firm chocolate exterior is utterly addictive. It’s the perfect balance of salty and sweet, creamy and crisp.
Made from simple, real ingredients you can trust. Grandma’s recipe doesn’t rely on corn syrup, preservatives, or artificial flavors. It’s just peanut butter, butter, powdered sugar, and a few pantry staples. You know exactly what’s going into each ball, which means you can feel good about serving them to your family. You can choose a natural peanut butter, organic powdered sugar, and high-quality chocolate to make them as clean as you like. And because they’re so rich, one or two balls is a perfectly satisfying treat—no need to overindulge (though it’s tempting!).
Endlessly customizable and perfect for any occasion. While the classic milk or semi-sweet chocolate coating is timeless, you can dress these balls up in countless ways. Roll them in crushed peanuts, colored sprinkles, shredded coconut, or a dusting of cocoa powder. Drizzle them with white chocolate or caramel. Add a pinch of sea salt on top for a salted peanut butter cup vibe. Swap the peanut butter for almond butter, cookie butter, or sunflower seed butter for different flavors. You can even make them keto-friendly with a sugar-free sweetener and sugar-free chocolate. Whether you’re filling a holiday cookie box, contributing to a bake sale, or just treating yourself on a Tuesday, these peanut butter balls are the answer.
Ingredient Deep Dive: The Simple, Creamy Lineup
The ingredient list is beautifully short, but each component plays a crucial role in the final taste and texture. Let’s break them down.
Creamy Peanut Butter – The Rich, Nutty Heart
You’ll need one cup of creamy, conventional peanut butter (like Jif or Skippy) for the most reliable texture. These brands contain added oils and sugar that help the filling hold its shape and prevent it from separating. Natural peanut butter (the kind that separates) can be used, but the filling may be oilier and softer, making it harder to roll. If you do use natural, make sure it’s well-stirred and thoroughly combined, and you may need to add a little extra powdered sugar to achieve the right consistency. For a crunchier filling, you can use chunky peanut butter, but the creamy version is classic and yields a smooth, velvety center. The peanut butter is the star of the show, so choose one you love. Its salty, nutty flavor will shine through the chocolate and the sweetness. For a nut-free alternative, sunflower seed butter or soy nut butter can be used, though the taste will be different. The key is to use a no-stir, thick spread for the most stable dough.
Unsalted Butter – The Silky, Melt-in-Your-Mouth Magic
Half a cup (one stick) of unsalted butter, softened to room temperature, is beaten with the peanut butter and sugar to create a smooth, creamy, and slightly fluffy filling. The butter adds richness and a luxurious mouthfeel, making the center of each ball literally melt on your tongue. It also helps the filling firm up when chilled, so the balls hold their shape during dipping. Make sure the butter is truly softened—if it’s too cold, it won’t mix smoothly, leaving lumps. If it’s melted, the filling will be too soft and greasy. Leave it on the counter for about an hour before you start. You can use salted butter if that’s all you have; just reduce or omit the added salt in the recipe. For a dairy-free version, a high-quality plant-based butter (like Earth Balance) works surprisingly well, though the balls may be a bit softer and need longer chilling. The butter also helps bind the powdered sugar and rice cereal together, creating a cohesive dough that’s easy to scoop and roll. Don’t skip it—it’s what makes these peanut butter balls taste like Grandma’s.
Powdered Sugar – The Sweetness and Structure
Three to three and a half cups of powdered sugar (also called confectioners’ sugar) sweeten the filling and give it the firm, pliable texture needed to form smooth balls. Powdered sugar is essential because it dissolves completely into the peanut butter and butter, leaving no gritty texture. It also absorbs moisture and helps the filling set up firmly when chilled. If you use too little sugar, the balls will be too soft to dip and may collapse. If you use too much, they’ll be dry and overly sweet. Start with three cups, mix it in, and feel the dough. It should be stiff enough to hold a shape when rolled, but not crumbly. You can add a bit more if needed. For a sugar-free version, use a powdered erythritol or monk fruit sweetener that measures like powdered sugar. Sift it before adding to prevent lumps. The powdered sugar is what gives these peanut butter balls their signature, candy-like sweetness, and it’s crucial for achieving the right consistency. Don’t substitute granulated sugar—it won’t work.
Crispy Rice Cereal (Optional) – The Delicate Crunch
One cup of crispy rice cereal (like Rice Krispies) is a beloved addition that gives the peanut butter balls a light, airy crunch that contrasts beautifully with the smooth filling and the firm chocolate shell. It’s Grandma’s secret ingredient—those little pockets of crispiness make each bite more interesting. You can leave it out for a completely smooth filling, but I highly recommend including it. The cereal should be fresh and crisp; stale cereal will be chewy rather than crunchy. Gently fold it into the peanut butter mixture by hand after beating the other ingredients to avoid crushing it. If you don’t have rice cereal, you can substitute with an equal amount of crushed graham crackers, vanilla wafer crumbs, or even crushed pretzels for a salty twist. The cereal also helps lighten the density of the filling, making each ball feel less heavy. It’s a small addition with a big impact, and it’s one of the things that sets this recipe apart from a standard buckeye or peanut butter ball. The subtle crackle is part of the nostalgia—it’s what you remember from childhood.
Chocolate Coating – The Glossy, Snappy Shell
Twelve ounces of semi-sweet chocolate chips (or chopped chocolate) are melted with a tablespoon of coconut oil or vegetable shortening. The chocolate coating is what transforms the peanut butter filling into a finished candy. Semi-sweet chocolate is classic, offering a balanced sweetness that complements the salty peanut butter. You can use milk chocolate for a sweeter, creamier shell, or dark chocolate (60-72% cacao) for a more sophisticated, less sweet finish. The coconut oil or shortening thins the chocolate slightly, making it easier to dip, and it helps the chocolate set with a glossy sheen and a pleasant snap. You can also use chocolate melting wafers or candy melts, which don’t require any added oil and set up beautifully—they’re a foolproof choice if you’re nervous about tempering. The chocolate should be melted gently, either in a double boiler or in the microwave in 30-second bursts, stirring frequently. Overheated chocolate can seize and become grainy, so take your time. The coating is the final, crowning touch that makes these peanut butter balls look like they came from a professional chocolatier. A smooth, even coating is the goal, but a few little drips and imperfections add to the homemade charm.
Step-by-Step: Mixing, Rolling, Dipping, and Devouring
These peanut butter balls are easy to make, but following these detailed steps will ensure a flawless result every time.
Step 1: Make the Peanut Butter Filling
In a large mixing bowl, beat the softened butter with an electric mixer on medium speed until it’s smooth and creamy, about 1–2 minutes. Add the peanut butter and beat again until the mixture is well combined and fluffy, scraping down the sides of the bowl as needed. Gradually add the powdered sugar, about 1 cup at a time, mixing on low speed to avoid a sugar cloud. Once all the sugar is incorporated, the mixture will be thick and slightly crumbly. Add a pinch of salt if your peanut butter is unsalted, and a teaspoon of vanilla extract for warmth. If you’re using crispy rice cereal, fold it in gently by hand with a spatula until it’s evenly distributed. The dough should be firm enough to scoop and roll without sticking to your hands. If it’s too soft, refrigerate it for 15–20 minutes to firm up. If it’s too dry, add a teaspoon of milk or cream, but be careful not to add too much liquid. The dough should hold together when squeezed and feel like a soft, pliable Play-Doh.
Step 2: Roll into Balls
Line a large baking sheet with parchment paper or wax paper. Using a small cookie scoop (about 1 tablespoon capacity) or a teaspoon, portion out the peanut butter mixture and roll it between your palms into smooth, uniform balls. Aim for about 1 inch in diameter. If the dough sticks to your hands, you can lightly dust your palms with powdered sugar or grease them with a tiny bit of butter. Place the rolled balls on the prepared baking sheet. You should get about 30–36 balls, depending on the size. Once all the balls are rolled, place the baking sheet in the freezer for 30 minutes to 1 hour, or in the refrigerator for at least 2 hours. The balls need to be very cold and firm before dipping, or they’ll fall apart in the warm chocolate. They should feel solid and chilled all the way through. This step is crucial for a clean dip and a smooth coating.
Step 3: Melt the Chocolate
While the balls chill, prepare the chocolate coating. Place the semi-sweet chocolate chips and coconut oil (or shortening) in a microwave-safe bowl. Microwave in 30-second bursts, stirring thoroughly between each burst, until the chocolate is completely melted and smooth. This usually takes 1½ to 2 minutes total. Alternatively, you can melt the chocolate in a heatproof bowl set over a pot of barely simmering water (a double boiler), stirring constantly. The chocolate should be fluid but not scorching hot. Let it cool for 2–3 minutes so it’s still pourable but not so hot that it melts the chilled peanut butter balls. A good test is to dip a spoon in the chocolate and let it drip; it should coat the spoon thickly and set slowly. If the chocolate seems too thick, add a tiny bit more coconut oil to thin it. If it’s too thin, let it cool slightly. You want a consistency that will cling to the balls and form a nice, even shell.
Step 4: Dip the Balls
Remove the chilled peanut butter balls from the freezer or fridge. Working one at a time, drop a ball into the melted chocolate. Use a fork to roll it around, ensuring it’s fully coated. Lift the ball out of the chocolate with the fork, letting the excess chocolate drip back into the bowl. Gently tap the fork against the side of the bowl to remove any drips. Then, use a toothpick or a second fork to carefully slide the coated ball off the fork and onto a parchment-lined baking sheet. Repeat with the remaining balls. If the chocolate in the bowl starts to thicken as it cools, you can reheat it gently in the microwave for 10–15 seconds. If the peanut butter balls start to soften too much while you’re dipping, return the baking sheet to the freezer for a few minutes. The dipping process should be done efficiently but without rushing. Once all the balls are coated, you can drizzle any remaining chocolate over the tops with a fork for a decorative finish, or sprinkle them with flaky sea salt, crushed peanuts, or sprinkles while the chocolate is still wet. Let the balls sit at room temperature until the chocolate is fully set, about 1 hour. You can also place the baking sheet in the refrigerator for 15–20 minutes to speed up the setting process. The chocolate should be firm and no longer tacky to the touch.
Step 5: Store and Enjoy
Once the chocolate is completely set, the peanut butter balls are ready to enjoy. Transfer them to an airtight container, separating layers with parchment or wax paper. They can be stored at room temperature for up to a week, in the refrigerator for up to two weeks, or in the freezer for several months. The flavor actually improves after a day or two as the filling and chocolate meld together. Serve them chilled or at room temperature—both are divine. A chilled ball will have a firmer, slightly snappier chocolate coating, while a room-temperature ball will be softer and creamier. Either way, you’re in for a treat that tastes like love, wrapped in chocolate.
Pro Tips for Perfectly Smooth, Crack-Free Balls
- Chill the balls thoroughly before dipping. This is the most important step for a clean, even chocolate coating. If the balls are even slightly warm, the chocolate will slide off, pool at the base, or cause the filling to soften and smear into the coating. At least 30 minutes in the freezer or 2 hours in the refrigerator is essential. They should feel like little rocks when you take them out. If they start to soften during dipping, pop the tray back in the freezer for 5–10 minutes. Cold balls also help the chocolate set faster, creating a thicker, more even shell.
- Use the right peanut butter for the job. Commercial creamy peanut butter (like Jif or Skippy) is formulated to be thick and stable, which makes a huge difference in how the filling holds together. Natural peanut butter, with its separated oil, can make the filling too soft, greasy, and difficult to roll. If you must use natural peanut butter, make sure it’s thoroughly stirred and consider adding an extra ¼ cup of powdered sugar to absorb the excess oil. You can also refrigerate the natural peanut butter for a few hours before using to help it firm up. The goal is a dough that’s smooth and easy to handle, and the type of peanut butter is a big factor.
- Don’t overheat the chocolate. Chocolate is temperamental. If it gets too hot, it can seize—turning into a grainy, thick paste that’s impossible to work with. Melt it gently in short bursts in the microwave, stirring often. The residual heat will finish melting any remaining solid chips. The coconut oil or shortening helps keep the chocolate smooth and adds a nice shine, but it’s not a cure for overheating. If your chocolate does seize, you can sometimes rescue it by stirring in a teaspoon of neutral oil, but it’s best to start low and slow. Aim for a warm, fluid consistency that’s comfortable to touch—not hot.
- Work in small batches for dipping. Remove only a few frozen balls from the freezer at a time, leaving the rest in the cold. This keeps them as firm as possible throughout the dipping process. If you try to dip an entire tray at once, the balls will warm up and become soft, making a mess. A dozen at a time is a manageable number. Also, have your parchment-lined tray ready to go before you start dipping, so you can place the coated balls down immediately without fumbling.
- Add decorations while the chocolate is wet. If you want to top your peanut butter balls with a sprinkle of flaky salt, crushed peanuts, sprinkles, or a drizzle of contrasting chocolate, do it right after dipping, before the coating sets. The toppings will stick firmly once the chocolate hardens. For drizzles, wait until the base coat is set, then drizzle with melted chocolate of a different color and let it set again. This is an easy way to make your balls look like they came from a gourmet shop.
Flavor Twists & Customizations
Once you’ve mastered the classic recipe, try these fun variations to make the recipe your own.
- Dark Chocolate Sea Salt Peanut Butter Balls: Use a high-quality dark chocolate (70% cacao or higher) for the coating. Right after dipping, sprinkle each ball with a few flakes of Maldon sea salt. The bitterness of the dark chocolate and the pop of salt perfectly balance the sweet, creamy peanut butter filling. This version feels sophisticated and is perfect for adult holiday parties or gifting to dark chocolate lovers.
- White Chocolate Peanut Butter Balls: Replace the semi-sweet chocolate with melted white chocolate or vanilla-flavored candy melts. The sweet, milky coating pairs wonderfully with the salty peanut butter. You can tint the white chocolate with gel food coloring for holidays—pink for Valentine’s Day, green for Christmas, or pastel for Easter. A drizzle of dark chocolate over the white creates a beautiful contrast.
- Keto / Sugar-Free Peanut Butter Balls: Use a powdered erythritol or monk fruit sweetener in place of the powdered sugar. Choose a sugar-free, low-carb peanut butter and sugar-free chocolate chips. The coconut oil remains the same. These keto peanut butter balls have only a couple of net carbs each and taste just as indulgent as the original. They’re a game-changer for anyone on a low-carb or diabetic diet.
- Vegan Peanut Butter Balls: Substitute the butter with a high-quality vegan butter (like Earth Balance sticks) and use dairy-free chocolate chips. Ensure your powdered sugar is vegan (most are, but some use bone char in processing; organic is usually safe). The crispy rice cereal should also be vegan (standard Rice Krispies contain vitamin D from lanolin, but many store brands are vegan). These modifications result in a completely plant-based treat that everyone can enjoy.
- Almond Butter or Cashew Butter Balls: Swap the peanut butter for an equal amount of creamy almond butter, cashew butter, or even cookie butter (speculoos) for a completely different flavor. Almond butter pairs beautifully with dark chocolate and a sprinkle of toasted sliced almonds. Cashew butter creates an extra-creamy filling that’s incredibly luxurious. Cookie butter, while not nut-based, makes a spiced, caramel-like ball that’s outrageously good with white chocolate. Each variation brings its own personality while keeping the same simple method.
Serving, Gifting & Occasions
Grandma’s peanut butter balls are the quintessential homemade gift. Arrange them in mini cupcake liners for a tidy presentation, then pack them in a decorative tin, a clear cellophane bag tied with a ribbon, or a festive box lined with tissue paper. Include a handwritten tag with the name of the treat and a note that they’re best kept cool. For a cookie exchange, pile them on a platter with other no-bake treats like rum balls, chocolate-covered pretzels, and peppermint bark—they’ll be the star of the show. These balls are also a wonderful addition to a dessert charcuterie board, nestled among fresh berries, nuts, and chunks of chocolate. During the holidays, they’re a must on the Christmas cookie tray, and they ship well in cool weather, making them ideal for sending to loved ones far away. For a simpler occasion, keep a stash in the fridge for an after-dinner treat or a pick-me-up with your afternoon coffee. Kids adore them, adults are transported back to childhood, and everyone asks for the recipe. That’s the sign of a true classic.
Storage, Freezing & Make-Ahead
Make-Ahead: The filling can be made up to 2 days in advance. Simply cover the bowl tightly with plastic wrap and refrigerate. When you’re ready to roll, let the dough sit at room temperature for about 10–15 minutes to soften slightly, then scoop and roll as directed. You can also roll the balls and freeze them (undipped) for up to 3 months. When you’re ready to dip, there’s no need to thaw—simply dip them in the melted chocolate directly from the freezer. The cold balls will help the chocolate set quickly and evenly. This is a huge time-saver for the holidays; you can do the rolling on a free afternoon and the dipping closer to the event.
Storing: Once the chocolate coating is fully set, store the peanut butter balls in an airtight container, with layers separated by parchment paper or wax paper. They will keep at room temperature for up to 1 week (if your kitchen is cool—below 70°F). In the refrigerator, they’ll stay fresh for up to 2 weeks. The chilled version is especially refreshing, with a firmer chocolate shell and a cool, creamy center. The flavor continues to develop as they sit, so they’re actually better a day or two after making.
Freezing: These balls freeze beautifully. Place the fully set balls in a single layer in a freezer-safe container, with parchment between layers. Freeze for up to 3 months. There’s no need to thaw them—you can eat them straight from the freezer for a firmer, ice-cream-like treat, or let them sit at room temperature for about 10 minutes to soften. Freezing is a fantastic way to get a jump on holiday baking, and it also means you can have a stash of homemade candy ready whenever a craving strikes. The chocolate coating remains snappy and the filling stays creamy, with no loss of texture or flavor.
Want the full recipe and simple step-by-step instructions?
Page 2 continues with the full ingredients, cooking tips, and easy directions so you can make this recipe perfectly at home.