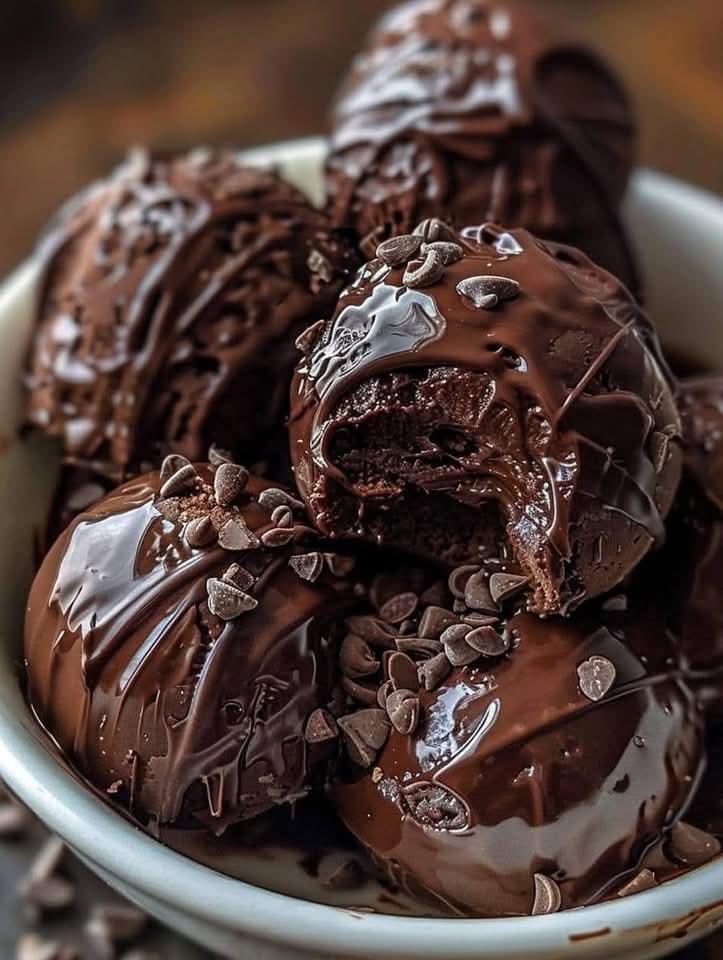
Sometimes you need a dessert that’s pure, unapologetic indulgence—the kind of treat that stops conversation the moment it hits the table. These No-Bake Triple Chocolate Brownie Bombs are exactly that. Imagine a velvety, brownie-based truffle center, studded with mini chocolate chips and wrapped in a glossy, snappable dark chocolate shell. Each bite delivers an explosion of deep cocoa flavor, from the fudgy interior to the smooth coating and the whisper of chocolate frosting that binds it all together. They’re impossibly rich, silky on the tongue, and require absolutely no oven time—just a bowl, a spoon, and a serious chocolate craving.
This recipe is for the true chocolate devotee. It takes leftover brownies (or a quick-baked batch, if you have the time) and transforms them into something that looks and tastes like a high-end confection. But the real beauty lies in the effortless assembly: cream cheese and chocolate frosting create a luscious, moldable dough, while melted semi-sweet chocolate sets into a crackly, elegant exterior. You don’t need a candy thermometer, a double boiler, or any fancy equipment—just a microwave, a fridge, and about twenty minutes of hands-on time. The result is a truffle that rivals anything you’d find in a chocolate shop, made entirely from pantry staples.
Whether you’re preparing a dessert tray for a holiday party, crafting edible gifts for friends, or simply stocking the freezer with a secret stash of after-dinner treats, these brownie bombs are destined to become your new favorite indulgence. In this guide, we’ll dive into every detail: the best base to use for the brownie crumbs, how to achieve that perfect glossy coating, creative ways to customize the flavors, and all the make-ahead and storage tricks to keep them at their peak. Let’s get rolling—literally.
Why You’ll Love These Brownie Bombs
A triple threat of chocolate in every bite. We’re talking about a fudgy brownie crumb center, a creamy chocolate cream cheese binder, mini chocolate chips for extra pops of texture, and a glossy semi-sweet chocolate shell. It’s chocolate on chocolate on chocolate—balanced with just enough tang from the cream cheese to keep it from becoming cloying. The result is a truffle that’s luxuriously rich but not heavy, with a finish so smooth it melts on your tongue.
Zero baking required, yet utterly decadent. This is the ultimate no-bake dessert for hot summer days, busy holiday seasons, or any time you need an impressive sweet with minimal effort. The only heat involved is melting the chocolate for the coating, which can be done in the microwave in 30-second bursts. Everything else is mixing, rolling, and chilling—so simple that even kids can help shape the little spheres.
A brilliant way to use up leftover brownies or cake. Did the edges of your pan of brownies turn out a little too crisp? Did a chocolate cake fail to rise? Instead of tossing the crumbly bits, crush them up and turn them into the base for these truffles. It’s a waste-not, want-not solution that yields a dessert far greater than the sum of its parts. You can even use store-bought brownie bites or chocolate wafer cookies in a pinch.
Gorgeous, giftable, and party-ready. Once dipped and decorated, these little bombs look like they belong in a glass case. Arrange them on a platter with a dusting of cocoa powder and a scattering of chocolate shavings, and they instantly become the centerpiece of any dessert table. They also make a heartfelt edible gift: tuck a few into mini cupcake liners inside a pretty box, and you’ve got a homemade present that far surpasses anything store-bought.
Ingredient Breakdown: The Triple Chocolate Lineup
Each ingredient plays a key role in texture and flavor. Here’s what you need and why.
1. Brownie Crumbs or Chocolate Cake Crumbs – The Fudgy Foundation
You’ll need 2 cups of finely crushed brownie or chocolate cake crumbs. If you’re starting from scratch, bake a simple box mix brownie and let it cool completely before crumbling. The brownies should be moist but not underdone; a slightly overbaked edge brownie works especially well because it provides a sturdier crumb that absorbs the cream cheese without turning to paste. You can also use purchased brownie bites, soft-baked chocolate cookies, or even a rich chocolate loaf cake. The key is to avoid anything too dry or crumbly; the crumbs should be tender and slightly oily to the touch. Pulse them in a food processor for a uniform texture, or place them in a zip-top bag and crush them with a rolling pin.
2. Cream Cheese – The Tangy Binder
Four ounces of full-fat cream cheese, softened to room temperature, provides the creamy, luxurious body that holds the truffles together. Its subtle tang is essential—it cuts through the intense sweetness of the chocolate, creating a more complex, adult-friendly flavor. Make sure the cream cheese is truly soft; if it’s too cold, it won’t blend smoothly and you’ll end up with white flecks in your dark chocolate center. Leave it on the counter for an hour, or microwave it in 10-second bursts until it’s easily squished. Do not use whipped cream cheese or the tub-style spread, as they contain more moisture and can make the mixture too soft to shape.
3. Chocolate Frosting or Ganache – The Flavor Amplifier
Half a cup of prepared chocolate frosting (from a can or homemade) or thick chocolate ganache adds an extra layer of sweetness and richness that pushes these truffles into triple-chocolate territory. The frosting helps bind the dry crumbs into a cohesive, moldable mass while contributing a silky mouthfeel. If using canned frosting, choose a high-quality brand with a deep chocolate flavor. For a slightly less sweet version, use a dark chocolate ganache made from equal parts melted dark chocolate and heavy cream. The frosting also adds moisture, so if your mixture feels too sticky, you can adjust by adding more crumbs or a spoonful of cocoa powder.
4. Semi-Sweet Chocolate Chips – The Coating & Inner Crunch
You’ll use 1 cup of semi-sweet chocolate chips for the dipping coating, and another ½ cup of mini chocolate chips folded into the center. Semi-sweet chocolate has just the right balance of cocoa and sugar to complement the already-sweet interior without overwhelming it. For the dipping chocolate, you can also use dark chocolate (60-70% cacao) if you prefer a more intense, less sugary finish. The mini chips in the middle add a delightful little crunch that contrasts with the creamy center and the firm outer shell. You can even use white chocolate chips for the coating if you want a striking black-and-white look.
5. Cocoa Powder, Vanilla & Salt – The Flavor Balancers
A tablespoon of unsweetened cocoa powder intensifies the chocolate flavor without adding additional sugar, giving the truffles a deeper, almost fudge-like taste. Pure vanilla extract rounds out the flavors with its warm, aromatic sweetness, and a tiny pinch of salt is the secret that makes everything pop. Salt suppresses bitterness and enhances the perception of sweetness, so even though the amount is minuscule, its impact is huge. Don’t skip it.
Step-by-Step: Roll, Chill, Coat
This recipe is incredibly forgiving. Follow these detailed steps for truffles that look like they came from a professional chocolatier.
Step 1: Prepare the Brownie Mixture
Place 2 cups of fine brownie or chocolate cake crumbs in a large mixing bowl. Add the softened cream cheese, chocolate frosting (or ganache), vanilla extract, cocoa powder, and a pinch of salt. Using a rubber spatula or your clean hands, mix everything together until a thick, sticky, uniform dough forms. It should hold together when pressed but not be so wet that it leaves a residue on your fingers. If it feels too dry and crumbly, add a teaspoon of extra frosting or cream cheese; if it’s too sticky, incorporate an additional tablespoon of crumbs or a dusting of cocoa powder. Fold in the ½ cup of mini chocolate chips until they are evenly distributed.
Step 2: Shape the Truffles
Using a small cookie scoop (about 1 tablespoon capacity) or a spoon, portion out the mixture and roll each portion between your palms into a smooth ball. If the mixture sticks to your hands, lightly dampen your hands with cold water or rub a tiny bit of neutral oil on them. You should end up with about 18 to 24 balls, depending on their size. Place them on a parchment-lined baking sheet or tray, leaving a little space between each one.
Step 3: First Chill
Slide the tray into the refrigerator and chill the balls for 30 minutes, or place them in the freezer for 15 minutes, until they are firm to the touch. This step is critical: warm truffles will melt the coating chocolate and cause it to slide off. You want the centers to be cold and solid enough to handle easily.
Step 4: Melt the Coating Chocolate
While the truffle centers chill, melt the 1 cup of semi-sweet chocolate chips. Place them in a microwave-safe bowl and heat in 30-second intervals, stirring thoroughly between each, until the chocolate is completely smooth and glossy. This should take 1 to 1½ minutes total. Alternatively, use a double boiler: set a heatproof bowl over a pot of barely simmering water and stir until melted. Let the melted chocolate cool for about 2–3 minutes—it should still be fluid but not so hot that it melts the truffle centers on contact.
Step 5: Dip and Coat
One at a time, drop a chilled truffle ball into the melted chocolate. Use a fork to roll it around and ensure it’s fully coated, then lift it out, letting the excess chocolate drip back into the bowl. Tap the fork gently against the edge of the bowl to remove any drips. Place the coated truffle back onto the parchment-lined tray. While the coating is still wet, sprinkle a few mini chocolate chips on top (they’ll stick as the chocolate sets), or drizzle with a contrasting color of melted chocolate if you’re feeling fancy. Repeat with all the truffles.
Step 6: Final Chill
Place the tray of coated truffles back in the refrigerator for another 20 to 30 minutes, until the chocolate shell is completely firm and snaps when you break one. Once set, they’re ready to eat! Keep them stored in the fridge until shortly before serving, as the centers are at their best when cool and fudgy.
Pro Tips for the Smoothest Truffles
- Work with cold centers. If the truffle balls start to soften as you dip, return the tray to the fridge for 10 minutes. The colder they are, the easier it is to achieve a thick, even coating that sets quickly without running off.
- Use a fork, not your fingers. Dipping with a fork allows excess chocolate to drain through the tines, preventing a thick, uneven puddle at the base. A toothpick or candy-dipping tool also works, but the fork method is the most accessible and gives you good control.
- Don’t overheat the coating chocolate. If chocolate gets too hot, it can seize or become grainy. Use short microwave bursts and stir well. If it thickens while you’re dipping, reheat it gently for another 10–15 seconds.
- Customize the finish. After dipping, before the chocolate sets, you can roll the truffles in chopped nuts, shredded coconut, crushed cookies, or even a dusting of powdered sugar for a different look. Just be aware that they may not keep as long in the fridge if the toppings are moisture-prone.
- Keep the layers thin but rich. The coating should be just thick enough to encase the truffle fully. If it’s too thick, the shell will dominate; if too thin, the center may poke through. Aim for a solid, even coverage that cracks pleasingly when you bite.
Flavor Twists & Decorative Ideas
The triple-chocolate base is a perfect launching pad for endless creativity. Try these riffs:
- Peanut Butter Brownie Bombs: Replace the chocolate frosting with ¼ cup of smooth peanut butter and an extra tablespoon of cream cheese. The peanut butter adds a salty, creamy dimension that pairs wonderfully with the chocolate. Roll the finished truffles in crushed roasted peanuts before the coating sets.
- Mint Chocolate Truffles: Add ½ teaspoon of pure peppermint extract along with the vanilla. The cool mint flavor cuts through the richness and makes these reminiscent of a certain famous Girl Scout cookie. Top with a small piece of crushed candy cane or Andes mint.
- Espresso Brownie Bombs: Dissolve 1 teaspoon of instant espresso powder in the vanilla extract before adding it to the mixture. The coffee intensifies the chocolate flavor dramatically, giving the truffles a sophisticated, dark-chocolate depth that adults adore.
- Orange Chocolate Dream: Stir in the zest of one orange and replace the vanilla extract with a splash of orange liqueur or pure orange extract. The citrus oil brightens the chocolate and creates a classic European candy-shop flavor. Drizzle with white chocolate for a beautiful contrast.
- Red Velvet Bombs: Use red velvet cake crumbs instead of brownie crumbs, and add a little extra cream cheese to lean into the classic red velvet flavor. Dip in white chocolate for a stunning presentation, then sprinkle with red velvet crumbs.
Serving Suggestions & Occasions
These truffles are the perfect ending to a dinner party, but they also have a place at casual gatherings and simple afternoon treats. Arrange them on a tiered dessert stand with other bite-sized sweets for a chocolate-lover’s dream buffet. They’re divine served alongside a hot cup of coffee or espresso—the bitterness of the coffee enhances the sweetness of the chocolate. For an over-the-top dessert board, pair them with vanilla ice cream, fresh raspberries, and a drizzle of caramel sauce. They also make a stunning addition to a holiday cookie box, nestled in mini cupcake liners and tucked among gingerbread and shortbread. For a party, set out bowls of toppings—chopped nuts, coconut, crushed cookies, sprinkles—and let guests roll their own brownie bombs for a fun, interactive dessert experience.
Storage, Freezing & Make-Ahead
Make-Ahead: These brownie bombs are the ultimate prep-ahead dessert. You can make them up to a week in advance and store them in the refrigerator. In fact, the flavors continue to meld, and the texture remains perfect. Just keep them in an airtight container with parchment paper between layers to prevent sticking.
Storing: Keep the truffles in a sealed container in the refrigerator for up to 7 days. They should be served cool but not ice-cold; let them sit at room temperature for about 10 minutes before eating for the best fudgy texture.
Freezing: These freeze beautifully! Place the finished, fully set truffles on a tray and freeze until solid, then transfer to a freezer bag. They’ll keep for up to 3 months. To serve, thaw them in the refrigerator overnight, or enjoy them straight from the freezer for a firmer, ice-cream-like bite. The chocolate shell may develop a slight bloom, but the flavor won’t be affected.
Want the full recipe and simple step-by-step instructions?
Page 2 continues with the full ingredients, cooking tips, and easy directions so you can make this recipe perfectly at home.