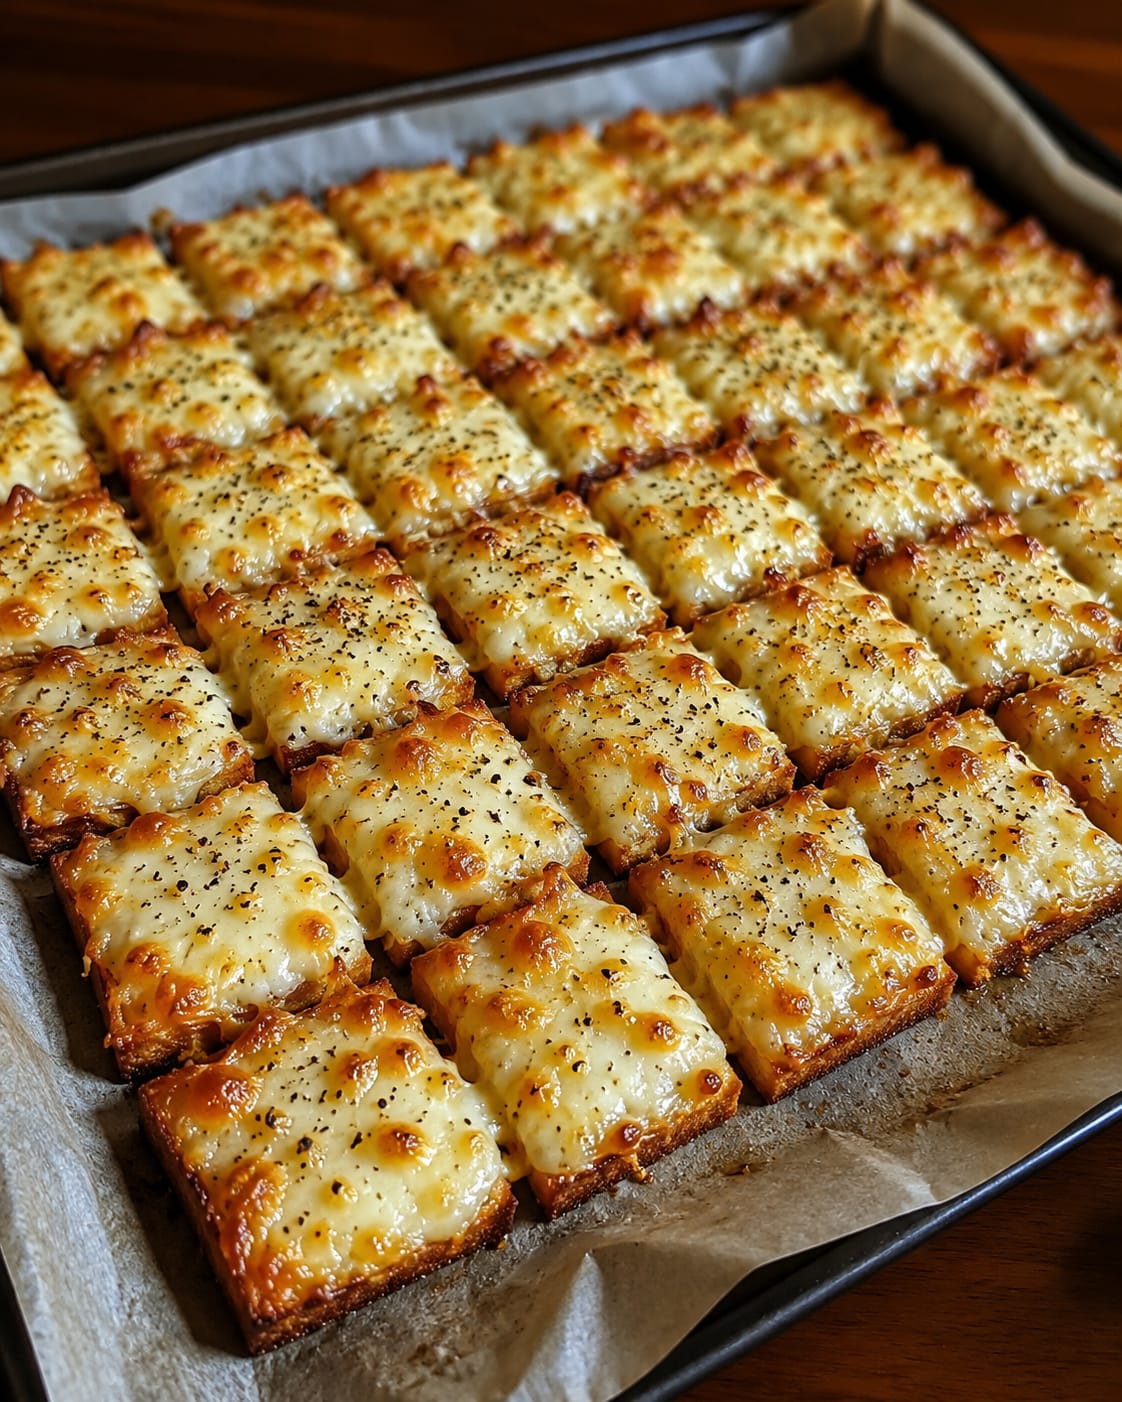
There are certain appetizers that vanish faster than you can say “seconds, please.” These Crispy Cheesy Garlic Bread Bites are at the very top of that list. Picture perfectly portioned squares of crusty bread, each one soaked in a fragrant garlic butter, buried under a blanket of mozzarella, sharp cheddar, and nutty Parmesan, then baked until the edges turn golden and the cheese bubbles into those irresistible lacy, crunchy edges. They’re the handheld version of everyone’s favorite restaurant-style cheesy garlic bread, but somehow even better—because you can pop them like chips, dunk them in warm marinara, and experience that perfect combination of a soft, pillowy center and a shatteringly crisp exterior. Whether you need a quick game-day snack, an after-school bite that makes kids cheer, or a simple side that turns a bowl of tomato soup into a feast, these cheesy garlic bites are the answer.
What makes this recipe so brilliant is its perfect simplicity. It starts with a humble loaf of French bread or sturdy sandwich bread—the kind you might already have on your counter—transforming it into something utterly crave-worthy with just a handful of pantry staples. Real melted butter, fresh garlic, Italian seasoning, and a trio of cheeses do all the heavy lifting. The oven turns the tops into a crunchy, golden-brown cheese crust while the insides stay soft and fluffy. And the optional final broil? It creates those slightly charred, bubbly cheese spots that taste like the best corner piece of a baked ziti. This is the kind of recipe that requires almost no effort, uses no fancy gadgets, and yields a platter of bites that look like they came from a café. It’s a guaranteed crowd-pleaser that will have everyone begging for the recipe.
In this comprehensive guide, I’ll walk you through every step of crafting these irresistible bites—from choosing the ideal bread and the perfect cheese blend, to secrets for maximizing crunch without drying them out. You’ll find tips for making them ahead of time, creative variations that turn them into a full-on flavor bomb, and all the dipping sauces that complement their garlicky, cheesy glory. Whether you’re hosting a party or just treating yourself on a cozy night in, these Crispy Cheesy Garlic Bread Bites are about to become your new favorite thing to bake.
Why You’ll Love These Crispy Cheesy Garlic Bread Bites
They’re the ultimate finger food. Unlike a full loaf of garlic bread that requires slicing and often falls apart, these individual squares are perfectly portioned for grabbing and dipping. They’re sturdy enough to scoop up sauce, hold their shape, and deliver that perfect bite every time—no knife required. They’re the kind of snack that instantly turns any gathering into a party, and they’re especially genius for kids who love anything they can eat with their hands.
Incredibly easy, yet unbelievably delicious. With just a loaf of bread, some butter, garlic, and three kinds of cheese, you can create a snack that rivals the cheesy bread from your favorite pizza place. The prep takes about 10 minutes, and the oven does the rest of the work—melting the cheese into a gooey, golden layer that clings to every crusty edge. It’s a low-effort, high-reward recipe that you’ll find yourself making on repeat, whether for a planned party or a last-minute craving.
A perfect balance of textures. The top is all about the cheese: bubbly, browned, and slightly crisp. The edges of the bread squares toast up in the garlic butter, creating a crunchy, buttery crust. And the interior stays wonderfully soft and pillowy, soaking up the garlic butter without becoming soggy. It’s a symphony of crunch and chew that keeps you reaching for just one more.
Endlessly versatile and customizable. The base recipe is a classic, but you can fold in countless additions to make it your own—crumbled bacon, a pinch of red pepper flakes, a sprinkle of ranch seasoning, or even a handful of chopped pepperoni. You can swap the bread, change the cheese blend, or serve them with a rainbow of dipping sauces. These bites are a blank canvas waiting for your signature touch.
Ingredient Deep Dive: The Bread, the Butter, the Cheese
Every component in this recipe works together to create the perfect cheesy, garlicky bite. Let’s break down the essentials.
The Bread – The Sturdy Foundation
You’ll need one loaf of French bread or a thick, sturdy sandwich bread. French bread is ideal because its crusty exterior and soft interior provide the perfect contrast—the crust crisps up in the oven, while the inside stays soft and tender. Italian bread also works wonderfully. If you’re using sandwich bread, make sure it’s a thick-cut, hearty variety; thin, flimsy bread will become too soft and may not hold the cheese well. Day-old bread is actually a benefit here, as it absorbs the garlic butter without turning mushy. Cut the bread into small squares, about 1½ to 2 inches in size—large enough to hold a generous amount of cheese, but small enough to eat in one or two bites.
The Cheese Trio – Mozzarella, Cheddar, and Parmesan
This combination is the secret to the perfect cheese pull and flavor depth. Mozzarella (2 cups shredded) is the melty, stretchy star that gives you those irresistible cheese pulls. Use low-moisture, part-skim mozzarella—fresh mozzarella contains too much water and can make the bread soggy. Sharp cheddar (½ cup shredded) adds a tangy, bold flavor that stands up to the garlic and herbs. Its oil content helps create that beautiful golden-brown color. Grated Parmesan (¼ cup) brings a salty, nutty bite and contributes to the crispy edges that form as it melts and caramelizes. Always shred your own mozzarella and cheddar from a block if possible—pre-shredded cheese contains anti-caking agents that can prevent a smooth melt.
Garlic Butter – The Flavor Infuser
Four tablespoons of melted unsalted butter, combined with two cloves of minced fresh garlic, is what soaks into the bread and perfumes the entire kitchen with that classic garlic bread aroma. Fresh garlic is absolutely non-negotiable here—it provides a pungent, aromatic kick that garlic powder simply can’t replicate. However, you can add a pinch of garlic powder in addition if you’re a serious garlic lover. The butter helps the bread toast up golden and crisp, and its richness carries the Italian seasoning and pepper across every square.
Italian Seasoning, Black Pepper, and Parsley
A teaspoon of dried Italian seasoning—a blend of oregano, basil, thyme, and rosemary—sprinkles the bites with a subtle herbal note that elevates them beyond basic cheese toast. Freshly ground black pepper adds a little warmth, and a tablespoon of chopped fresh parsley (optional) gives a pop of color and a mild, fresh flavor that balances the richness. These simple seasonings make the bites taste thoughtfully seasoned, not just salty.
Step-by-Step: Baking Golden, Crunchy Perfection
These bites come together in minutes and bake into a bubbling, golden masterpiece. Here’s exactly how to do it.
Step 1: Preheat and Prep
Preheat your oven to 400°F (200°C). Line a large baking sheet with parchment paper. The parchment prevents sticking and makes cleanup a breeze. It also helps the bread toast evenly without burning on the bottom.
Step 2: Cut the Bread
Using a sharp serrated knife, cut the loaf of bread into small, uniform squares, about 1½ to 2 inches in size. If your bread is very soft, a gentle sawing motion will prevent squishing. Try to keep the pieces similar in size so they toast at the same rate. You should get roughly 24 to 30 pieces, depending on the size of your loaf. Arrange the squares in a single layer on the prepared baking sheet, leaving a little space between each one for maximum crispness.
Step 3: Make the Garlic Butter
In a small bowl, combine the melted butter, minced garlic, Italian seasoning, black pepper, and chopped parsley if using. Stir well so the garlic and herbs are evenly distributed in the butter. Using a pastry brush, generously brush the garlic butter over the top of each bread square. You want to coat the entire surface so every bite is infused with that savory, buttery flavor. Don’t worry about the sides or bottom—the butter will spread as it melts in the oven.
Step 4: Pile on the Cheese
In a separate bowl, toss together the shredded mozzarella, cheddar, and grated Parmesan. Sprinkle the cheese blend generously over each buttered bread square, covering as much of the surface as possible. Some cheese will inevitably spill onto the parchment between the squares—that’s a good thing! Those little bits will melt into crispy, lacy cheese edges that are arguably the best part. Don’t be shy with the cheese; this is what gives the bites their signature golden, bubbly crust.
Step 5: Bake Until Golden and Bubbly
Slide the baking sheet into the preheated oven and bake for 10 to 15 minutes. Start checking at the 10-minute mark. You’re looking for the cheese to be completely melted, bubbly, and turning a beautiful golden-brown. The edges of the bread should look crisp and slightly darker, and any cheese on the parchment should be sizzling and lacy. If you like a deeper, more caramelized top, switch the oven to broil and broil for 1 to 2 minutes, watching like a hawk. The broiler turns the cheese into a glorious, spotted, crunchy crust in seconds, but it can quickly go from golden to burnt, so stay close.
Step 6: Cool Slightly and Serve
Remove the baking sheet from the oven and let the bites rest for 2 to 3 minutes before serving. This brief rest allows the cheese to set slightly, making the bites easier to pick up without the cheese sliding off. Transfer them to a serving platter using a spatula, scraping up any crispy cheese from the parchment to tuck alongside the bites. Serve warm with your favorite dipping sauces.
Pro Tips for the Crispiest Edges and Best Texture
- Use a sturdy, slightly crusty bread. Soft, airy bread can collapse under the weight of the cheese and butter. French bread or a dense Italian loaf holds its shape, and a slightly stale loaf is even better because it absorbs the butter without becoming mushy.
- Don’t skimp on the butter—it’s the secret to the golden crust. Each square should be well-brushed so the entire surface gets infused with garlic flavor. The butter also promotes browning and crisping, so a thorough coating is essential.
- Space the bread squares out. Leaving a little room between each piece allows hot air to circulate around all sides, ensuring the edges get crispy rather than steaming together. It also gives the cheese room to melt onto the parchment and form those irresistible crispy cheese laces.
- Broil for the final touch—but watch carefully. The broiler is what transforms melted cheese into a crunchy, golden-brown crust. Position the rack about 6 inches from the broiler element, and stand by the oven. Even 30 seconds can make a big difference, so check constantly.
- Serve immediately for peak crispness. These bites are at their absolute best right out of the oven, when the cheese is still gooey and the edges are crunchy. If you need to keep them warm for a short time, transfer them to a wire rack in a 200°F oven—this keeps them crisp without steaming.
Flavor Twists & Creative Add-Ins
The base recipe is incredible, but these bites are an open invitation for customization. Try these riffs:
- Bacon Cheddar Garlic Bites: Sprinkle finely crumbled cooked bacon over the cheese before baking. The smoky, salty bacon amplifies the savory garlic and cheese, making each bite taste like a loaded baked potato on bread. A drizzle of ranch after baking takes it to another level.
- Jalapeño Popper Garlic Bites: Mix finely diced pickled or fresh jalapeños into the cheese blend, and swap a portion of the mozzarella for softened cream cheese dollops. The result is a spicy, creamy, crunchy bite that mimics the flavor of a jalapeño popper. Dip in cool sour cream or ranch to balance the heat.
- Pizza-Style Garlic Bites: Before adding the cheese, spread a thin layer of pizza sauce or marinara on each bread square. Top with the cheese blend, mini pepperoni slices, and a pinch of dried oregano. These taste just like a deep-dish pizza in bite-sized form and are perfect for a kids’ party.
- Everything Bagel Cheesy Bread: After brushing with garlic butter, sprinkle the bread squares with everything bagel seasoning before adding the cheese. The sesame seeds, poppy seeds, dried onion, and garlic add an extra layer of crunch and a distinctly savory flavor that’s completely addictive.
- Ranch & Herb Bread Bites: Mix a tablespoon of dry ranch seasoning into the garlic butter. The tangy, herby notes of the ranch complement the cheese beautifully and make these taste like a restaurant-style appetizer. Serve with cool ranch dip for a double dose of ranch flavor.
Serving Ideas & Dipping Sauces
These cheesy garlic bites are a standalone star, but the right dipping sauce turns them into a full-on experience. Warm marinara sauce is the classic pairing—its bright acidity and tomato sweetness balance the richness of the cheese and butter. Garlic butter dip or a creamy garlic aioli doubles down on the garlic flavor for true enthusiasts. Ranch dressing is a cool, herby companion that’s especially popular with kids. For a little heat, try chipotle mayo or a spicy arrabbiata sauce. You can also serve them alongside a bowl of tomato soup for a dunk-and-eat meal, or scatter them on top of a pasta bake or salad as crunchy croutons. They’re also fantastic next to scrambled eggs for a brunch twist. Set out a few small bowls of different sauces on a platter so everyone can find their favorite.
Make-Ahead, Storage & Reheating
Make-Ahead: You can prepare the unbaked bread squares with butter and cheese up to a few hours in advance. Arrange them on the baking sheet, cover loosely with plastic wrap, and keep in the refrigerator. Bake them directly from the fridge, adding 2–3 minutes to the baking time. You can also prep the garlic butter and shred the cheese the night before and assemble them just before baking. However, the bites are best baked fresh, as they don’t hold their crunch for hours after baking.
Storing Leftovers: Leftover bites will lose their crispiness but remain delicious. Store them in an airtight container in the refrigerator for up to 3 days. The cheese may firm up, but the flavor will still be excellent.
Reheating: To restore the crunch, reheat the bites in a 350°F oven or toaster oven for 5–7 minutes, or in an air fryer at 350°F for 3–4 minutes until the cheese melts again and the edges crisp. Avoid the microwave, which will make them soft and chewy. If they seem dry, brush them lightly with a little extra melted butter before reheating.
Freezing: You can freeze unbaked assembled bites. Place the prepared, unbaked bread squares on a parchment-lined baking sheet and freeze until solid. Transfer to a freezer bag and freeze for up to 2 months. Bake directly from frozen, adding 5–7 minutes to the baking time. The cheese may brown a bit more, but the results are still fantastic.
Want the full recipe and simple step-by-step instructions?
Page 2 continues with the full ingredients, cooking tips, and easy directions so you can make this recipe perfectly at home.