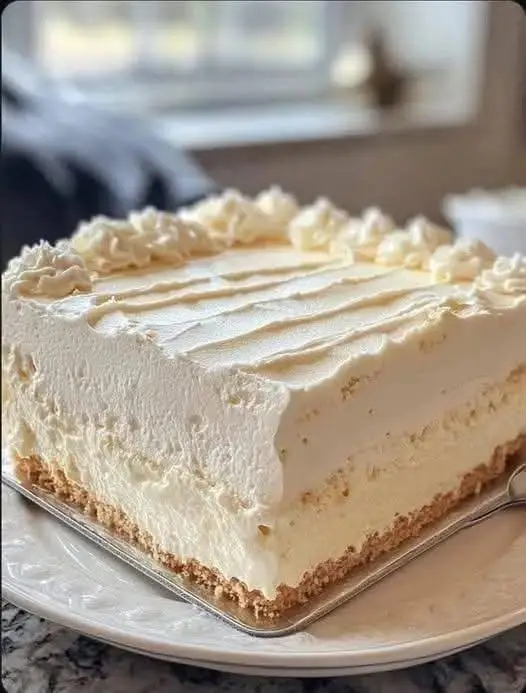
A classic dessert made simple – no oven required, just a handful of ingredients and a few hours of chilling for a cheesecake that’s impossibly creamy, delicately vanilla‑scented, and pure perfection.
There are desserts that demand patience, skill, and a precisely calibrated oven – and then there are desserts that practically make themselves. This No‑Bake Vanilla Cream Cheesecake falls firmly into the latter category. It’s the kind of dessert that looks like you spent hours at the pastry counter, but in reality, it comes together in about twenty minutes of active work, with the refrigerator doing all the heavy lifting. The result is a lusciously smooth, deeply vanilla‑infused cheesecake that’s set on a buttery graham cracker crust and crowned with a cloud of softly whipped cream – a timeless classic that never goes out of style.
I first discovered no‑bake cheesecake during a sweltering summer when turning on the oven was simply not an option. I was skeptical – could a cheesecake without eggs or baking really have the same luxurious texture as its baked cousin? The answer was a resounding yes. The combination of cream cheese, sweetened condensed milk, and heavy cream whipped together creates a fluffy, mousse‑like filling that is every bit as decadent as a traditional cheesecake, with a fraction of the effort. The vanilla bean paste (or extract) adds a floral, aromatic warmth that elevates the entire dessert to something truly special.
This recipe is a crowd‑pleaser for all occasions – holiday gatherings, summer barbecues, birthday celebrations, or just a quiet weeknight treat. It’s gluten‑free if you use a gluten‑free crust, and it’s incredibly adaptable to different flavours and toppings. In this comprehensive guide, I’ll walk you through every step, share my best pro tips for a flawless set, offer creative variations, answer your most pressing questions, and explain why this no‑bake wonder has earned a permanent spot in my dessert repertoire.
✨ Why this no‑bake cheesecake is a dessert game‑changer:
• No oven required – perfect for hot days or when your oven is occupied.
• Ready in 20 minutes – plus chilling time, but the fridge does all the work.
• Incredibly creamy – like a cloud of vanilla‑infused silk.
• Make‑ahead friendly – can be made up to 2 days in advance.
• Endlessly customisable – add lemon zest, berries, chocolate, or caramel.
📋 The Recipe – No‑Bake Vanilla Cream Cheesecake
Prep: 20 min · Chill: 6+ hrs · Total: ~6.5 hrs
Servings: 8–10 · Diet: Vegetarian · Gluten‑Free option
🥣 Ingredients
- For the crust:
- 2 cups (200g) graham cracker crumbs (or digestive biscuits)
- ½ cup (115g) unsalted butter, melted
- 2 tablespoons granulated sugar
- Pinch of salt
- For the filling:
- 16 oz (450g) cream cheese, softened to room temperature
- 1 can (14 oz / 397g) sweetened condensed milk
- 1 cup (240ml) heavy cream (cold)
- 2 teaspoons vanilla bean paste or pure vanilla extract
- 1 tablespoon fresh lemon juice (optional, for tang)
- Optional topping:
- Whipped cream, fresh berries, or a drizzle of caramel or chocolate sauce
👩🍳 Step‑by‑Step Instructions
- Make the crust: In a medium bowl, combine the graham cracker crumbs, sugar, salt, and melted butter. Stir until the mixture resembles wet sand. Press firmly into the bottom of a 9‑inch (23cm) springform pan. Use the back of a spoon or the bottom of a measuring cup to create an even, compact layer. Refrigerate while you prepare the filling.
- Whip the cream: In a large bowl, using an electric hand mixer or a stand mixer with the whisk attachment, whip the cold heavy cream until stiff peaks form. Set aside.
- Cream the cheese: In another large bowl, beat the softened cream cheese with the sweetened condensed milk, vanilla, and lemon juice (if using) until completely smooth and lump‑free – about 2 minutes on medium speed.
- Fold in the whipped cream: Gently fold the whipped cream into the cream cheese mixture in two additions. Use a rubber spatula and a light hand – you want to preserve as much air as possible for a light, mousse‑like texture.
- Assemble and chill: Pour the filling into the prepared crust and smooth the top with an offset spatula. Cover and refrigerate for at least 6 hours, but preferably overnight, until completely firm.
- Serve: Run a knife around the edge of the pan to release the cheesecake, then remove the springform ring. Top with fresh berries, whipped cream, or your favourite sauce, slice, and enjoy!
💡 Pro tip: For the cleanest slices, dip your knife in hot water and wipe it dry between each cut – it works like magic.
~420Calories
8gProtein
28gFat
36gCarbs
The Science of No‑Bake – Why This Recipe Works Without Eggs or Oven
Traditional baked cheesecakes rely on eggs to coagulate and set the filling, and on the oven’s gentle heat to create that dense, creamy texture. No‑bake versions achieve a similar effect through physical and chemical means – the combination of fat, sugar, and air creates a stable emulsion that firms up when chilled. Let’s explore the key players:
Cream Cheese – The Structure and Richness
Cream cheese is the backbone of the filling. Its high fat content (around 33% milkfat) provides the creamy, dense base that defines cheesecake. It also contains stabilizers and emulsifiers that help hold the structure. Using full‑fat cream cheese is crucial – low‑fat varieties have more water and less fat, which can lead to a softer, less stable set. Always let cream cheese come to room temperature before beating; cold cream cheese will create lumps that are difficult to smooth out.
Sweetened Condensed Milk – The Sweetener and Binder
This is the secret weapon of no‑bake cheesecakes. Sweetened condensed milk is a mixture of milk and sugar that has been heated to remove most of the water, leaving a thick, syrupy liquid. It provides concentrated sweetness and a viscous body that helps bind the filling. The high sugar content also lowers the freezing point, which contributes to the creamy, not icy, texture. It eliminates the need for granulated sugar and cornstarch, simplifying the recipe.
Heavy Cream – The Aeration and Lightness
Whipped heavy cream is what gives this cheesecake its light, airy, mousse‑like quality. When you whip cream, you incorporate air bubbles that are stabilized by the fat globules. Folding this into the cream cheese mixture creates a foam that sets into a delicate, fluffy texture. Be sure to whip the cream to stiff peaks – if it’s under‑whipped, the cheesecake will be dense; if over‑whipped, it may turn grainy (though you’re more likely to get butter if you go too far, so stop at stiff peaks).
Vanilla – The Flavor Anchor
High‑quality vanilla is essential here – it’s the primary flavoring and should shine through. Use vanilla bean paste for the most intense, floral aroma, or pure vanilla extract (not imitation). The lemon juice is optional but recommended; it adds a subtle tang that brightens the overall flavor and balances the sweetness.
The Crust – Building the Perfect Foundation
The crust is more than just a base – it’s a crucial textural counterpoint to the creamy filling. A good crust should be buttery, slightly sweet, and firm enough to hold a slice without crumbling. Here’s how to nail it:
- Use fine crumbs: If you’re crushing whole biscuits, aim for a consistent, sandy texture. A food processor makes quick work of this, but you can also place biscuits in a ziplock bag and roll with a rolling pin.
- Press firmly: This is the most important step. Use the bottom of a flat‑bottomed glass or a measuring cup to press the crust evenly and tightly into the pan. If it’s too loose, it will crumble when you slice.
- Chill before filling: Refrigerating the crust for at least 15 minutes helps the butter firm up, so the crust stays crisp and doesn’t absorb moisture from the filling.
- Butter ratio: The mixture should hold together when pressed between your fingers – if it’s too dry, add a little more melted butter; if too wet, add a few more crumbs.
Pro Tips for a Flawless No‑Bake Cheesecake Every Time
🧈 Room‑temperature cream cheese – Cold cream cheese will leave lumps. Let it sit out for 1–2 hours before starting.
🥄 Fold, don’t stir – When mixing in the whipped cream, use a gentle folding motion to keep the air in. Over‑mixing will deflate the filling.
❄️ Chill overnight – 6 hours is the minimum, but overnight gives the best set and flavour meld.
🔪 Hot knife for clean slices – Dip a sharp knife in hot water, wipe it dry, then cut. Repeat between slices for picture‑perfect servings.
Endless Variations – Make This Cheesecake Your Signature Dessert
Once you’ve mastered the classic vanilla version, the possibilities are boundless. Here are ten creative twists to keep your no‑bake cheesecake exciting:
- Lemon Vanilla: Add the zest of 2 lemons and replace 2 tbsp of the heavy cream with fresh lemon juice for a bright, citrusy version.
- Chocolate Chip: Fold in ¾ cup of mini chocolate chips before chilling – they add a delightful crunch and chocolatey richness.
- Berry Swirl: Swirl in ½ cup of raspberry or strawberry puree before chilling for a marbled effect and fruity tang.
- Caramel Pecan: Drizzle caramel sauce over the filling and sprinkle with toasted pecans before chilling – a decadent twist.
- Mocha: Dissolve 1 tablespoon of instant espresso powder in the vanilla and add 2 tablespoons of cocoa powder for a coffee‑chocolate fusion.
- Peanut Butter Cup: Add ½ cup of creamy peanut butter to the cream cheese mixture and fold in chopped peanut butter cups.
- Coconut Lime: Add ½ teaspoon of coconut extract and the zest of 1 lime – serve with toasted coconut flakes.
- Almond Amaretto: Replace vanilla with almond extract and add 2 tablespoons of amaretto liqueur (if you’re serving to adults).
- Pumpkin Spice: Fold in ½ cup of pumpkin puree and 1 tablespoon of pumpkin pie spice for a fall favourite.
- White Chocolate: Melt 4 oz (113g) of white chocolate and fold it into the cream cheese mixture for an extra‑creamy, sweet twist.
Each variation maintains the same basic method, so you can experiment freely without worrying about a fail. The vanilla base is a blank canvas – let your creativity run wild.
Serving Suggestions – How to Elevate Your Cheesecake Presentation
A simple cheesecake is wonderful, but a few thoughtful garnishes can transform it into a stunning centrepiece:
- Fresh berries: Raspberries, blueberries, or strawberries add colour and a tart contrast to the sweet, creamy filling.
- Whipped cream rosettes: Pipe a border of whipped cream around the edge for a classic, elegant look.
- Fruit coulis: A drizzle of raspberry or passionfruit sauce adds a vibrant pop of colour and a burst of acidity.
- Chocolate shavings: Use a vegetable peeler to create curls of dark or white chocolate – they add texture and sophistication.
- Edible flowers: For a special occasion, garnish with pansies, violets, or rose petals (ensure they are food‑grade).
Serve chilled with a cup of coffee or a glass of dessert wine for a truly memorable finish to any meal.
Storage and Make‑Ahead Tips
This no‑bake cheesecake is a make‑ahead marvel. You can prepare it up to 2 days in advance and keep it refrigerated, covered, until serving. In fact, it’s often better after a day or two – the flavors meld and the texture firms up beautifully. To store, cover the cheesecake loosely with plastic wrap or place it in a cake carrier to protect it from absorbing fridge odours.
You can also freeze this cheesecake for up to 3 months. Wrap it tightly in plastic wrap and then in foil, or place individual slices in freezer‑safe containers. Thaw overnight in the refrigerator before serving – the texture remains creamy and delicious, though the crust may soften slightly.
If you’re making it for a party, you can even assemble it in a disposable foil pan and serve it directly from the pan. This is a lifesaver when you’re short on serving platters or transporting the cheesecake.
Nutritional Overview – Indulgent but Manageable
While this cheesecake is certainly a treat, it’s not devoid of nutritional value. Here’s a breakdown of the key components:
- Protein: Cream cheese and condensed milk provide about 8g of protein per slice, making it more satisfying than many other desserts.
- Fat: The fat content (28g) comes mainly from cream cheese and heavy cream. Using full‑fat dairy helps keep the texture luscious and stable.
- Carbohydrates: The 36g of carbs are mostly from sugar (in the crust and condensed milk). If you’re watching sugar, you can use a sugar‑free sweetener in the filling and a nut‑based crust for a lower‑carb version.
- Calcium: Dairy‑based, so it’s a good source of calcium – important for bone health.
For a lighter version, you can reduce the cream cheese to 12 oz and add 8 oz of Greek yoghurt, or use a sugar‑free condensed milk alternative. However, the classic full‑fat version delivers the best texture and flavor, so I recommend reserving this for occasions when you want to indulge.
For gluten‑free, simply use gluten‑free graham crackers or a combination of almond flour and butter for the crust. For dairy‑free, you can use vegan cream cheese and sweetened condensed coconut milk – the texture will be slightly different, but still delicious.
Common Pitfalls and How to Avoid Them
Even the simplest recipes can go awry. Here are the most frequent issues and how to solve them:
- Filling is too soft: Make sure you used full‑fat cream cheese and whipped the cream to stiff peaks. Chilling for the full 6+ hours is essential – if it’s still soft, it might need more time.
- Lumpy filling: Your cream cheese wasn’t fully softened. Beat it thoroughly before adding other ingredients, and consider sifting the condensed milk to ensure it’s smooth.
- Crust crumbles when slicing: You didn’t press it firmly enough, or the butter ratio was off. Press harder next time, and ensure the mixture holds together.
- Too sweet: Reduce the amount of sugar in the crust or use a less sweet cookie. You can also add more lemon juice to balance.
- Filling cracked on top: This is less common with no‑bake, but can happen if you over‑mix or if the cheesecake dries out. Covering with plastic wrap during chilling helps.
Frequently Asked Questions
Can I use low‑fat cream cheese? It’s not recommended – the lower fat content can result in a softer, less stable cheesecake. Use full‑fat for the best texture.
How long does this cheesecake need to set? At least 6 hours in the refrigerator, but overnight is best. The longer it chills, the firmer and more flavorful it becomes.
Can I make this in a different pan? Yes – a 9×13 inch dish works for a thinner bar‑style cheesecake, or you can use individual ramekins for single servings.
Can I add fruit puree to the filling? Yes – fold in ½ cup of fruit puree (like strawberry or mango) after combining the filling, but reduce the condensed milk slightly to account for the extra liquid.
Why did my cheesecake become watery? This can happen if you used too much liquid (e.g., over‑whipped cream that turned into butter) or if the cheesecake was not chilled long enough. Make sure to use cold, heavy cream and not over‑whip.
Final Thoughts – A Dessert That Never Disappoints
This No‑Bake Vanilla Cream Cheesecake is proof that you don’t need a complicated technique or a hot oven to create something truly memorable. With just a handful of quality ingredients and a little patience, you can produce a dessert that’s creamy, elegant, and universally loved. The vanilla‑scented filling, the buttery crust, and the silky texture make it a timeless classic that feels special every time you serve it.
What I appreciate most about this recipe is its reliability and adaptability. It’s a dessert I turn to again and again – for holidays, potlucks, or just a quiet weekend treat. It never fails to impress, and the variations mean I can keep it fresh and exciting. Whether you stick to the classic vanilla or experiment with a new twist, this cheesecake is sure to become a staple in your dessert repertoire.
So next time you need a dessert that requires minimal effort but delivers maximum wow‑factor, remember this no‑bake wonder. Chill it, slice it, and watch it disappear. Enjoy every creamy, dreamy forkful!
🍰 Save this recipe · Share with a fellow dessert lover · And enjoy the simplest, most heavenly no‑bake cheesecake of your life!
📌 No‑Bake · Vanilla Cheesecake · Easy Dessert · Make‑Ahead · Crowd‑Pleaser