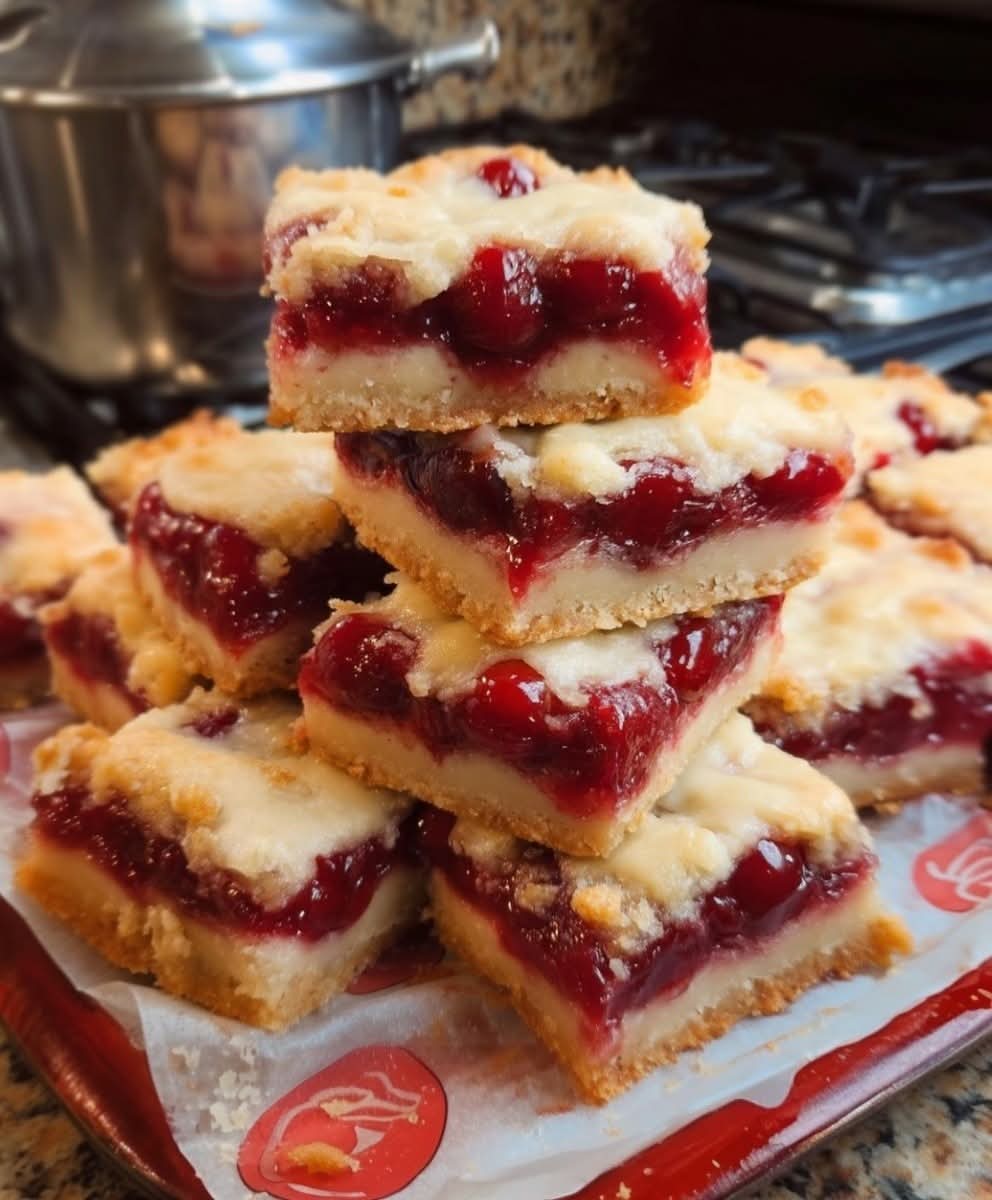
There are desserts that are merely sweet, and then there are desserts that are a symphony of textures and flavors – the kind that make you close your eyes, savor every bite, and reach for seconds before you’ve even finished the first. Cherry Crumble Bars are emphatically the latter. Imagine a buttery, golden shortbread crust, a layer of sweet‑tart cherry filling that’s bursting with juicy fruit, and a crispy, crumbly topping that adds the perfect crunch. They’re like a cherry pie and a cookie bar had the most delicious love child – and the result is absolutely irresistible.
If you’re looking for a dessert that’s easy to make, feeds a crowd, and tastes like a warm summer day, this recipe is about to become your new favorite. These bars are perfect for potlucks, picnics, holiday gatherings, or simply enjoying with a cup of coffee. They’re portable, sliceable, and packed with bright, fruity flavor.
What Are Cherry Crumble Bars?
At their heart, these bars are a layered dessert bar that combines three simple components: a buttery shortbread crust, a sweet cherry filling, and a crunchy crumble topping. The crust and crumble are made from the same base mixture – a combination of butter, flour, sugar, and oats – which simplifies the process and ensures perfect texture throughout. The cherry filling can be made from fresh, frozen, or canned cherries, making this recipe accessible year‑round.
This recipe falls into the category of “easy baking” and “crowd‑pleasing desserts” – dishes that are simple to make yet always impress. They’re reminiscent of classic fruit crumbles and crisps, but in a convenient, sliceable bar form that’s perfect for any occasion.
What makes this version especially brilliant is the balance of textures and flavors. The crust is firm and buttery, the cherry filling is sweet and slightly tart, and the crumble topping adds a satisfying crunch. Every bite is a delightful contrast of soft and crispy, sweet and tangy.
Why You’ll Love This Recipe
There are countless reasons to fall in love with these Cherry Crumble Bars. Here are just a few that will have you making them on repeat:
Incredibly easy to make – no complicated techniques or equipment required.
Perfect balance of textures – buttery crust, juicy filling, crunchy topping.
Versatile – use fresh, frozen, or canned cherries.
Great for any occasion – potlucks, picnics, holidays, or a simple treat.
Sliceable and portable – easy to serve and share.
Make‑ahead friendly – they store beautifully.
Budget‑friendly – simple, affordable ingredients.
Kid‑friendly – everyone loves these sweet, fruity bars.
Naturally customizable – swap in different fruits or add nuts.
Always a crowd‑pleaser – they disappear in minutes.
This is the dessert that will make you feel like a baking pro. It’s proof that you don’t need fancy techniques to create something truly spectacular.
Ingredients for Cherry Crumble Bars
This recipe uses simple, wholesome ingredients that come together beautifully. Here’s what you’ll need:
For the Crust and Crumble Topping
- 1½ cups all‑purpose flour
- 1 cup rolled oats (old‑fashioned)
- ½ cup granulated sugar
- ½ cup packed brown sugar
- ½ teaspoon salt
- 1 cup unsalted butter, cold and cubed
- 1 teaspoon vanilla extract
For the Cherry Filling
- 4 cups pitted fresh or frozen cherries (about 1½ pounds)
- ¼ cup granulated sugar
- 2 tablespoons cornstarch
- 1 tablespoon fresh lemon juice
- ½ teaspoon almond extract (optional, but adds a wonderful flavor)
Ingredient Notes and Substitutions
Cherries: Fresh, pitted cherries are ideal when in season. Frozen cherries work beautifully – do not thaw them before using. You can also use canned cherry pie filling for a shortcut (omit the sugar, cornstarch, lemon juice, and almond extract).
Oats: Old‑fashioned rolled oats provide the best texture. Quick oats will work but won’t be as crunchy.
Butter: Unsalted butter is preferred so you can control the salt level. For a dairy‑free version, use vegan butter.
Almond Extract: This is the secret to that classic cherry flavor. It’s optional but highly recommended.
Step‑by‑Step Instructions
Follow these detailed steps to create a flawless batch of Cherry Crumble Bars. The process is straightforward, and the results are spectacular.
1. Preheat and Prepare
Preheat your oven to 375°F (190°C). Line a 9×13‑inch baking dish with parchment paper, leaving some overhang on two opposite sides. This makes it easy to lift the bars out of the pan after baking.
2. Make the Crumb Mixture
In a large bowl, combine the flour, oats, granulated sugar, brown sugar, and salt. Add the cold, cubed butter and vanilla extract. Use a pastry blender, two forks, or your fingers to cut the butter into the dry ingredients until the mixture resembles coarse crumbs with some pea‑sized pieces of butter remaining. Set aside 1½ cups of this mixture for the topping.
3. Press the Crust
Press the remaining crumb mixture firmly into the bottom of the prepared baking dish, creating an even layer. Use the flat bottom of a measuring cup or a glass to press it down tightly. This ensures a firm, compact crust.
4. Prepare the Cherry Filling
In a medium bowl, combine the cherries, sugar, cornstarch, lemon juice, and almond extract (if using). Stir well until the cherries are evenly coated. Let the mixture sit for about 5 minutes to allow the juices to release and the cornstarch to dissolve.
5. Assemble the Bars
Spoon the cherry filling evenly over the pressed crust, spreading it into a uniform layer. Sprinkle the reserved crumb mixture evenly over the top of the cherries, covering them completely.
6. Bake
Bake for 35–40 minutes, or until the topping is golden brown and the cherry filling is bubbly. If the top is browning too quickly, cover loosely with foil for the last 10 minutes.
7. Cool and Slice
Remove from the oven and let the bars cool completely in the pan on a wire rack – at least 1 hour. For clean slices, refrigerate for an additional hour before cutting. Use the parchment overhang to lift the entire slab out of the pan. Cut into squares or bars.
Expert Tips for the Perfect Crumble Bars
This recipe is simple, but a few expert tricks will elevate it to perfection. Here’s what I’ve learned from making these bars countless times:
Use cold butter – cold butter is essential for a crumbly, tender texture. Cut it into small cubes and keep it chilled until you’re ready to use it.
Don’t overwork the crumb mixture – you want coarse crumbs with some larger chunks of butter. Overworking will make the crust tough.
Press the crust firmly – a compacted crust prevents crumbling when you slice the bars.
Let the cherry filling sit – this allows the juices to release and the cornstarch to dissolve, creating a thicker, less runny filling.
Cool completely before slicing – this is the most important step. If you cut the bars while they’re warm, they’ll fall apart. Be patient!
Refrigerate for cleaner slices – chilling the bars before cutting helps them firm up, giving you neat, beautiful squares.
Add a glaze – for an extra touch, drizzle a simple powdered sugar glaze over the cooled bars.
Double the recipe – these bars freeze beautifully, so make a double batch and save some for later.
Delicious Variations
One of the best things about this recipe is how easily it adapts to different tastes and cravings. Here are some of my favorite ways to switch it up:
Mixed Berry Crumble Bars
Replace the cherries with a mix of blueberries, raspberries, and blackberries. The combination of berries creates a beautiful, colorful filling.
Peach Crumble Bars
Use 4 cups of sliced fresh peaches instead of cherries. Add a pinch of cinnamon and nutmeg to the filling. These are perfect for summer.
Apple Crumble Bars
Use 4 cups of sliced apples and add 1 teaspoon of cinnamon and ½ teaspoon of nutmeg to the filling. This fall‑inspired version is warm and comforting.
Cherry Almond Crumble Bars
Add ½ cup of sliced almonds to the crumble topping. The nuts add extra crunch and pair beautifully with the cherry and almond flavors.
Chocolate Cherry Crumble Bars
Fold ½ cup of mini chocolate chips into the crumble topping. The chocolate adds a rich, decadent twist.
Gluten‑Free Cherry Crumble Bars
Use a gluten‑free flour blend and certified gluten‑free oats. The texture will be slightly different but still delicious.
Dairy‑Free Cherry Crumble Bars
Use vegan butter instead of dairy butter. The results will be just as buttery and delicious.
Serving Suggestions
These versatile bars can be served in a variety of ways, making them perfect for any occasion:
With vanilla ice cream – the classic pairing that never fails.
With whipped cream – a dollop of freshly whipped cream adds a light, airy contrast.
With a dusting of powdered sugar – for a beautiful, elegant finish.
With a cup of coffee – the perfect afternoon treat.
For a potluck – these bars travel well and are always a hit.
For a picnic – easy to pack and serve outdoors.
As a snack – enjoy them straight from the fridge!
Storage and Reheating Guidelines
These bars store beautifully, making them a fantastic make‑ahead option.
Room Temperature: Store in an airtight container at room temperature for up to 3 days.
Refrigeration: Store in an airtight container in the refrigerator for up to 1 week. They’re delicious cold or at room temperature.
Freezing: These bars freeze beautifully. Place them in a freezer‑safe container, separating layers with parchment paper, and freeze for up to 2 months. Thaw at room temperature or overnight in the refrigerator.
Reheating: For warm bars, reheat in a 350°F oven for 5–7 minutes. You can also microwave individual portions for 15–20 seconds.
Pro tip: If you’re freezing the bars, freeze them before adding any glaze or powdered sugar – add those after thawing.
Want the full recipe and simple step-by-step instructions?
Page 2 continues with the full ingredients, cooking tips, and easy directions so you can make this recipe perfectly at home.