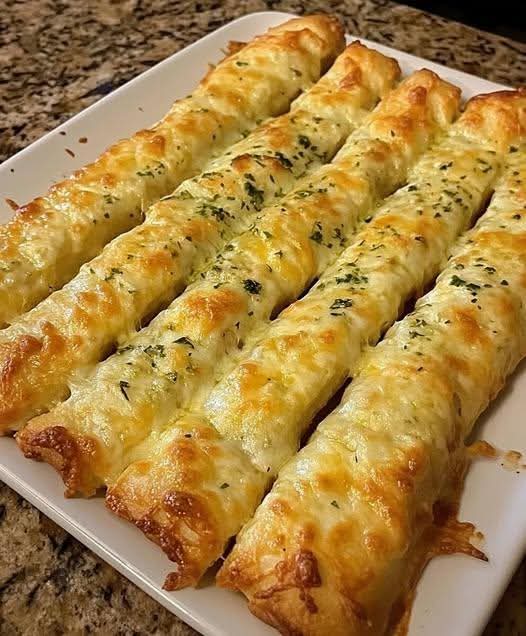
There are breadsticks that are merely a side dish, and then there are breadsticks that steal the show – the kind that make you forget about the main course entirely. Cheesy Garlic Breadsticks are emphatically the latter. Imagine warm, pillowy, golden breadsticks, brushed with a luscious garlic butter, topped with a generous blanket of melted mozzarella and Parmesan, and baked to bubbly, cheesy perfection. They’re crispy on the outside, soft and tender on the inside, and absolutely bursting with savory garlic flavor. It’s the kind of breadstick that you reach for again and again, even after the basket is empty.
If you’re looking for a side dish, appetizer, or snack that’s guaranteed to be a hit, this recipe is about to become your new favorite. They’re better than any restaurant version, incredibly easy to make, and come together with simple ingredients you already have in your kitchen. Serve them with marinara sauce, Alfredo, or simply on their own – they’re impossible to resist.
What Are Cheesy Garlic Breadsticks?
At their heart, these breadsticks are a soft, yeasted bread that’s brushed with garlic butter, topped with a blend of cheeses, and baked until golden and bubbly. They’re a cross between classic garlic bread and cheesy pizza sticks – the best of both worlds. The dough is soft and pillowy, the garlic butter is fragrant and savory, and the cheese melts into a gooey, irresistible topping.
This recipe falls into the category of “better‑than‑takeout” and “crowd‑pleasing appetizers” – dishes that are faster, fresher, and more flavorful than their restaurant counterparts. They’re perfect for pasta nights, game day gatherings, or any time you need a little something extra to share.
What makes this version especially brilliant is the no‑rise dough option. You can use a quick homemade dough that requires no rising time, or use refrigerated pizza dough for an even faster shortcut. Either way, you’ll have warm, cheesy breadsticks on the table in under 30 minutes.
Why You’ll Love This Recipe
There are countless reasons to fall in love with these Cheesy Garlic Breadsticks. Here are just a few that will have you making them on repeat:
Better than a restaurant – fresher, cheesier, and more flavorful.
Quick and easy – ready in under 30 minutes.
Soft, pillowy, and cheesy – the perfect texture combination.
Simple pantry ingredients – no specialty items required.
Kid‑friendly – even picky eaters love cheesy garlic bread.
Versatile – serve as an appetizer, side dish, or snack.
Customizable – add herbs, spices, or different cheeses.
Perfect for any occasion – pasta night, game day, parties, or holidays.
Make‑ahead friendly – freeze the dough for later.
Always a crowd‑pleaser – everyone loves warm, cheesy breadsticks.
This is the recipe that will make you feel like a pizzeria pro. It’s proof that you don’t need a brick oven to create incredible breadsticks at home.
Ingredients for Cheesy Garlic Breadsticks
This recipe uses simple, flavorful ingredients that come together beautifully. Here’s what you’ll need:
For the Dough
2¼ cups all‑purpose flour (or bread flour)
1 packet (2¼ teaspoons) instant yeast
1 teaspoon salt
1 tablespoon granulated sugar
¾ cup warm water (110°F / 43°C)
2 tablespoons olive oil
For the Garlic Butter Topping
- 4 tablespoons unsalted butter, melted
- 3 cloves garlic, minced (or 1 teaspoon garlic powder)
- ½ teaspoon salt
- 1 tablespoon fresh parsley, chopped (or 1 teaspoon dried)
- ¼ teaspoon red pepper flakes (optional, for heat)
For the Cheesy Topping
- 1 cup shredded mozzarella cheese
- ½ cup grated Parmesan cheese
- Extra fresh parsley for garnish
Ingredient Notes and Substitutions
Flour: All‑purpose flour works beautifully, but bread flour gives an even chewier, more bread‑like texture. For a gluten‑free version, use a gluten‑free flour blend.
Yeast: Instant yeast is ideal – you can add it directly to the flour without dissolving it first. If you only have active dry yeast, dissolve it in the warm water with the sugar and let it foam for 5–10 minutes before adding.
Butter: Unsalted butter is preferred so you can control the salt level. For a dairy‑free version, use vegan butter or olive oil.
Cheeses: Mozzarella gives that perfect stretchy, gooey melt, while Parmesan adds a nutty, salty depth. You can also use provolone, Asiago, or a blend of Italian cheeses.
Garlic: Freshly minced garlic gives the most intense, authentic flavor. Garlic powder works in a pinch – use 1 teaspoon.
Step‑by‑Step Instructions
Follow these detailed steps to create a flawless batch of Cheesy Garlic Breadsticks. The process is quick, easy, and virtually foolproof.
1. Preheat and Prepare
Preheat your oven to 425°F (220°C). Line a baking sheet with parchment paper or a silicone baking mat. If you have a pizza stone, place it in the oven to preheat as well.
2. Make the Dough
In a large mixing bowl, combine the flour, instant yeast, salt, and sugar. Add the warm water and olive oil, and stir with a wooden spoon until the dough starts to come together. Turn the dough out onto a lightly floured surface and knead for 3–5 minutes until smooth and elastic. If the dough is too sticky, add a little more flour – if it’s too dry, add a splash of water.
Quick shortcut: If you’re short on time, you can use 1 pound of refrigerated pizza dough instead of making your own. Let it come to room temperature before rolling.
3. Roll and Shape
Using a rolling pin, roll the dough into a large rectangle, about 12×8 inches and ¼‑inch thick. If the dough springs back, let it rest for 5 minutes and try again. Transfer the rolled dough to your prepared baking sheet.
4. Make the Garlic Butter
In a small bowl, combine the melted butter, minced garlic, salt, parsley, and red pepper flakes (if using). Brush this garlic butter mixture generously over the entire surface of the rolled dough.
5. Add the Cheese
Sprinkle the mozzarella and Parmesan cheeses evenly over the buttered dough, covering it completely. Make sure to get right to the edges for maximum cheesiness.
6. Slice the Breadsticks
Using a pizza cutter or a sharp knife, cut the dough into 12–15 strips (about 1 inch wide). You can cut them straight across or at an angle for a more rustic look. Leave the strips in place on the baking sheet – they’ll bake together and you can break them apart later.
7. Bake
Bake for 12–15 minutes, or until the breadsticks are golden brown and the cheese is melted and bubbly. If you’re using a pizza stone, slide the parchment paper onto the stone for an extra crispy bottom.
8. Serve
Remove from the oven and let the breadsticks cool for 2–3 minutes. Sprinkle with additional fresh parsley. Use a spatula to transfer them to a serving platter. Serve warm with marinara sauce, ranch dressing, or garlic aioli for dipping.
Expert Tips for the Perfect Breadsticks
This recipe is simple, but a few expert tricks will elevate it to perfection. Here’s what I’ve learned from making these breadsticks countless times:
Use warm (not hot) water – water that’s too hot will kill the yeast. The ideal temperature is 110°F (43°C).
Knead the dough well – kneading develops gluten, which gives the breadsticks their chewy texture. Knead until smooth and elastic.
Don’t overbake – the breadsticks should be golden, not dark brown. Overbaking will make them dry.
Add extra garlic – if you’re a garlic lover, feel free to double the garlic. It’s the star of the show.
Use fresh cheese – freshly shredded mozzarella melts better than pre‑shredded cheese, which often contains anti‑caking agents.
Serve with dipping sauce – warm marinara, ranch, or garlic aioli take these breadsticks to the next level.
Make them ahead – you can prepare the dough, cover it, and refrigerate for up to 24 hours before rolling and baking.
Freeze the dough – you can freeze the unbaked dough for up to 2 months. Thaw overnight in the refrigerator before rolling.
Delicious Variations
One of the best things about this recipe is how easily it adapts to different tastes and cravings. Here are some of my favorite ways to switch it up:
Spicy Cheesy Breadsticks
Add ½ teaspoon of red pepper flakes to the garlic butter mixture and sprinkle an extra pinch over the cheese before baking. These are perfect for those who like a little heat.
Herb and Cheese Breadsticks
Add 1 teaspoon of Italian seasoning or 1 tablespoon of fresh chopped herbs (basil, oregano, thyme) to the garlic butter mixture. The herbs add a wonderful aromatic depth.
Pesto Cheesy Breadsticks
Spread a thin layer of pesto over the dough before adding the cheese. The basil and pine nut flavors pair beautifully with the garlic and cheese.
Three‑Cheese Breadsticks
Use a blend of mozzarella, provolone, and Parmesan cheeses. The combination creates a complex, rich cheese flavor.
Pizza Breadsticks
Spread a thin layer of marinara sauce over the dough before adding the cheese. Top with pepperoni slices and bake. They’re like pizza in breadstick form.
Everything Bagel Breadsticks
Sprinkle everything bagel seasoning over the cheese before baking. The garlic, onion, sesame, and poppy seeds add incredible flavor and crunch.
Gluten‑Free Breadsticks
Use a gluten‑free pizza dough mix or a gluten‑free flour blend. The texture will be slightly different, but they’ll still be delicious.
Serving Suggestions
These versatile breadsticks can be served in a variety of ways, making them perfect for any occasion:
With marinara sauce – the classic pairing. Serve warm marinara for dipping.
With Alfredo sauce – for a creamy, indulgent twist.
With ranch dressing – a favorite for dipping, especially with spicy breadsticks.
With garlic aioli – a rich, garlicky dip that’s perfect for garlic lovers.
Alongside pasta – serve with spaghetti, fettuccine, or lasagna for a complete Italian meal.
As an appetizer – perfect for parties, game day, or holiday gatherings.
With soup or salad – serve alongside a bowl of tomato soup or a crisp green salad.
Storage and Reheating Guidelines
These breadsticks store beautifully, making them a fantastic make‑ahead option.
Room Temperature: Store in an airtight container at room temperature for up to 2 days.
Refrigeration: Store in an airtight container in the refrigerator for up to 4 days. The flavor remains delicious.
Reheating: For the best texture, reheat in a 350°F oven for 3–5 minutes until warm and crispy. You can also reheat in a toaster oven or air fryer. Microwave is not recommended – they’ll become soft and chewy.
Freezing: These breadsticks freeze beautifully. Place them in a freezer‑safe container or bag and freeze for up to 2 months. Reheat directly from frozen in a 350°F oven for 5–7 minutes.
Pro tip: If the breadsticks lose their crispiness, a quick trip in the oven will bring them back to life.
Nutritional Information
Approximate values per breadstick (based on 12 breadsticks):
- Calories: 185
- Carbohydrates: 18g
- Protein: 7g
- Fat: 9g
- Saturated Fat: 5g
- Fiber: 1g
- Sugar: 1g
- Sodium: 280mg
Using less cheese or a dairy‑free alternative will lower the calories and fat content.
Want the full recipe and simple step-by-step instructions?
Page 2 continues with the full ingredients, cooking tips, and easy directions so you can make this recipe perfectly at home.