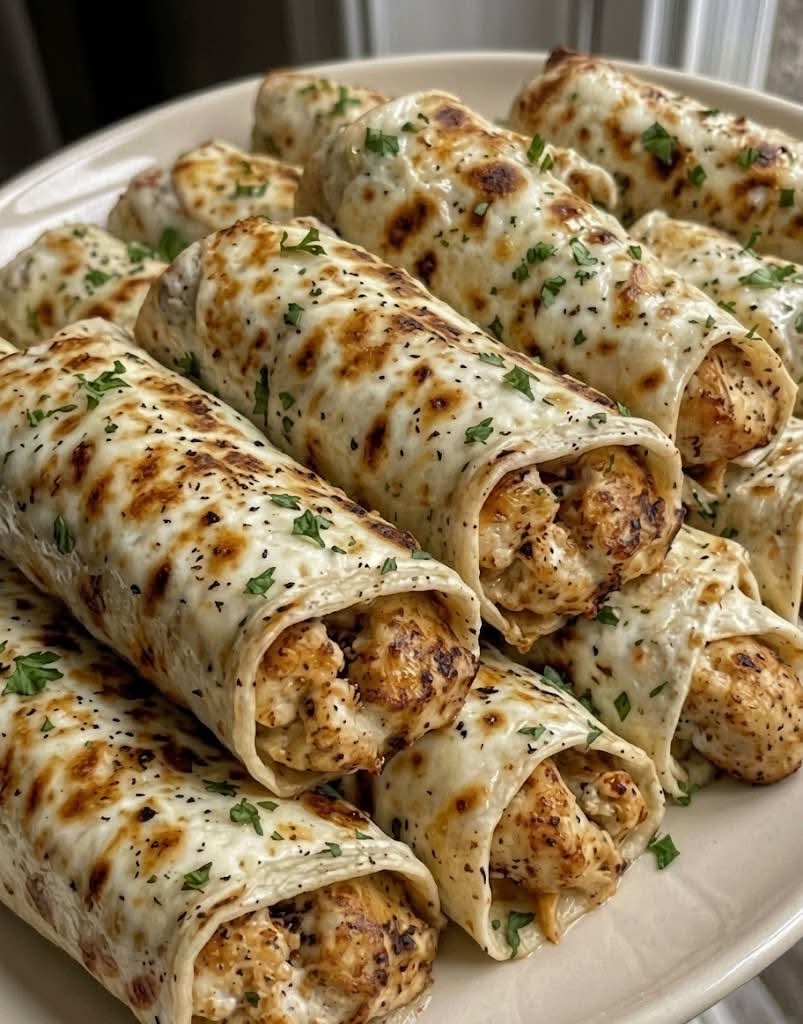
When you need dinner on the table fast, something that pleases everyone from picky toddlers to hungry adults, and that delivers that irresistible combination of crispy, golden-brown tortilla, gooey melted cheese, and savory, seasoned chicken, these Cheesy Chicken Tortilla Wraps are the answer. They’re the ultimate weeknight hero—a warm, satisfying handheld meal that’s ready in about 20 minutes and can be customized with whatever you have in the fridge. Imagine a soft flour tortilla wrapped around a creamy, cheesy filling of shredded chicken, sharp cheddar, a touch of cream cheese for richness, and a pop of green chiles or taco seasoning for a gentle Tex-Mex kick. Then the whole thing gets pan-fried in a little butter until the outside is shatteringly crisp and the inside is molten and gooey. Each bite is a perfect balance of crunch, creaminess, and savory flavor. Serve them with salsa, sour cream, or guacamole for dipping, and watch them disappear in minutes. These wraps are destined to become your new favorite quick dinner, and once you taste them, you’ll want to make them on repeat.
This recipe is a masterclass in simple, clever cooking. It starts with cooked, shredded chicken—a rotisserie chicken makes this unbelievably fast, but you can also use leftover roasted chicken, poached breasts, or even well-drained canned chicken in a pinch. The chicken is mixed with a luscious blend of cream cheese, sour cream (or Greek yogurt), shredded cheddar, and seasonings like cumin, garlic powder, and a touch of paprika. A can of diced green chiles or a spoonful of salsa adds moisture and a subtle, tangy heat. The filling is then spooned onto large flour tortillas, folded into neat, flat packets, and pan-fried in a hot skillet with a little butter or oil until the tortilla is deeply golden and the cheese is completely melted. The result is a wrap that’s crisp on the outside, oozing with cheesy, creamy chicken on the inside, and packed with flavor in every single bite. You can make them as mild or as spicy as you like, and they’re endlessly adaptable to what your family loves. Add black beans, corn, diced jalapeños, or a handful of fresh spinach. Swap the cheddar for Monterey Jack, pepper Jack, or a Mexican blend. You can even bake them or cook them in an air fryer for a slightly lighter version. These wraps are also perfect for meal prep: assemble them ahead of time, refrigerate, and pan-fry when you’re ready to eat. They reheat beautifully and make a fantastic packed lunch. Whether you need a quick dinner, a game-day snack, or a fun way to use up leftover chicken, these Cheesy Chicken Tortilla Wraps deliver every time. They’re the ultimate fast, flavorful, family-friendly meal that tastes like you spent much longer in the kitchen.
In this comprehensive guide, I’ll walk you through every detail of creating the perfect cheesy chicken tortilla wraps. We’ll explore the best tortillas to use for a crispy exterior, the secrets to a creamy, flavorful filling that doesn’t leak, tips for achieving that beautiful golden-brown crust, and endless variations to suit your taste buds. You’ll find step-by-step instructions, pro tips, make-ahead and storage advice, and a full recipe card to keep handy. Let’s fire up that skillet and get ready to wrap up something truly irresistible.
Why You’ll Love These Cheesy Chicken Tortilla Wraps
Incredibly quick and easy. From start to finish, you can have these wraps on the table in about 20 minutes. If you use rotisserie chicken, the prep time is just a few minutes of mixing and folding. The pan-frying takes about 3–4 minutes per side, giving you a hot, golden, crispy meal faster than a drive-thru and infinitely more satisfying. It’s the perfect solution for busy weeknights, last-minute lunches, or when you need to feed hungry kids fast. The recipe is so simple that even beginner cooks can master it, and the cleanup is minimal—just one bowl for the filling and one skillet.
Perfectly crispy on the outside, irresistibly cheesy on the inside. The contrast between the shatteringly crisp, golden-brown tortilla and the warm, oozy, creamy filling is what makes these wraps so crave-worthy. As the wraps cook, the cheese melts into a gooey, stretchy blanket that binds the chicken together, while the cream cheese and sour cream keep everything incredibly moist. The butter in the skillet adds a rich, nutty flavor and helps the tortilla achieve that beautiful, even browning. Every bite delivers a satisfying crunch followed by a burst of savory, cheesy goodness. It’s pure comfort food that you can hold in your hand.
Endlessly customizable to your family’s tastes. The basic recipe is a blank canvas. Use different cheeses—pepper Jack for a spicy kick, mozzarella for extra stretch, or a smoked Gouda for depth. Add cooked, crumbled bacon for a smoky, salty twist, or stir in a can of diced green chiles for a mild, tangy heat. Fold in some black beans, corn, or diced bell peppers for extra texture and nutrition. You can even switch up the protein: try it with shredded turkey, ground beef, or refried beans for a vegetarian version. The seasonings can be adjusted to your liking—use taco seasoning, ranch seasoning, or a simple blend of cumin, garlic powder, and chili powder. You can make them mild enough for young children or fiery enough for heat lovers. The possibilities are endless, and you’ll never get bored. This is the kind of recipe that becomes a weekly staple, with a different twist each time.
Perfect for meal prep and freezer-friendly. These wraps are a meal prepper’s dream. You can assemble them completely, wrap them individually in plastic or foil, and refrigerate for up to 3 days. When you’re ready to eat, just pan-fry them straight from the fridge. They also freeze beautifully: assemble the wraps, place them on a baking sheet to freeze individually, then transfer to a freezer bag. Cook them directly from frozen in a skillet over medium heat, adding a few extra minutes per side. This means you can have a stash of homemade, hot, crispy wraps ready in the time it takes to heat a skillet. Pack them in lunchboxes (they’re delicious at room temperature too), or keep them on hand for quick snacks. The convenience factor is off the charts, and you’ll feel like a genius when you pull a golden wrap out of the freezer and have a delicious meal in minutes.
Ingredient Deep Dive: The Creamy, Cheesy Filling and the Perfect Tortilla
Each ingredient in this recipe plays a vital role in creating the perfect balance of creamy, cheesy, and crispy. Let’s explore them in detail.
Cooked, Shredded Chicken – The Protein Powerhouse
You’ll need about 2 cups of cooked, finely shredded chicken. Rotisserie chicken is a lifesaver here—it’s already seasoned, incredibly tender, and readily available. Simply remove the skin and shred the meat with two forks. You can also use poached chicken breasts (simmer in salted water or broth until cooked through), leftover roasted or grilled chicken, or even well-drained canned chicken in a pinch. The chicken should be shredded quite finely so it incorporates evenly into the creamy filling and doesn’t poke through the tortilla. If the chicken is dry, the cream cheese and sour cream will compensate beautifully. The chicken provides a lean, high-protein base that makes these wraps satisfying and filling. You can also substitute with shredded turkey, ground beef that’s been cooked and drained, or even a plant-based chicken alternative. The key is to have the protein fully cooked and ready to mix, because the wraps only cook long enough to melt the cheese and crisp the tortilla. The chicken soaks up the flavors of the seasonings and the creaminess of the cheeses, ensuring every bite is moist and delicious.
Cream Cheese and Sour Cream – The Creamy, Tangy Binders
Four ounces of full-fat cream cheese, softened to room temperature, and ¼ cup of sour cream (or plain Greek yogurt) combine to create the luscious, creamy base of the filling. The cream cheese adds a rich, velvety texture and a subtle tang, while the sour cream lightens it slightly and adds moisture. Full-fat versions are recommended for the best flavor and mouthfeel, but you can use reduced-fat if you prefer. The cream cheese must be softened so it mixes smoothly without lumps. If you forget to take it out of the fridge, microwave it in 10-second bursts until soft but not melted. The sour cream can be replaced with Greek yogurt for a higher-protein, tangier filling. Together, they bind the chicken, cheese, and seasonings into a cohesive, spreadable mixture that won’t leak out of the wraps during cooking. The cream cheese also helps the filling stay creamy and prevents it from becoming dry when heated. It’s the secret to that luxurious, melt-in-your-mouth interior that makes these wraps so indulgent. For a dairy-free version, use a plant-based cream cheese and a dairy-free yogurt or sour cream alternative; the texture will be similar, though the flavor will differ slightly.
Shredded Cheddar Cheese – The Gooey, Melty Goodness
One and a half cups of shredded sharp cheddar cheese provide the bold, tangy flavor and the irresistible cheese pull. Sharp cheddar is the ideal choice because its strong taste holds its own against the other ingredients. You can use a Mexican blend, Monterey Jack, pepper Jack for heat, or a combination. Shredding your own cheese from a block is always recommended—it melts more smoothly and avoids the starches and anti-caking agents found in pre-shredded cheese. A portion of the cheese is mixed directly into the filling, creating little pockets of gooeyness throughout, and the rest can be sprinkled on top before folding for an extra-cheesy center. The cheese acts as a glue when it melts, helping to hold the wrap together and seal the edges slightly as it cooks. It’s what gives these wraps their satisfying, indulgent character. If you’re a cheese lover, feel free to add an extra handful. Just be mindful that too much cheese can make the wraps greasy if it leaks out during cooking. A moderate, well-distributed amount is perfect.
Seasonings and Optional Add-Ins – The Flavor Boosters
A simple blend of seasonings elevates the filling from bland to bold. A teaspoon of garlic powder, a teaspoon of onion powder, a teaspoon of ground cumin, and a teaspoon of chili powder (or paprika) create a warm, savory, slightly smoky profile. A pinch of salt and a few grinds of black pepper round it out. If you prefer a spicier kick, add a pinch of cayenne or a few dashes of hot sauce. A 4-ounce can of diced green chiles, drained, adds a mild, tangy heat and a bit of texture. You can also use a tablespoon of taco seasoning or ranch seasoning mix for a different flavor direction. The seasonings should be mixed into the cream cheese base so they distribute evenly. Fresh chopped cilantro or sliced green onions can be stirred in for a burst of freshness. These small additions make a big difference, and you can adjust them to your family’s preferences. The filling should be well-seasoned but not overly salty, especially because the cheese and any canned ingredients already contain salt. Taste the filling before assembling the wraps and adjust as needed. A spoonful of salsa stirred in adds both moisture and flavor, making the filling even more delicious.
Large Flour Tortillas – The Crispy, Golden Vessel
You’ll need 4 to 6 large (burrito-size) flour tortillas, about 10 inches in diameter. Flour tortillas are essential for this recipe because they’re pliable, easy to fold without cracking, and they crisp up beautifully in a skillet. Corn tortillas are smaller, more brittle, and won’t achieve the same golden, crispy exterior. Look for soft, fresh flour tortillas; if they’re a little dry, you can warm them briefly in the microwave or a dry skillet to make them more flexible. The tortillas should be at room temperature for easy folding. The size is important: you need enough surface area to hold a generous amount of filling and still fold securely without tearing. If you can only find smaller tortillas, you can make more wraps with a little less filling in each. The tortilla is what transforms the filling into a portable, hand-held meal, and its buttery, flaky layers are what create that irresistible crunch. When pan-fried in butter, the tortilla turns a deep golden brown and develops a crackly, almost fried-bread texture that’s absolutely addictive. It also seals in the filling, keeping everything warm and gooey inside. For a whole-grain option, use whole wheat flour tortillas; they’ll be slightly nuttier and just as delicious. For a low-carb version, you can use a low-carb or keto-friendly tortilla; the cooking method remains the same. The tortilla is the vessel that holds all the goodness together, so choose one you love.
Step-by-Step: From Filling to Golden, Crispy Wraps
Follow these detailed steps for perfectly assembled, crispy, cheesy chicken tortilla wraps every time.
Step 1: Make the Creamy Chicken Filling
In a large mixing bowl, combine the 4 ounces of softened cream cheese, ¼ cup sour cream (or Greek yogurt), 1½ cups shredded cheddar cheese (reserve a little for sprinkling if desired), the shredded chicken, and all your seasonings: 1 teaspoon garlic powder, 1 teaspoon onion powder, 1 teaspoon cumin, 1 teaspoon chili powder, and a pinch of salt and pepper. If you’re using green chiles, salsa, or any other add-ins, stir them in now. Mix everything together with a spatula or your hands until the chicken is evenly coated and the mixture is thick and cohesive. It should be creamy and spreadable, not too dry or too wet. If it seems too thick, add a splash of milk or an extra spoonful of sour cream. If it’s too thin, add a little more cheese. Taste the filling and adjust the seasonings to your preference. The filling can be made up to 2 days ahead and stored in the refrigerator; bring it to room temperature before assembling the wraps to make spreading easier. This step takes about 5 minutes and is the heart of the recipe. The aroma of the cumin and garlic will already start to make your mouth water. The filling should be well-combined and ready to go.
Step 2: Assemble the Wraps
Lay a large flour tortilla flat on a clean work surface. Spoon about ½ to ⅔ cup of the chicken filling onto the center of the tortilla, spreading it into a rectangular shape, leaving about 1½ inches of space around the edges. The filling should be fairly flat so the wrap cooks evenly. If you reserved some extra shredded cheese, sprinkle a little on top of the filling now. Fold the left and right sides of the tortilla inward over the filling, then fold the bottom edge up and over the filling, and roll it tightly away from you, tucking the sides in as you go, to form a neat, sealed packet. The seam should be on the bottom. The folded sides will help prevent the filling from leaking out during cooking. If the tortillas are a bit stiff, warm them for 10–15 seconds in the microwave to make them more pliable. The key is a snug, tight wrap, but not so tight that the tortilla tears. If a small tear happens, it’s okay; the cheese will melt and seal it as it cooks. Place the assembled wrap seam-side down on a plate or cutting board. Repeat with the remaining tortillas and filling. You should have 4 to 6 wraps, depending on how generously you fill them. The assembled wraps can be cooked immediately or refrigerated for later. The folding technique is simple and becomes second nature after the first one. The goal is a compact, flat packet that will cook evenly in the skillet. The sealed edges create a pocket that traps the steam inside, melting the cheese into gooey perfection. A well-folded wrap will stay closed during cooking and look beautifully neat when served. This step is quick and satisfying, and it’s a great one to involve kids in.
Step 3: Pan-Fry to Golden, Crispy Perfection
Heat a large nonstick or cast-iron skillet over medium heat. Add 1–2 tablespoons of butter (or a drizzle of oil) and let it melt, swirling to coat the bottom of the pan. The butter adds flavor and helps the tortilla achieve that beautiful golden-brown color. Place the wraps in the skillet, seam-side down, without overcrowding. You may need to cook them in batches. The seam-side down placement is crucial: it seals the edge closed as it cooks first, preventing the wrap from opening. Cook for 3–4 minutes per side, until the tortilla is deeply golden brown, crispy, and the cheese is visibly melted. Use a spatula to flip the wraps carefully. If the wraps are browning too quickly, reduce the heat slightly; you want the cheese to fully melt before the outside burns. The wraps should be pressed down gently with the spatula to ensure even contact with the pan. The sizzle of the butter and the sight of the tortilla turning golden are incredibly satisfying. The aroma will fill your kitchen, drawing everyone to the stove. Cook until both sides are beautifully crisp and the wrap feels firm but slightly yielding to the touch—a sign the filling is hot and the cheese is melted. If you’re cooking multiple batches, you can keep the finished wraps warm in a 200°F oven on a wire rack while you cook the rest. The butter in the pan will get brown and nutty, which adds even more flavor. If the butter burns, wipe the pan clean and add fresh butter before the next batch. The pan-fry method gives you that irresistible crunch that makes these wraps so special. You can also cook them in an air fryer: preheat to 375°F, spray the wraps with oil, and air fry for 6–8 minutes, flipping halfway, until crispy and golden. This method uses less oil and yields an equally crispy result. The oven is another option: bake at 400°F on a parchment-lined sheet for 15–18 minutes, flipping once. However, the skillet gives the most immediate, rich, golden crust. Each method works; choose based on your preference and the number of wraps you’re making. The skillet is my go-to for the best flavor and texture.
Step 4: Rest Briefly and Serve
Remove the wraps from the skillet and place them on a cutting board. Let them rest for 2–3 minutes before slicing. This brief rest allows the cheese to set slightly, so it doesn’t all ooze out when you cut into it. It also prevents burnt mouths—the filling will be extremely hot. Slice each wrap in half diagonally with a sharp knife. This creates a beautiful presentation and makes them easier to eat. Arrange the halves on a plate, with the crispy, golden-brown exterior facing up. Serve them with your favorite dipping sauces: salsa, sour cream, guacamole, ranch dressing, or a spicy chipotle crema. A bowl of warm queso or a simple pico de gallo are also wonderful accompaniments. The wraps are delicious on their own, but a dipping sauce adds an extra layer of flavor and coolness that balances the warm, cheesy interior. Garnish with a sprinkle of fresh cilantro or sliced green onions for a pop of color. These wraps are a complete meal in themselves, but they pair beautifully with a simple side salad, some Mexican rice, or a bowl of black bean soup. They’re also fantastic for parties: slice them into smaller pinwheels for a fun appetizer that will disappear in minutes. However you serve them, these Cheesy Chicken Tortilla Wraps are guaranteed to bring smiles and requests for the recipe. Enjoy every crispy, cheesy, satisfying bite.
Pro Tips for the Crispiest Wraps and No Leaks
- Don’t overfill the tortillas. It’s tempting to pile on the filling, but too much can cause the wrap to burst open during cooking, spilling melted cheese and chicken into the skillet. A generous ½ cup to ⅔ cup is perfect for a large burrito-size tortilla. The filling should be spread in a thin, even layer, leaving a border around the edges. This ensures the wrap folds tightly and cooks evenly. If you have extra filling, save it for another meal or use additional tortillas. A well-proportioned wrap is easier to handle and looks more appetizing.
- Seal the edges tightly and cook seam-side down first. The folding technique is key to a leak-free wrap. After folding in the sides, roll the tortilla up firmly, tucking the filling in as you go. Place the wrap seam-side down in the hot skillet. The heat seals the seam closed immediately, locking everything inside. If you’re worried about the wrap opening, you can secure it with a toothpick (just remember to remove it before serving). The tight seal also helps the wrap hold its shape and makes for a prettier presentation.
- Use medium heat and be patient. Cooking the wraps over medium heat allows the cheese to melt fully before the outside burns. If the heat is too high, the tortilla will become dark and crisp before the center is hot. Medium heat gives you a beautiful, even golden brown and ensures the filling is piping hot. It may take a minute or two longer, but the result is worth it. Adjust the heat as needed; if the butter starts to smoke or the tortilla is browning too fast, lower the temperature. A steady, moderate heat is your best friend for perfect wraps.
- Let the wraps rest before cutting. That brief 2–3 minute rest after cooking is essential. It allows the molten cheese to cool just enough to become slightly firm, preventing it from oozing out everywhere when you slice. It also makes the wraps easier to handle without burning your fingers. The wrap will stay hot and the tortilla will remain crispy. If you cut too soon, the cheese will spill out onto the plate and the wrap may lose some of its structural integrity. A little patience here yields a much more enjoyable eating experience.
- Customize the crispiness with different cooking methods. The skillet is classic and gives you that buttery, pan-fried flavor. For a lighter version, use an air fryer: it produces an exceptionally crispy exterior with minimal oil. The oven is great for making a large batch at once. Whichever method you choose, a light spray or brush of oil on the outside of the tortilla helps it crisp and brown. You can even brush the wraps with a little melted garlic butter before cooking for an extra burst of flavor. Each method yields a slightly different texture, and they’re all delicious. Experiment to find your favorite.
Flavor Twists & Customizations
Once you’ve mastered the classic cheesy chicken wrap, try these delicious variations to keep things exciting.
- Buffalo Chicken Wraps: Replace the seasonings with ¼ cup of buffalo wing sauce and a tablespoon of ranch seasoning mix. Use a combination of cheddar and crumbled blue cheese. The spicy, tangy buffalo flavor is incredible, and the cool ranch and blue cheese balance it perfectly. Serve with extra ranch or blue cheese dressing for dipping. This version is a game-day favorite and always a massive hit. You can also add diced celery for a classic buffalo wing crunch.
- Chicken Bacon Ranch Wraps: Add ¼ cup of cooked, crumbled bacon and 1 tablespoon of dry ranch seasoning to the filling. Use a blend of cheddar and mozzarella. The smoky, salty bacon and tangy ranch elevate the wrap to a whole new level. Serve with a side of ranch for dipping. This combination is reminiscent of a loaded baked potato in wrap form. You can also add a handful of chopped green onions for freshness. It’s a guaranteed crowd-pleaser.
- Southwest Black Bean and Corn Wraps: Stir in ½ cup of drained black beans, ½ cup of thawed frozen corn, and a chopped jalapeño. Use pepper Jack cheese for a spicy kick. Add a squeeze of lime juice and a handful of chopped cilantro to the filling. These wraps have a fresh, vibrant Tex-Mex flavor and are a bit more substantial. They’re also great with a scoop of guacamole inside before rolling. Serve with salsa and sour cream. This version is perfect for a meatless Monday if you omit the chicken and double the beans.
- BBQ Chicken Wraps: Replace the seasonings with ¼ cup of your favorite BBQ sauce. Use smoked Gouda or sharp cheddar. Add some thinly sliced red onion and chopped fresh cilantro. The sweet, smoky, tangy BBQ flavor pairs beautifully with the cheesy chicken. Serve with extra BBQ sauce or a cool coleslaw on the side. These wraps taste like a backyard barbecue in a handheld package. You can also add a few slices of cooked bacon for a smoky crunch.
- Philly Cheesesteak Wraps: Replace the chicken with thinly sliced, sautéed beef (like ribeye or sirloin), and use provolone cheese. Add sautéed green peppers, onions, and mushrooms to the filling. A smear of garlic aioli or a sprinkle of Italian seasoning takes it over the top. This is a fun twist that combines two comfort food classics. Serve with a side of au jus for dipping. It’s a versatile recipe that can be endlessly adapted to whatever protein and cheese you have on hand.
Serving, Dipping Sauces & Party Ideas
These cheesy chicken tortilla wraps are a hit at any table. Serve them as a main dish with a variety of dipping sauces: salsa, sour cream, guacamole, ranch dressing, chipotle crema, or warm queso. A bowl of pico de gallo or a fresh mango salsa adds a bright, fruity contrast. For a family dinner, arrange the sliced wraps on a platter with small bowls of the different sauces in the center, and let everyone choose their favorites. For a party or game-day spread, slice the wraps into 1-inch pinwheels, secure them with toothpicks, and arrange them on a tray. They make an excellent finger food that’s easy to grab and dip. These wraps are also wonderful packed in lunchboxes; they’re delicious at room temperature and hold up well. You can keep them warm in a slow cooker on the “warm” setting for a buffet. Pair them with a simple green salad, a cup of tortilla soup, or some Mexican rice for a more complete meal. A pitcher of iced tea, lemonade, or margaritas completes the experience. No matter how you serve them, they’re guaranteed to be a crowd-pleaser. The combination of crispy tortilla, gooey cheese, and savory chicken is universally appealing, and the dipping sauces make it interactive and fun. Get creative with the presentation and watch them disappear.
Storage, Meal Prep & Reheating
Meal Prep: You can assemble the wraps completely up to 3 days in advance. Wrap each uncooked wrap tightly in plastic wrap or foil and store them in the refrigerator. When you’re ready to cook, simply unwrap and pan-fry them straight from the fridge; you may need to add an extra minute or two per side to ensure the center is hot. The filling itself can be made up to 2 days ahead and stored in an airtight container in the fridge. Having the filling ready to go makes assembly and cooking even faster on a busy night. You can also freeze the assembled, uncooked wraps: place them on a parchment-lined baking sheet, freeze until solid, then transfer to a freezer bag. Cook directly from frozen in a skillet over medium heat for 5–7 minutes per side, or until the tortilla is crispy and the filling is hot. The air fryer works beautifully for frozen wraps as well.
Storing Leftovers: If you have leftover cooked wraps, store them in an airtight container in the refrigerator for up to 3 days. They will lose some of their crispiness, but they’ll still be tasty. To re-crisp them, reheat in a skillet over medium heat for a few minutes per side, or in an air fryer at 350°F for 3–5 minutes. The microwave is not recommended, as it will make the tortilla soft and chewy. The oven can also work to re-crisp a larger batch: place the wraps on a baking sheet and bake at 375°F for 8–10 minutes. The filling will remain moist and cheesy, and the tortilla will regain some of its crunch. Leftover wraps are great for a quick lunch or snack, and they’re even good cold, straight from the fridge.
Freezing: The assembled, uncooked wraps freeze beautifully, as mentioned above. You can also freeze the cooked wraps for a quick meal later. Let them cool completely, wrap them individually in plastic wrap and then foil, and freeze for up to 2 months. To reheat, thaw overnight in the refrigerator if you have time, or cook directly from frozen in a skillet or air fryer. The oven method also works: bake at 375°F for 15–20 minutes from frozen, flipping halfway. The texture of the tortilla will be slightly different than fresh, but still delicious. Having a stash of these wraps in the freezer is a game-changer for busy nights. You can pull out exactly as many as you need and have a hot, homemade meal in minutes.
Want the full recipe and simple step-by-step instructions?
Page 2 continues with the full ingredients, cooking tips, and easy directions so you can make this recipe perfectly at home.