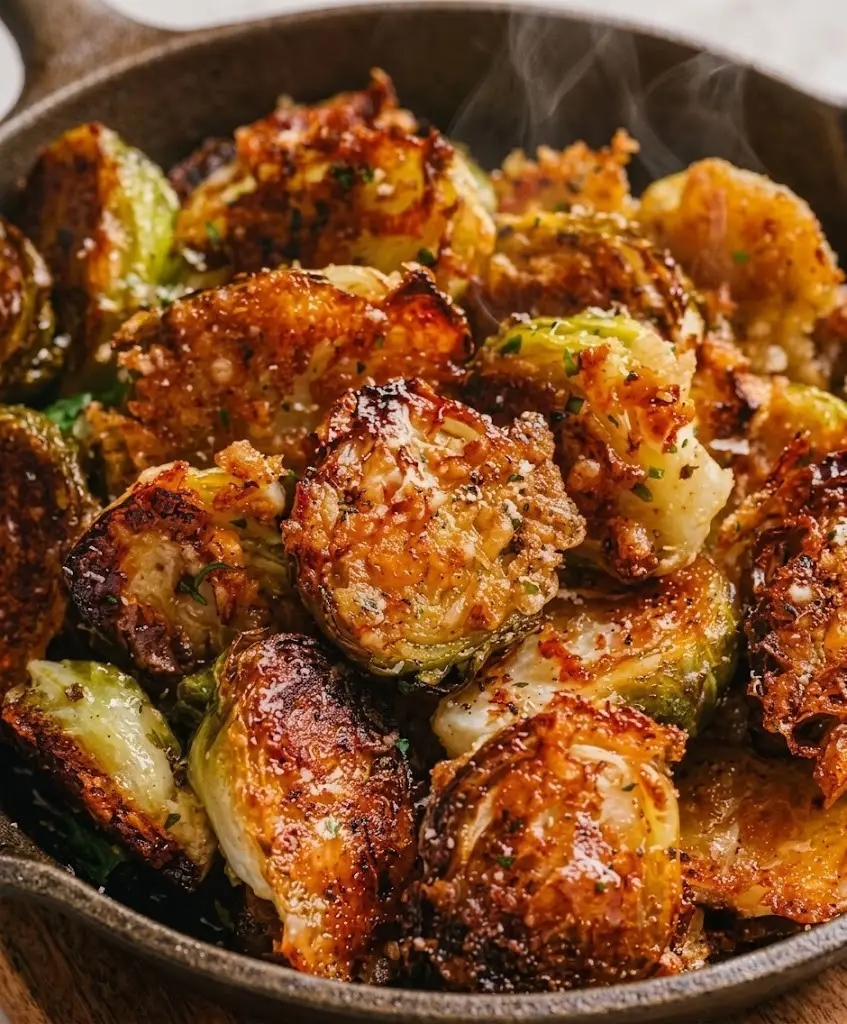
Five ingredients, 20 minutes, and a hot air fryer transform humble Brussels sprouts into golden, cheesy, candy-like bites – the ultimate kid-friendly vegetable recipe.
Let’s be honest: Brussels sprouts have had a bad reputation for far too long. Boiled to a sad, mushy pulp, they’ve been the butt of dinner table jokes for generations. But when you give them the air fryer treatment, something magical happens. The hot, circulating air caramelizes the natural sugars, the edges turn deeply golden and crisp, and a generous sprinkle of Parmesan cheese creates a flaky, savory crust that’s utterly addictive. These Air Fryer Brussels Sprouts aren’t just good – they’re crave-worthy, sweet, salty, and crunchy in all the right ways.
I first discovered this method when I was searching for a vegetable side dish that my kids would actually eat without complaint. The first batch disappeared in minutes, with requests for seconds. Now, it’s a staple in our house – a go-to for busy weeknights, holiday feasts, and even casual entertaining. The best part? It requires just five simple ingredients, takes less than 20 minutes, and delivers perfectly crispy, caramelized results every time. The Parmesan cheese melts into golden, lacy bits that cling to the sprouts, creating that irresistible crusty coating you see in the picture.
In this comprehensive guide, I’ll walk you through the exact air fryer method, share the secret to that deep, pan-charred look (a cast-iron skillet trick), and offer plenty of tips, variations, and answers to your questions. Whether you’re a Brussels sprouts skeptic or a devoted fan, this recipe is about to become your new favorite way to eat your greens.
✨ Why these air fryer Brussels sprouts are a total game‑changer:
• 20 minutes from prep to plate – faster than roasting.
• Perfectly crisp exterior – no more soggy sprouts.
• Sweet & caramelized – the air fryer brings out their natural sugars.
• Parmesan crust – adds a crispy, savory, flaky coating.
• Kid‑approved – even picky eaters love these.
📋 The Recipe – Air Fryer Brussels Sprouts with Parmesan
Prep: 5 min · Cook: 17 min · Total: 22 min
Servings: 4 · Diet: Gluten‑Free · Low‑Carb · Vegetarian
🥣 The 5 Core Ingredients
- 1 lb (450g) fresh Brussels sprouts, trimmed and sliced in half lengthwise
- 2 tablespoons olive oil (or avocado oil)
- ½ teaspoon garlic powder
- Salt and freshly cracked black pepper, to taste
- ½ cup finely grated Parmesan cheese – the secret to that crispy, flaky crust
- Optional but recommended: 1 tablespoon balsamic glaze or honey for a sweet finish (great for kids!)
👩🍳 Step‑by‑Step Instructions (Air Fryer Method)
- Prep the sprouts: Pat the halved sprouts completely dry with a paper towel. This is the #1 rule for crispiness! Any moisture will cause steaming instead of roasting.
- Toss: In a large bowl, toss the sprouts with the olive oil, garlic powder, salt, and pepper until they are glossy and well‑coated.
- Air fry (phase 1): Preheat your air fryer to 400°F (200°C). Place the sprouts cut‑side down in the air fryer basket in a single, even layer – don’t overcrowd or they’ll steam. Cook in batches if necessary. Air fry for 10 minutes.
- Flip and cheese: Shake the basket to flip the sprouts. Sprinkle half of the Parmesan cheese over them, give a quick toss, and air fry for another 5–7 minutes.
- The crispy finish: Add the remaining Parmesan and toss again. Cook for the final 2–3 minutes, until the cheese is melted, bubbly, and forms golden, flaky crispy bits just like the photo.
- Serve immediately: Transfer to a bowl, drizzle with balsamic glaze or honey if desired, and watch them disappear.
💡 Pro tip: For the exact pan‑charred look in the photo, follow the air fryer steps for just 10 minutes, then finish in a hot cast‑iron skillet for 3–4 minutes – see the tips below!
~180Calories
8gProtein
12gFat
10gCarbs
The Science of Crispy Brussels Sprouts – Why the Air Fryer Is a Game‑Changer
Traditional roasting in an oven can yield excellent Brussels sprouts, but it often takes 30–40 minutes and requires careful flipping. The air fryer, on the other hand, uses intense, circulating heat to cook the sprouts faster and more evenly, with a concentrated heat that crisps the edges beautifully. Here’s why it works so well:
- Rapid dehydration: The high‑speed hot air rapidly evaporates moisture from the surface of the sprouts, which is essential for achieving a crispy exterior. This is why patting them dry is so important – any surface moisture will turn to steam and prevent browning.
- Even cooking: The air fryer’s fan ensures that hot air reaches every surface, so the sprouts cook uniformly without the need to rotate a baking sheet.
- Caramelization: The natural sugars in Brussels sprouts caramelize at high heat, creating that sweet, nutty flavour. The air fryer’s high temperature accelerates this process, giving you those beautiful browned edges in a fraction of the time.
The Parmesan Crust – How to Get Those Flaky, Golden Bits
Parmesan cheese is the magic ingredient that takes these sprouts from good to unforgettable. When baked or air‑fried, Parmesan melts and then dehydrates, creating crispy, lacy, intensely savoury bits that adhere to the sprouts. The key is to add the cheese in two stages:
- First addition: Adding half the cheese halfway through the cooking time allows it to melt and spread, creating a base layer of flavour.
- Second addition: Adding the remaining cheese in the last few minutes ensures it becomes golden and crisp, adding a textural contrast that makes these sprouts so irresistible.
For the best results, use freshly grated Parmesan from a block – it melts more evenly and creates a superior crust compared to pre‑shredded, which often contains anti‑caking agents that can affect melting.
Pro Tips for the Ultimate Air Fryer Brussels Sprouts
🥬 Dry, dry, dry – Pat the sprouts with paper towels until completely dry. This is the single most important step for crispy sprouts.
🔥 Don’t overcrowd – Leave space between sprouts for air circulation. If they’re stacked, they’ll steam. Work in batches if needed.
🧀 Grate your own Parmesan – Pre‑shredded cheese has added starches that prevent clumping but also prevent that lacy, crispy texture.
🍯 Add a sweet finish – A drizzle of balsamic glaze or honey balances the savory Parmesan and adds a kid‑friendly sweetness.
How to Get the Exact Pan‑Charred Look from the Photo
The photo you’ve seen shows Brussels sprouts with deep, almost blackened charred spots – the kind of caramelization that only comes from high heat on a flat surface. While the air fryer gives you 90% of the way there, to achieve that restaurant‑level, cast‑iron finish, you can use a hybrid method:
- Follow the air fryer steps above for just 10 minutes (phase 1, before adding cheese). This partially cooks the sprouts and starts the browning process.
- Heat a cast‑iron skillet over medium‑high heat with a tiny splash of oil until it’s shimmering.
- Transfer the partially cooked sprouts to the pan, cut‑side down. Press them firmly into the pan with a spatula – this ensures maximum contact and that deep, dark char.
- Let them sit undisturbed for 3–4 minutes – resist the urge to move them! This is where that incredible caramelized crust forms.
- Add Parmesan in the last minute to get that crispy, flaky coating exactly like the photo.
This method gives you the best of both worlds: the quick, even cooking of the air fryer, plus the intense, high‑heat sear of a cast‑iron skillet. The result is Brussels sprouts that are crispy, deeply charred, and absolutely stunning – perfect for impressing guests or just treating yourself to a restaurant‑quality side dish at home.
Endless Variations – Make These Sprouts Your Own
Once you’ve mastered the base recipe, you can easily experiment with different flavours and add‑ins:
- Balsamic Parmesan: Toss the finished sprouts with 1 tablespoon of balsamic vinegar and an extra sprinkle of Parmesan – the tangy sweetness is incredible.
- Lemon Garlic: Add the zest of one lemon and 1 extra clove of minced garlic to the oil mixture – it adds a fresh, bright finish.
- Spicy Sriracha: Add ½ teaspoon of sriracha or red pepper flakes to the oil for a gentle heat that kids might actually love (or skip for them).
- Maple Bacon: Crumble 2 slices of cooked bacon into the sprouts before the final toss, and drizzle with maple syrup – a sweet‑savory explosion.
- Panko Crunch: Mix ¼ cup of panko breadcrumbs with the Parmesan for an extra‑crunchy coating.
- Parmesan & Herb: Add 1 teaspoon of dried oregano or thyme along with the garlic powder for a more herbaceous flavour.
How to Serve These Showstopping Sprouts
These Brussels sprouts are incredibly versatile and pair beautifully with a wide range of main dishes. Here are some of my favourite ways to serve them:
- As a side to roast chicken – the crispy, savoury flavours complement roasted poultry perfectly.
- Alongside a steak – the sweetness of the sprouts balances the richness of beef.
- On a holiday table – they’re a welcome alternative to heavier, carb‑laden sides.
- In a grain bowl – top with a fried egg and quinoa for a hearty, healthy lunch.
- As a party appetizer – serve with a dipping sauce (like aioli or spicy mayo) for a crowd‑pleasing bite.
And don’t forget the finishing touch – a sprinkle of fresh parsley, extra black pepper, or a squeeze of lemon juice adds a final burst of brightness.
Storing and Reheating – Keeping the Crisp Alive
Brussels sprouts are always best fresh out of the air fryer, but if you have leftovers (unlikely!), you can store them in an airtight container in the refrigerator for up to 3 days. To reheat and restore crispiness, pop them back in the air fryer at 375°F for 3–4 minutes – this brings back much of that initial crunch. Avoid reheating in the microwave, as it will make them soggy.
If you’re meal‑prepping, you can pre‑trim and halve the sprouts, and even toss them with the oil and seasonings up to a day ahead. Store the coated sprouts in the fridge, then air fry when ready – this saves you a few minutes on busy evenings.
Want the full recipe and simple step-by-step instructions?
Page 2 continues with the full ingredients, cooking tips, and easy directions so you can make this recipe perfectly at home.