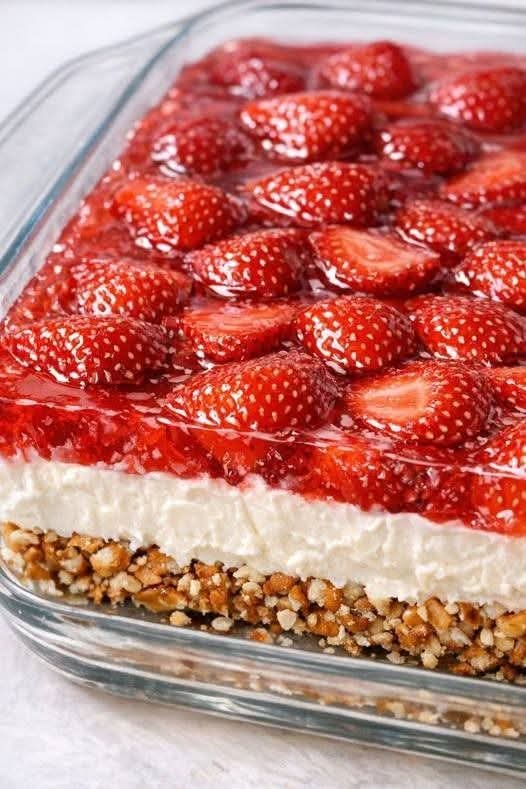
When the sun is blazing and the very thought of turning on the oven makes you wilt, No-Bake Strawberry Delight sweeps in like a hero. This glorious dessert is a symphony of layers: a buttery graham cracker crust that crunches beneath your fork, a velvety, sweetened cream cheese filling that’s as smooth as silk, a jewel-bright layer of strawberry-studded Jell-O that wobbles just right, and a final cloud of whipped topping that crowns it all in cool, creamy bliss. Every spoonful is a perfect balance of sweet and tangy, crunchy and soft, and it’s pure, refreshing strawberry heaven. It’s the dessert that defines summer potlucks, the centerpiece of Fourth of July spreads, and the reason everyone asks for “that pink layered thing” at family reunions. Best of all, it requires zero oven time, comes together with a handful of simple ingredients, and can be made ahead, which makes it the ultimate stress-free showstopper. Once you taste it, you’ll understand why this vintage recipe has been loved for generations—and why it deserves a permanent spot in your recipe box.
Strawberry Delight, sometimes called Strawberry Jell-O Delight or Strawberry Pretzel Salad’s sweeter cousin, is a classic American dessert that rose to fame in the mid-20th century, appearing in church cookbooks and on the backs of Cool Whip containers. Its genius lies in its simplicity and its perfect, no-bake construction. Each layer is prepared separately and allowed to set, creating distinct bands of flavor and texture that look stunning in a clear glass dish. The crust is a simple press-in mixture of graham cracker crumbs, melted butter, and a touch of sugar, which firms up in the fridge into a sturdy, crunchy base. The cream cheese layer is a dreamy blend of softened cream cheese, powdered sugar, and a little vanilla, lightened with whipped topping until it’s almost mousse-like. Then comes the fruity layer: strawberry Jell-O, partially set, mixed with sliced fresh strawberries (and sometimes a can of strawberry pie filling for extra oomph), poured over the cream cheese and left to set into a jiggly, ruby-red jewel. A final blanket of whipped topping, a scatter of fresh berries, and maybe a few graham cracker crumbs on top complete the masterpiece. The result is a dessert that tastes like a strawberry cheesecake met a Jell-O salad and fell in love. It’s cool, creamy, fruity, and so satisfying that no one can resist a second helping. And because it’s best made the day before, it frees you up to focus on the rest of your meal, making it the perfect host’s secret weapon. It travels well, slices beautifully, and looks like it took far more effort than it actually did.
In this comprehensive guide, I’ll walk you through every layer of this stunning no-bake dessert, from the perfect graham cracker crust that doesn’t crumble to the secrets of a smooth, never-lumpy cream cheese filling, to the strawberry Jell-O layer that’s packed with fresh fruit and sets up perfectly every time. You’ll find tips for making it ahead, creative variations to change up the flavors, and all the answers to your most frequently asked questions. Whether you’re a long-time fan of this retro classic or discovering it for the first time, get ready to meet your new favorite summer dessert. Let’s layer up some sunshine.
Why You’ll Love This No-Bake Strawberry Delight
Absolutely no oven required. From the crust to the topping, every layer sets up in the refrigerator, making this the perfect dessert for hot summer days, busy holidays, or anytime you don’t want to heat up the kitchen. It’s a true no-bake dessert that relies on the fridge to do all the work. You can make it without ever touching a stovetop, aside from boiling water for the Jell-O, which takes about two minutes. This makes it an ideal recipe for beginner cooks, kids helping in the kitchen, or anyone who wants a stunning dessert with minimal effort and maximum wow-factor. All you need is a mixing bowl, a hand mixer, and a 9×13-inch dish.
Four distinct, gorgeous layers in every bite. This is a dessert that’s as beautiful as it is delicious. The buttery graham cracker crust anchors the dish with a satisfying crunch. The sweet, tangy cream cheese layer is luxuriously smooth and just sweet enough. The strawberry Jell-O layer, studded with fresh, juicy berries, is a vibrant, fruity jewel. And the fluffy whipped topping is the perfect finishing touch, light and cool. When you slice into it, each forkful reveals the distinct layers, and the combination of flavors and textures—crunchy crust, creamy cheese, jiggly Jell-O, and airy topping—is pure dessert perfection. It looks stunning on a buffet table, and it always draws gasps of delight.
Incredibly easy to make with simple ingredients. You don’t need any fancy equipment or hard-to-find items. The ingredients are all available at any grocery store: graham crackers, butter, cream cheese, powdered sugar, whipped topping, strawberry Jell-O, and fresh or frozen strawberries. It’s a budget-friendly dessert that feeds a crowd, and you likely have many of the components in your pantry already. The techniques are straightforward: mix, press, beat, spread, pour, and chill. Even if you’ve never made a layered dessert before, this one is foolproof. It’s the kind of recipe that becomes a tradition because it’s so reliable and so beloved.
Perfect for making ahead—it actually gets better overnight. Because the layers need time to set, Strawberry Delight is designed to be made in advance. In fact, the flavors meld and the textures set up even better after an overnight rest in the fridge. This means you can prepare it a day or two before your party, leaving you completely stress-free on the day of the event. It’s the ultimate host-friendly dessert. You simply pull it out of the refrigerator, slice, and serve. It also travels well if you keep it chilled, making it a great choice for potlucks, picnics, and family gatherings. The make-ahead nature of this dessert is one of its greatest assets, and it will quickly become your go-to for entertaining.
Ingredient Deep Dive: The Luscious Layers
Let’s break down each component of this layered masterpiece and understand why it works so perfectly.
The Graham Cracker Crust – The Buttery, Crunchy Foundation
You’ll need 2 cups of finely crushed graham cracker crumbs (about 12–14 full sheets), ½ cup of melted unsalted butter, and 2 tablespoons of granulated sugar. The butter binds the crumbs together and hardens when chilled, creating a firm, sliceable crust. The sugar adds a touch of sweetness and helps the crust brown slightly. You can crush the graham crackers in a food processor, or place them in a zip-top bag and crush them with a rolling pin until you have fine, uniform crumbs. The finer the crumbs, the more cohesive the crust. Press the mixture firmly and evenly into the bottom of a 9×13-inch dish; the back of a measuring cup or a flat-bottomed glass works perfectly to compact it. No pre-baking is needed—the crust sets up beautifully in the refrigerator while you prepare the next layer. You can also use vanilla wafer crumbs, shortbread cookie crumbs, or even crushed Golden Oreos for a different flavor. For a nuttier crust, add ¼ cup of finely chopped pecans. The crust is the foundation that contrasts beautifully with the creamy layers above. A well-pressed crust will hold together when sliced, making it easy to serve. Be sure to press it firmly; a loose crust can crumble. The butter should be fully melted so it evenly coats the crumbs. This simple, classic crust is the same one used in countless icebox desserts, and it never fails to deliver that satisfying crunch.
The Cream Cheese Layer – The Velvety, Tangy Middle
Eight ounces of full-fat cream cheese, softened to room temperature, is the base of this luxurious layer. Beat the cream cheese until it’s completely smooth before adding 1 cup of powdered sugar, which dissolves seamlessly and sweetens without any graininess. A teaspoon of vanilla extract adds a warm, aromatic note. Once the cream cheese and sugar are well combined, gently fold in 1 cup of thawed whipped topping (like Cool Whip). This lightens the mixture and creates a mousse-like texture that’s absolutely dreamy. The key to a smooth, lump-free cream cheese layer is to ensure your cream cheese is truly soft—leave it out on the counter for at least an hour, or microwave it in 10-second bursts until it’s soft to the touch but not melted. Beat it alone first until it’s creamy, then add the powdered sugar gradually. Folding in the whipped topping by hand preserves the air and gives the layer its light, fluffy character. This layer is spread evenly over the chilled graham cracker crust, creating a white, velvety band. It provides a tangy contrast to the sweet Jell-O layer above, and it’s reminiscent of a no-bake cheesecake. For a slightly different flavor, you can add a tablespoon of lemon juice or the zest of a lemon for brightness. You can also use neufchâtel cheese for a slightly lighter version, but full-fat cream cheese gives the richest taste and best texture. This is the layer that makes everyone swoon, and it’s so simple to put together. Be sure the crust is fully chilled before spreading this layer, or the crumbs may mix into the cream cheese and muddy the layers. A gentle touch when spreading keeps the crust intact.
The Strawberry Jell-O Layer – The Fruity, Jewel-Like Heart
This is the star of the show. You’ll need one 6-ounce package of strawberry-flavored Jell-O. Dissolve the Jell-O powder in 1½ cups of boiling water, stirring until it’s completely dissolved. Then, stir in 1 cup of cold water (or you can use some ice to speed up the cooling). Let this mixture cool to room temperature—you can place it in the refrigerator to speed the process, but keep an eye on it; you want it to thicken to the consistency of egg whites, not set completely. This usually takes about 45–60 minutes in the fridge. When the Jell-O has thickened to a syrupy, slightly wobbly stage, fold in 2–3 cups of sliced fresh strawberries (or an equal amount of thawed frozen strawberries, drained of excess liquid). The fruit will be suspended in the Jell-O, creating a beautiful, colorful layer. Pour this mixture over the cream cheese layer and spread it gently. Then return the dish to the refrigerator for at least 2 hours, until the Jell-O is fully set and firm to the touch. The key to a perfect layer is patience: if the Jell-O is too warm when poured, it can melt the cream cheese layer and cause the layers to mix. If it’s too set, it won’t pour smoothly. The thickened but still pourable stage is what you’re aiming for. The fresh strawberries add a burst of juicy sweetness and a beautiful texture. You can also add sliced bananas, but they may brown slightly over time. Some versions of this dessert use strawberry pie filling instead of Jell-O and fresh fruit; this creates a thicker, more jam-like layer that’s also delicious. If you go that route, simply spread the pie filling over the cream cheese layer. But the classic Jell-O version, with its translucent, wobbly texture and suspended berries, is what gives Strawberry Delight its signature look and retro charm. The fruity layer is what makes this dessert taste like a strawberry field in June, and it’s absolutely bursting with berry flavor.
The Whipped Topping – The Cloud-Like Finish
The final layer is simple but essential: 2 cups of thawed whipped topping (like Cool Whip), spread over the completely set Jell-O layer. This creates a fluffy, white cloud that contrasts beautifully with the bright red strawberry layer. You can spread it gently with a spatula, or pipe it on for a more decorative look. The whipped topping adds a light, sweet finish and helps seal in the Jell-O layer. For an extra touch, garnish the top with a few whole strawberries, a sprinkle of graham cracker crumbs, or some white chocolate shavings. The whipped topping should be fully thawed and easy to spread. You can also sweeten it with a little powdered sugar if you like, but Cool Whip is already sweetened. Homemade whipped cream can be used, but it may deflate over time and won’t hold up as well for a make-ahead dessert. The stabilized nature of Cool Whip makes it the better choice for a dessert that needs to sit in the fridge for a day or two. This final layer adds the perfect, creamy finish and brings the whole dessert together. It’s the first thing your guests will see, and it makes the dish look like a beautiful, snowy field over a strawberry sunset. The contrast of colors and textures—white, red, white, and golden crust—is absolutely stunning, especially when sliced. This simple topping is the crowning glory of the dessert.
Step-by-Step: Building the Perfect Layers
Follow these detailed steps for a perfectly layered, beautiful No-Bake Strawberry Delight every time.
Step 1: Make the Graham Cracker Crust
In a medium bowl, combine the 2 cups of finely crushed graham cracker crumbs, ½ cup melted butter, and 2 tablespoons of sugar. Stir with a fork until the crumbs are evenly moistened and the mixture resembles damp sand. Press the crumb mixture firmly and evenly into the bottom of a 9×13-inch glass or ceramic baking dish. Use the flat bottom of a measuring cup or a glass to really press it down compactly. The more firmly you press, the better the crust will hold together when sliced. Place the dish in the refrigerator for at least 30 minutes to allow the crust to set and firm up. This cooling step is essential before adding the cream cheese layer, or the crust may crumble and mix into the filling. A well-chilled crust provides a sturdy, crunchy base. The crust can also be made a day ahead and kept in the fridge.
Step 2: Prepare the Cream Cheese Layer
In a large mixing bowl, beat the 8 ounces of softened cream cheese with a hand mixer on medium speed until it is completely smooth and free of lumps. This takes about 1–2 minutes. Gradually add 1 cup of powdered sugar, beating on low speed until incorporated, then increase the speed and beat until the mixture is smooth and creamy. Add 1 teaspoon of vanilla extract and mix to combine. Using a rubber spatula, gently fold in 1 cup of thawed whipped topping (Cool Whip) until the mixture is light, fluffy, and uniform in color. No streaks of whipped topping should remain. Be gentle to keep the air in the mixture. Remove the chilled crust from the refrigerator. Spoon the cream cheese mixture onto the crust and gently spread it into an even layer, being careful not to disturb the crust. A light touch with the spatula is key. Return the dish to the refrigerator while you prepare the Jell-O layer. The cream cheese layer should chill for at least 30 minutes to firm up slightly, which helps create a clean separation between it and the Jell-O layer. This is important for distinct, beautiful layers.
Step 3: Make the Strawberry Jell-O Layer
In a medium heatproof bowl, dissolve the 6-ounce package of strawberry Jell-O in 1½ cups of boiling water. Stir for at least 2 minutes, until the gelatin is completely dissolved and no granules remain. Stir in 1 cup of cold water (or you can use a combination of cold water and ice cubes to speed up the cooling). Let the mixture cool to room temperature. To speed up the process, place the bowl in the refrigerator for about 30–45 minutes, stirring occasionally, until the Jell-O has thickened to the consistency of unbeaten egg whites—it should be syrupy and slightly wobbly, but not set. Do not let it set completely. Once the Jell-O is thickened, gently fold in 2–3 cups of sliced fresh strawberries (or thawed frozen strawberries, well drained). The berries should be evenly distributed. Remove the dish with the cream cheese layer from the refrigerator. Carefully pour the thickened Jell-O and strawberry mixture over the cream cheese layer, spreading it gently with a spatula if needed. The cream cheese layer should be firm enough that the Jell-O sits on top without mixing. Return the dish to the refrigerator and chill for at least 2–3 hours, or until the Jell-O is completely set and firm to the touch. The dessert can even be chilled overnight, which yields the best texture. The Jell-O layer should be wobbly but not liquid. It should be solid enough to slice cleanly.
Step 4: Add the Whipped Topping
Once the Jell-O layer is fully set, spread the remaining 2 cups of thawed whipped topping evenly over the top. Use a spatula to create a smooth, even layer or swirl it decoratively. You can also pipe it if you prefer a fancier look. Garnish with a few fresh strawberry slices, a sprinkle of graham cracker crumbs, or some white chocolate curls, if desired. Return the dish to the refrigerator for at least 30 minutes before serving to allow the whipped topping to firm up slightly. This final chill ensures the dessert is perfectly cold and the layers are set. When ready to serve, slice into squares and use a spatula to lift each piece out. The dessert will hold its shape beautifully, with distinct layers visible in every slice. Serve cold and watch it disappear. This final step is quick and transforms the dessert into a true showpiece. The white topping looks gorgeous against the red Jell-O layer. The dessert is best enjoyed cold, straight from the fridge. The leftovers, if there are any, will keep for several days, though the crust may soften slightly over time. But the flavor remains incredible, and the layers stay distinct.
Pro Tips for a Perfectly Set, Beautiful Dessert
- Chill the crust thoroughly before adding the cream cheese layer. A warm or room-temperature crust will crumble into the cream cheese, ruining the clean layer. At least 30 minutes in the fridge, and preferably an hour, ensures the butter has hardened and the crust is solid. The crust should feel firm to the touch. If you’re short on time, you can pop it in the freezer for 15 minutes, but don’t let it freeze solid. A well-chilled crust is the foundation for all the layers above, and it makes spreading the cream cheese mixture much easier.
- Let the Jell-O thicken before pouring. This is the most critical step for achieving distinct layers. If the Jell-O is too thin and warm, it will melt the cream cheese layer and the two will combine into a pink mush—still tasty, but not the beautiful layered dessert you’re aiming for. Wait until the Jell-O has the consistency of thick syrup or raw egg whites. It should mound slightly when dropped from a spoon. If it’s too thick to pour, you can stir it gently to loosen it, but it’s better to err on the side of slightly thicker than too thin. The cream cheese layer should also be well-chilled and firm to help resist the Jell-O. Patience at this stage guarantees those picture-perfect layers.
- Use room-temperature cream cheese. Cold cream cheese will leave lumps in your filling that are impossible to beat out. Let it sit on the counter for at least an hour before you plan to use it. If you forgot, you can microwave it in 10-second bursts, but be very careful not to melt it—you just want it soft. Lumpy cream cheese leads to a grainy, uneven layer. Smooth cream cheese ensures a velvety, creamy middle that’s a pleasure to eat. Beat the cream cheese alone first to get it perfectly smooth before adding anything else. This small step makes a big difference in the final texture.
- Fresh strawberries are best, but frozen work well too. If using fresh berries, slice them to about ¼ inch thick so they suspend nicely in the Jell-O. If using frozen, be sure to thaw them completely and drain off all the excess juice, which can water down the Jell-O and prevent it from setting properly. Frozen strawberries are often softer and may break down a bit more, but they’re a great option when fresh aren’t in season. The flavor is still wonderful. You can also use a combination of fresh strawberries and strawberry pie filling for an extra-fruity, thicker layer. Just adjust the amount of Jell-O accordingly if you add pie filling, as it can make the layer very thick and sweet. The strawberries should be evenly distributed so every bite gets a burst of fruit.
- Make it a day ahead for the best flavor and easiest slicing. This dessert truly benefits from an overnight rest. The layers meld together beautifully, the Jell-O sets completely, and the crust maintains its crunch. Plus, making it ahead takes all the pressure off the day of your event. Simply keep it covered in the refrigerator, and add any final garnishes just before serving. A cold, well-set dessert slices like a dream and looks stunning on the plate. The flavors of the strawberry, cream cheese, and graham cracker deepen and become more harmonious. This is the ultimate make-ahead dessert, and it’s practically designed for busy hosts.
Flavor Twists & Customizations
Once you’ve mastered the classic Strawberry Delight, try these fun variations to change up the flavors.
- Raspberry Delight: Swap the strawberry Jell-O for raspberry, and use fresh raspberries instead of strawberries. The color is a deep, ruby red, and the tartness of the raspberries is a wonderful contrast to the sweet cream cheese. Garnish with a few fresh raspberries and a sprinkle of lemon zest. This version is especially elegant and perfect for a dinner party.
- Peach Delight: Use peach Jell-O and fold in 2 cups of diced fresh or canned peaches (drained well). The sweet, summery flavor of peaches pairs beautifully with the graham cracker crust. A sprinkle of cinnamon in the crust adds a warm, cozy note that’s reminiscent of peach cobbler. This variation is a Southern favorite and tastes like a summer picnic.
- Lemon Blueberry Delight: Use lemon Jell-O and fold in 2 cups of fresh blueberries. Add the zest of one lemon to the cream cheese layer for an extra citrusy punch. The combination of bright lemon and sweet blueberries is refreshing and light. A garnish of lemon slices and a few blueberries on top makes it look like a sunny day. This version is a wonderful choice for spring brunches or Easter.
- Chocolate Strawberry Delight: Use a chocolate cookie crust (made from crushed Oreos or chocolate graham crackers) instead of the regular graham cracker crust. The chocolate and strawberry combination is a classic that everyone loves. You can also drizzle melted chocolate over the top for a beautiful finish. This version tastes like a chocolate-covered strawberry in layered dessert form. Use a chocolate cookie crust with a bit of melted butter, just like the graham cracker version. Press it firmly and chill. The dark chocolate color contrasts gorgeously with the red strawberry layer and the white cream cheese and whipped topping.
- Pina Colada Delight: Use a vanilla wafer crust, pineapple Jell-O with crushed pineapple (drained), and add a teaspoon of coconut extract to the cream cheese layer. Top with toasted coconut flakes. This tropical twist is a hit at summer parties and tastes like a beach vacation. The combination of pineapple, coconut, and the creamy layers is irresistible. You can also swap the whipped topping for a coconut-flavored whipped topping if you can find it. The toasted coconut on top adds a lovely crunch and visual appeal.
Serving & Presentation Ideas
This dessert is a natural beauty, but a few extra touches can make it even more stunning. Serve it in a clear glass 9×13-inch dish to show off those gorgeous layers. For individual servings, you can assemble the dessert in small trifle cups or mason jars—simply layer the crust, cream cheese, Jell-O with fruit, and whipped topping in each jar. This is a wonderful option for parties or picnics, and everyone gets their own perfect little dessert. Garnish the top with whole fresh strawberries, a mint sprig, or a light dusting of graham cracker crumbs. A drizzle of strawberry syrup or a few white chocolate curls adds a gourmet touch. For a Fourth of July celebration, add a handful of blueberries to the strawberry layer for a red, white, and blue theme. The dessert slices cleanly with a sharp knife; wipe the knife between cuts for the neatest presentation. Use a flat spatula to lift each piece out of the dish, supporting the bottom crust. The dessert is best served cold, straight from the refrigerator. It pairs wonderfully with a glass of iced tea, lemonade, or a sparkling rosé. The refreshing, fruity flavors and the cool, creamy texture make it the perfect ending to any summer meal. And because it’s so light, it doesn’t leave you feeling heavy, even after a big dinner. The combination of fruit, cream, and crunch is universally appealing, and you’ll be amazed at how quickly it disappears.
Storage, Make-Ahead & Shelf Life
Make-Ahead: This dessert is practically designed to be made ahead. You can prepare it entirely up to 2 days in advance. The layers will stay distinct, and the crust will remain crunchy if kept properly chilled. Cover the dish tightly with plastic wrap or a lid once the final layer has set, and keep it in the refrigerator. The flavors will meld beautifully, and the dessert will slice even more cleanly after an overnight rest. If you’re adding garnishes like fresh strawberries or graham cracker crumbs, add them just before serving so they look fresh. Making it ahead is the best way to ensure a stress-free event and a perfectly set dessert.
Storing Leftovers: Cover any leftover dessert tightly and store it in the refrigerator. It will keep for up to 3–4 days. The crust may soften slightly over time as it absorbs moisture from the layers above, but it will still be delicious. The Jell-O layer may also release a little liquid, but this is normal and doesn’t affect the flavor. If you’re storing it for more than a day, you may want to place a paper towel under the plastic wrap to absorb any excess moisture. The whipped topping may lose some of its fluffiness, but the dessert will still be wonderfully creamy and fruity. It’s so good that leftovers are rarely an issue—most pans are scraped clean within the first serving!
Can you freeze Strawberry Delight?
Freezing is not recommended. The Jell-O layer can become watery and grainy upon thawing, and the cream cheese layer may separate. The crust can also become soggy. This dessert is best enjoyed fresh from the refrigerator. If you must freeze it, do so without the whipped topping layer, and add that fresh when serving. However, the texture will not be the same. For the best results, make it fresh and enjoy it within a few days. The simplicity of the recipe means you can whip it up quickly whenever a craving strikes, so freezing is rarely necessary. It’s a dessert meant to be shared and enjoyed in the moment, bringing a touch of retro charm to any table.
Want the full recipe and simple step-by-step instructions?
Page 2 continues with the full ingredients, cooking tips, and easy directions so you can make this recipe perfectly at home.