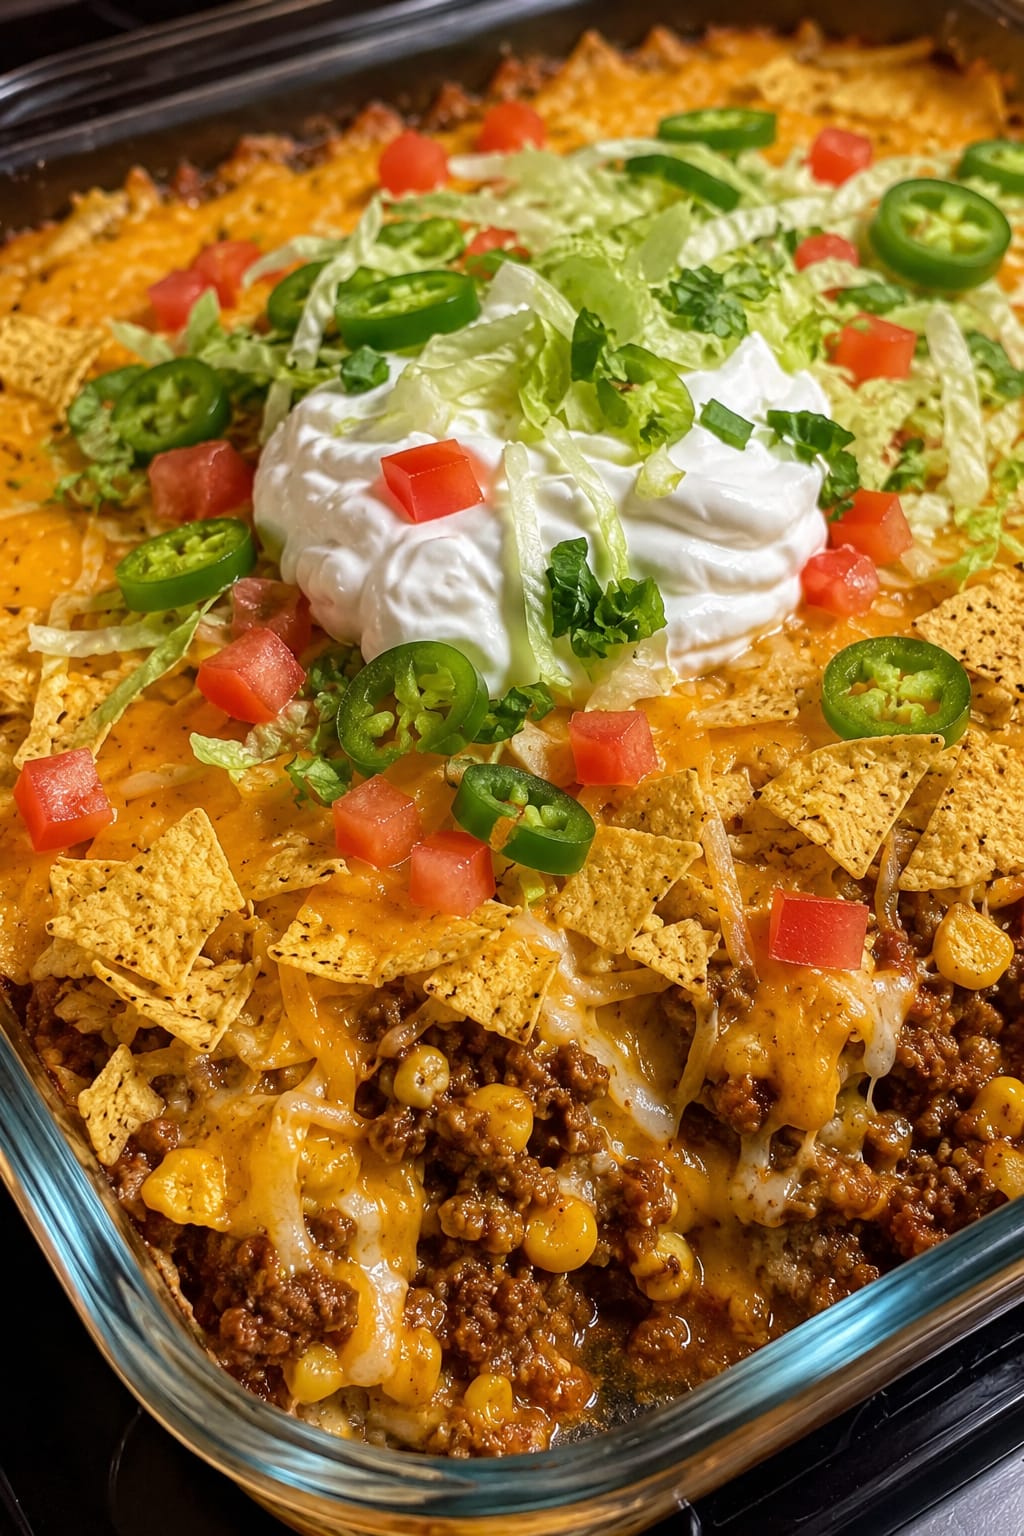
If your family goes wild for taco night but you’re tired of the assembly-line mess—or the inevitable avalanche of toppings tumbling out of individual bags—this Walking Taco Casserole is about to become your weeknight hero. It captures everything we love about the iconic fairground snack: seasoned ground beef, gooey melted cheese, crunchy corn chips, and all the fresh, zesty toppings you crave. But instead of slicing open a bag of chips and spooning chili inside, we’re building a glorious, layered casserole that bakes up hot and bubbly, feeds a crowd effortlessly, and brings that same interactive, customizable taco joy right to your dinner table.
A traditional walking taco is a brilliant concept—a small bag of Fritos or Doritos crushed, topped with chili or seasoned beef, and finished with cheese, lettuce, salsa, and sour cream, eaten straight from the bag with a fork. This casserole takes that spirit and expands it into a family-style baked dish that’s perfect for potlucks, game day gatherings, busy weeknight dinners, and even meal-prepped lunches. Layers of crunchy corn chips, a savory, perfectly spiced ground beef mixture, and a generous blanket of melted cheese come together in one pan, then get showered with your favorite fresh toppings right before serving. It’s fast, it’s fun, and it’s an undeniable crowd-pleaser.
In this comprehensive guide, we’ll cover everything: how to build the best walking taco casserole step by step, which chips hold up best, how to customize the spice level and protein, make-ahead and storage tips, and an entire array of topping ideas so everyone can build their perfect bite. Get ready to meet the casserole that just might replace your traditional taco Tuesday forever.
Why You’ll Love This Walking Taco Casserole
It’s the ultimate family-friendly weeknight dinner. Ground beef seasoned with taco spices, crunchy corn chips, and plenty of melted cheese—what’s not to love? Even picky eaters can’t resist this combination. It comes together fast, bakes in about 20 minutes, and can be on the table in under an hour. This is the kind of easy ground beef recipe that saves busy weeknights.
A complete meal in one dish, yet fully customizable. The casserole itself is the warm, hearty base. The fresh, cold toppings—lettuce, tomatoes, sour cream, salsa, jalapeños, avocado—get added at the table, so everyone builds their perfect bite. It’s a build-your-own taco bar in casserole form, and it keeps the crunch alive because the fresh toppings don’t bake.
Perfect for potlucks, tailgates, and game day. This dish travels well, reheats beautifully, and can be doubled or tripled for a crowd. It’s one of the best Mexican casserole recipes for feeding a hungry group, and it always disappears fast. You can even set it up as a walking taco bar with individual chip bags on the side for a fun, interactive twist.
Budget-friendly and made from pantry staples. Ground beef, canned beans if you choose, corn chips, cheese, and a packet of taco seasoning are the backbone. These are inexpensive, long-lasting ingredients you can keep on hand for a last-minute dinner that never disappoints. It’s a cheap family meal that tastes like a celebration.
Ingredient Breakdown: From Beef to Chips
Every component in this casserole works together to create layers of flavor and texture. Let’s talk about what you’ll need and why.
The Savory Beef Layer
Ground beef: One pound of lean ground beef (80/20 or 85/15) is classic. You can also use ground turkey or ground chicken for a lighter version. Brown the meat thoroughly and drain off any excess grease to keep the casserole from becoming oily. Season it generously with a packet of taco seasoning (or your own blend of chili powder, cumin, garlic powder, onion powder, paprika, and oregano) and a splash of water to create a slightly saucy, well-coated mixture.
Optional additions: A can of drained and rinsed black beans or pinto beans stretches the meat further and adds fiber and creaminess. A can of Rotel diced tomatoes with green chilies, or a cup of salsa stirred into the meat, adds extra moisture and a spicy kick. These are totally optional but highly recommended.
The Crunchy Chip Layer
Corn chips: The classic choice is Fritos, but you can use any sturdy corn chip like Tostitos or even Doritos for a nacho cheese twist. The chips should be slightly thick to hold up under the meat and cheese without instantly turning to mush. You’ll need about 3 to 4 cups, lightly crushed, for a 9×13-inch dish.
The Cheese and Binders
Shredded cheese: A Mexican blend, sharp cheddar, Monterey Jack, or a mix is perfect. You’ll use cheese both inside the layers and melted on top. About 2 to 3 cups total. Shredding your own cheese from a block melts more smoothly than pre-shredded, but both work.
Creamy binder (optional): Some versions stir a can of condensed nacho cheese soup or a few tablespoons of sour cream into the beef mixture to create a creamier, queso-like consistency. It’s a delicious, indulgent addition.
The Fresh Toppings (Added After Baking)
The real magic of a walking taco casserole is the contrast between the hot, cheesy base and the cold, crisp toppings. Classic choices include shredded lettuce, diced fresh tomatoes or pico de gallo, sliced black olives, pickled jalapeños, sour cream or Mexican crema, fresh cilantro, diced avocado or guacamole, and a generous drizzle of hot sauce or salsa.
Step-by-Step Assembly & Baking
This casserole builds in simple layers and bakes quickly. Here’s how to do it.
Step 1: Preheat and Prep the Pan
Preheat your oven to 375°F (190°C). Lightly grease a 9×13-inch baking dish with nonstick spray or a thin layer of oil.
Step 2: Brown and Season the Beef
In a large skillet over medium-high heat, cook the ground beef, breaking it apart with a spatula, until fully browned and no longer pink. Drain any excess fat. Stir in the taco seasoning and a splash of water (as directed on the packet or about ⅓ cup). Let it simmer for 2-3 minutes until the mixture thickens slightly and the beef is well coated. If adding beans, Rotel, or nacho cheese soup, stir them in now and heat through.
Step 3: Layer the Chips
Spread about half of the lightly crushed corn chips in an even layer at the bottom of the prepared baking dish. This bottom layer provides a sturdy, crunchy foundation that will absorb some of the beef juices while still retaining texture.
Step 4: Add the Beef and Cheese
Spoon the seasoned ground beef mixture evenly over the chip layer. Sprinkle a generous amount of shredded cheese (about 1½ cups) over the beef. Top with the remaining crushed corn chips, then finish with another layer of shredded cheese. The double cheese layer ensures gooey, melty goodness throughout.
Step 5: Bake Until Bubbly and Golden
Place the dish in the preheated oven and bake for 15 to 20 minutes, until the cheese is completely melted, bubbly, and beginning to turn golden around the edges. If you like a crispier top, switch to broil for the last 1–2 minutes, watching carefully so the chips don’t burn.
Step 6: Add Fresh Toppings and Serve Immediately
Remove the casserole from the oven. Now comes the walking taco magic—pile on the cold, fresh toppings. Scatter shredded lettuce, diced tomatoes, jalapeños, olives, and anything else you love across the top. Add dollops of sour cream and guacamole, or pass them at the table. Scoop generous portions onto plates or into bowls and enjoy immediately while hot and crunchy.
Pro Tips for a Crunchy, Never-Soggy Casserole
- Use sturdy, thick corn chips. Thin, delicate chips will disintegrate under the weight of the beef and cheese. Fritos, Tostitos Scoops, or thick restaurant-style tortilla chips hold up best. Slightly stale chips actually work great here.
- Don’t over-crush the chips. Leave some larger pieces for texture. A mix of fine crumbs and larger shards gives you the best crunch-to-creamy ratio.
- Drain the beef well. Excess grease will seep into the chips and make them soggy. After browning, drain the meat thoroughly before adding seasonings.
- Add cold toppings just before serving. The lettuce, tomatoes, sour cream, and other fresh ingredients should go on after the casserole comes out of the oven. This preserves their cool, crisp texture and keeps the dish from wilting.
- Broil for extra crunch. A minute or two under the broiler at the end of baking gives the top cheese and exposed chips an irresistible crisp, golden finish.
Flavor Twists & Topping Bar Ideas
This casserole is a launchpad for creativity. Here are some riffs to try.
- Frito Pie Casserole: Use chili instead of taco-seasoned beef. Layer Fritos, chili (homemade or canned), and plenty of cheddar. Top with diced onions and jalapeños after baking. It’s the classic Frito pie in casserole form.
- Doritos Locos Taco Casserole: Swap Fritos for Nacho Cheese Doritos. The bold, cheesy chip flavor pairs incredibly well with the seasoned beef and extra cheese. A drizzle of nacho cheese sauce on top before serving sends it over the edge.
- Chicken Taco Casserole: Replace ground beef with shredded rotisserie chicken seasoned with taco spices. It’s a lighter, yet still protein-packed alternative that comes together even faster.
- Vegetarian Black Bean Version: Skip the meat entirely. Use two cans of seasoned black beans, a cup of corn kernels, and a can of Rotel. The beans provide plenty of substance, and the corn adds a sweet pop.
- Street Corn Walking Taco Casserole: Add a layer of Mexican street corn (elote) ingredients—grilled corn kernels mixed with mayo, lime juice, chili powder, and cotija cheese—on top of the beef before the final cheese layer. Finish with fresh cilantro and a squeeze of lime.
Serving Suggestions & Side Dishes
This casserole is a full meal, but simple sides round out the plate. Mexican rice or cilantro-lime rice on the side soaks up any extra beef juices. Refried beans or a simple black bean soup complement the flavors. For freshness, a jicama slaw, corn and avocado salad, or a crisp green salad with a lime vinaigrette balances the richness. And don’t forget the aguas frescas or margaritas for a true fiesta vibe.
Make-Ahead, Storage & Reheating
Make-Ahead: You can brown the seasoned beef mixture up to 2 days in advance and store it in the refrigerator. When ready to bake, simply layer the chips, beef, and cheese, and pop it in the oven. You can also assemble the entire unbaked casserole (without the fresh toppings) a few hours ahead, cover, and refrigerate. Add 5–7 minutes to the bake time to account for the chilled dish.
Storing Leftovers: The chips will soften as the casserole sits, but it’s still delicious. Store leftovers in an airtight container in the refrigerator for up to 3 days. Keep any uneaten fresh toppings in separate containers.
Reheating: For the best texture, reheat in a 350°F oven or an air fryer until warmed through and the cheese re-melts. The microwave works in a pinch but will result in a softer texture. Add fresh, cold toppings after reheating to revive that contrast.
Freezing: It’s not recommended to freeze the casserole with the chips, as they’ll become extremely soggy. You can, however, freeze the seasoned beef mixture for up to 3 months. Thaw and then assemble with fresh chips and cheese when ready to bake.
Want the full recipe and simple step-by-step instructions?
Page 2 continues with the full ingredients, cooking tips, and easy directions so you can make this recipe perfectly at home.