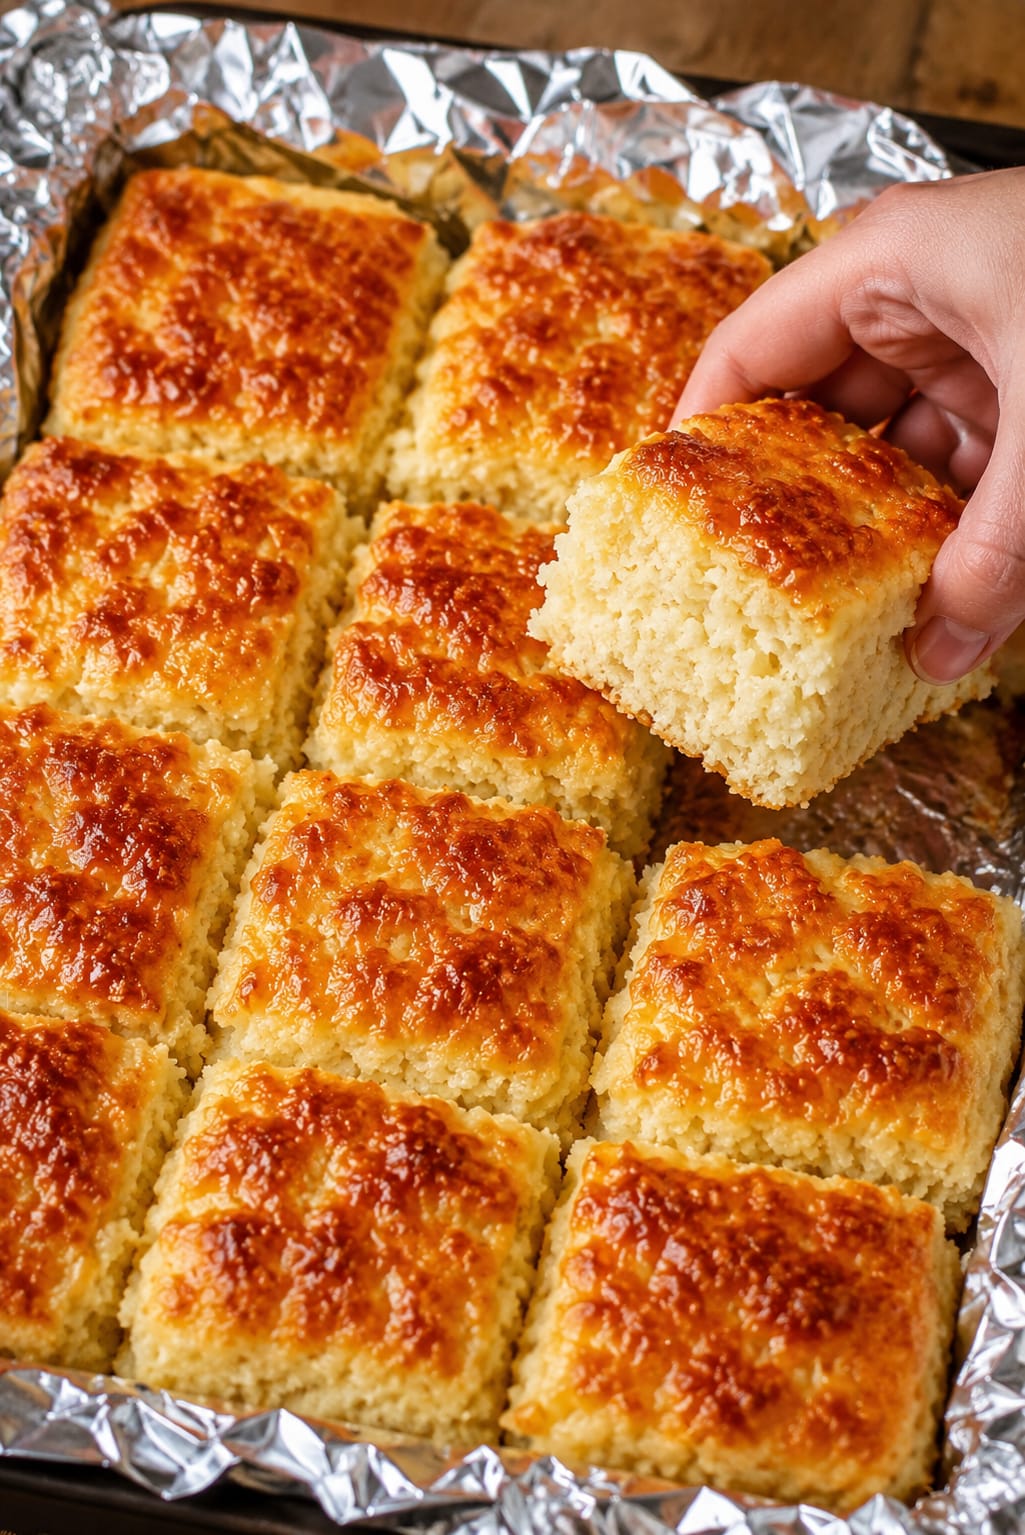
Some of the best recipes are born from the simplest moments: a near-empty fridge, a hungry family, and a deep craving for something warm, cheesy, and comforting. These 4-Ingredient Cheesy Biscuit Squares are exactly that kind of miracle. With just self-rising flour, sharp cheddar cheese, Greek yogurt or sour cream, and melted butter, you can pull a pan of golden, soft, utterly irresistible squares out of the oven in under half an hour. They’re the quick bread you’ll turn to again and again—no yeast, no resting, no kneading, just a thick dough pressed into a pan, brushed with butter, and baked until the top is beautifully bronzed and the center is tender and fluffy.
If you’ve ever made a batch of drop biscuits and wished they were easier, or loved those cheddar bay biscuits from a certain seafood restaurant but didn’t have the mix, these squares are your answer. They slice neatly into perfect portions, making them ideal for little hands and busy dinner tables. The yogurt or sour cream keeps them incredibly moist and adds a subtle tang that perfectly balances the rich cheddar. They’re fantastic alongside a bowl of soup, a plate of fried chicken, a pile of barbecue, or simply served warm with an extra pat of butter melting into all the nooks and crannies. And because they’re endlessly customizable—add garlic powder, fresh herbs, crumbled bacon, or even a pinch of cayenne—you’ll never get bored.
In this guide, I’ll walk you through everything you need to know to make the perfect pan of Cheesy Biscuit Squares, from the science behind the simple ingredients to fun variations, storage tips, and the best dishes to serve them with. Let’s get baking.
Why You’ll Love These Cheesy Biscuit Squares
Just four ingredients and zero fuss. Self-rising flour does the heavy lifting, combining flour, baking powder, and salt into one convenient ingredient. No measuring out leavening agents, no guesswork. Add cheese, yogurt (or sour cream), and melted butter, and you’re done. The dough comes together in minutes, and there’s no rolling or cutting—just press it into a dish and bake.
Soft, tender crumb with a golden, buttery top. The yogurt or sour cream adds moisture and a delicate tang, while the butter brushed on top creates that irresistible golden crust. The cheese melts into pockets throughout, giving you bursts of savory flavor in every bite.
Perfect for kids and adults alike. These squares are mild enough for picky eaters yet satisfying enough for grown-ups. They’re fun to eat out of hand, great for dipping, and sturdy enough to hold up to soups, stews, and chili.
Ready in under 30 minutes. From the moment you reach for the flour to the moment you pull the pan from the oven, you’re looking at about 30 minutes. That makes these squares a reliable last-minute side dish, an easy addition to a brunch spread, or a quick after-school snack.
The Four Simple Ingredients
Understanding the role of each ingredient ensures perfect results every time, and gives you the confidence to adapt the recipe to what’s in your kitchen.
1. Self-Rising Flour: The No-Fuss Base
Self-rising flour is the secret to this recipe’s speed and simplicity. It’s a blend of all-purpose flour, baking powder, and salt, perfectly proportioned to give baked goods a reliable lift. If you don’t have self-rising flour on hand, you can easily make your own: for every cup of all-purpose flour, whisk in 1½ teaspoons of baking powder and ¼ teaspoon of fine salt. Measure accurately and whisk well to distribute the leavening evenly. Two cups of self-rising flour give these squares a tender, biscuit-like crumb that’s sturdy enough to cut into clean squares but soft enough to melt in your mouth.
2. Shredded Cheddar Cheese: The Melty, Savory Star
Sharp cheddar is my go-to because it brings a bold, tangy flavor that stands up beautifully to the yogurt or sour cream. Mild cheddar, Colby Jack, or even a spicy pepper Jack all work wonderfully. Shred your own cheese from a block if you can; pre-shredded cheese often contains anti-caking agents that can make it less melty. You’ll need 1½ cups, which is generous enough to create those gooey, golden pockets throughout the dough.
3. Greek Yogurt or Sour Cream: The Moisture and Tang
This is the ingredient that sets these biscuit squares apart. Greek yogurt (full-fat, 2%, or even nonfat) yields a slightly lighter, softer texture with a mild tang. Sour cream makes the biscuits richer and more decadent, with a creamier crumb. Both work brilliantly. The choice comes down to what you have on hand and the texture you prefer. You’ll need 1½ cups, which may sound like a lot, but it completely replaces the need for milk, buttermilk, or additional fat, making the dough incredibly easy to mix and handle.
4. Melted Butter: The Golden Finish
Just ¼ cup of melted butter is brushed generously over the top before baking. It promotes browning, adds richness, and gives the finished squares that classic buttery sheen and flavor. Unsalted butter is best so you can control the salt level, but salted butter works too—just be aware that the self-rising flour already contains a little salt.
Step-by-Step: From Mixing Bowl to Oven
This recipe moves quickly, so it’s helpful to have everything measured and ready before you begin. Here’s the full process.
Step 1: Preheat the Oven and Prepare the Pan
Preheat your oven to 400°F (200°C). While it heats, line a baking dish (an 8×8-inch or 9×9-inch square pan, or a similar-sized rectangular dish) with aluminum foil or parchment paper, leaving a little overhang on two sides for easy lifting. Lightly grease the lining with butter or nonstick cooking spray. This ensures the squares release cleanly and makes cleanup a breeze.
Step 2: Mix the Dry Ingredients and Cheese
In a large mixing bowl, combine 2 cups of self-rising flour and 1½ cups of shredded cheddar cheese. Toss them together with a fork until the cheese is evenly distributed and lightly coated in flour. This prevents the cheese from clumping and helps it stay suspended throughout the dough rather than sinking to the bottom.
Step 3: Add the Yogurt or Sour Cream
Add 1½ cups of Greek yogurt or sour cream to the flour-cheese mixture. Using a sturdy spatula or a wooden spoon, stir everything together until a thick, soft dough forms. Stop mixing as soon as the flour is absorbed and no dry patches remain. Overmixing can develop the gluten and make the biscuits tough; a few small lumps are fine.
Step 4: Press the Dough into the Pan
Transfer the dough to the prepared baking dish. With lightly floured fingers or the back of a spatula, gently press the dough into an even layer, pushing it into the corners and smoothing the top as best you can. The dough will be sticky, but a light dusting of flour on your hands makes it manageable. It should fill the pan to about ½ to ¾ inch thick.
Step 5: Brush with Melted Butter
Melt ¼ cup of butter and brush it evenly over the entire surface of the dough. This butter layer will pool slightly in places, which is exactly what you want—it creates that beautiful, golden-brown, slightly crisp crust on top.
Step 6: Bake Until Golden
Place the dish in the preheated oven and bake for 22 to 28 minutes. Start checking at the 22-minute mark: the top should be deeply golden brown, and a toothpick or cake tester inserted into the center should come out clean or with just a few moist crumbs. The internal temperature will be around 200°F when fully baked. If the top is browning too quickly but the center isn’t done, tent loosely with foil.
Step 7: Cool and Cut
Remove the dish from the oven and let the biscuit slab cool in the pan for 5 minutes. This brief rest makes it easier to slice cleanly and helps the squares hold together. Use the foil or parchment overhang to lift the whole slab out of the dish, place it on a cutting board, and cut into squares with a sharp knife. Serve warm.
Pro Tips for the Softest, Most Golden Squares
- Don’t overmix. Stir just until the flour disappears. A light hand makes a tender crumb.
- Use full-fat dairy for the richest texture. Full-fat Greek yogurt or full-fat sour cream yields the softest, most luxurious squares. Low-fat and nonfat versions work but may produce a slightly less tender result.
- Shred your own cheese. It melts more smoothly and gives you better cheese distribution throughout the dough.
- Let the pan rest before cutting. Those 5 minutes allow the structure to set. Cutting too soon can make the squares crumble.
- Line the pan. Lining with foil or parchment is a game-changer for easy removal and cleanup. It also lets you lift the whole slab out for picture-perfect cutting.
Flavor Twists & Add-Ins
The base recipe is a beautiful blank canvas. Here are some easy ways to customize it:
Garlic & Herb Cheddar Biscuit Squares
Add ½ teaspoon of garlic powder and 1 tablespoon of chopped fresh parsley (or 1 teaspoon dried Italian seasoning) to the flour along with the cheese. The garlic and herbs echo the flavors of a classic restaurant-style biscuit.
Bacon, Cheddar & Chive
Fold in ¼ cup of cooked, crumbled bacon and 2 tablespoons of finely chopped fresh chives. These savory additions turn the squares into a full-flavored side that pairs beautifully with eggs or a crisp salad.
Spicy Jalapeño Cheddar
Add 2 tablespoons of finely diced pickled or fresh jalapeños and a pinch of cayenne pepper for a little heat. Perfect with chili, barbecue, or a bowl of black bean soup.
Parmesan & Black Pepper
Replace half the cheddar with grated Parmesan and add a generous amount of freshly cracked black pepper. The result is a nuttier, more sophisticated biscuit that’s lovely with a glass of wine.
What to Serve with Cheesy Biscuit Squares
These squares are wonderfully versatile. Serve them with soup or chili—a bowl of creamy tomato soup, hearty beef stew, or spicy chili is the classic pairing. They’re perfect with fried chicken, barbecue, or roasted meats; the cheesy, buttery squares mop up sauces beautifully. For a breakfast or brunch spread, cut them smaller and serve alongside scrambled eggs, crispy bacon, and fresh fruit. They also make a fantastic after-school snack with a smear of butter or a drizzle of honey. And for a light lunch, just add a simple green salad with a bright vinaigrette.
Want the full recipe and simple step-by-step instructions?
Page 2 continues with the full ingredients, cooking tips, and easy directions so you can make this recipe perfectly at home.